
Table of contents: Battery - Removal and Installation ↓ Battery - care of poles and terminals ↓ Battery - Checking and Charging ↓ Starting the engine with a… ↓ Forced starting using another car's… ↓ Starting the engine from a tug ↓
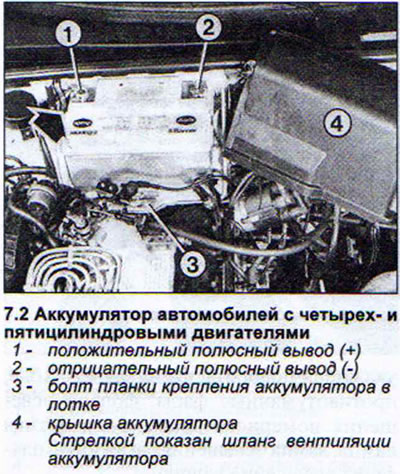
The battery of AUDI 80 cars with four- and five-cylinder engines is in the rear part of the engine compartment on the right side. In cars with six-cylinder engines, the battery is in the front part of the engine compartment on the left. The battery is covered with a protective cover in all models.
The following types of batteries are installed on AUDI 80 cars:
- 12 V/40 Ah, type 54 045 (all four cylinder engines);
- 12 V/63 Ah, type 56318 (five- and six-cylinder engines).
Batteries tolerate low temperatures relatively well if they are charged. A discharged battery freezes and can burst. For this reason, it is recommended to check the battery charge when the season changes.
The electrolyte that fills the battery is sulfuric acid diluted with distilled water. Some of the water may evaporate or decompose during battery charging, releasing hydrogen.
AUDI 80 cars are equipped with batteries that do not require maintenance. The volume of electrolyte added at the manufacturer is sufficient for the entire service life under normal operating conditions and there is no need to add distilled water. Fluid losses are possible only when the car is used in regions with a hot climate, the generator voltage regulator fails, the battery self-discharges, or the battery discharges due to an on-board network consumer left on, such as parking lights.
The electrolyte level in the battery should not be below the lower mark on the case. It should cover the top of the plates. If the electrolyte level drops, unscrew the cell plugs.
If the battery has a normal charge, then add distilled water to the cells to the level of the lower mark on the case, but no more than 15 mm higher than the top of the plates in the cells.
If the battery is very discharged, add distilled water just enough to cover the top of the plates in the cells. The electrolyte level will rise during subsequent charging. After charging the battery, add distilled water so that the electrolyte level is level with the top mark on the battery case.
Note: Do not pour excessive amounts of distilled water into the battery. Such a battery will "boil" and excess electrolyte will leak out from under the plugs.
If all requirements for battery operation are met, its service life is on average 3-4 years.
Battery - Removal and Installation
1. Make sure you know the security code entered into the radio so you can re-enter it later.
2. Remove the battery cover. For vehicles with four- and five-cylinder engines, the cover is removed after releasing the latches on the right and left (see illustration).
3. Six-cylinder engines: Disconnect both plastic cover retaining clips: one on the bottom on the engine side and one near the fender.
Attention! It is imperative that you first disconnect the battery terminal of the ground (-) wire and only then the terminal of the (+) wire.
4. Loosen the terminal nut (+) and disconnect the terminal (see illustration).
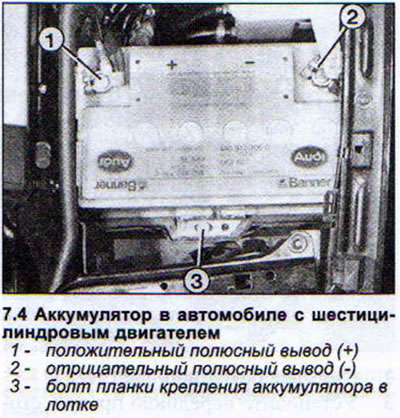
5. Unscrew the bolt of the bar holding the battery in the tray and remove the bar together with the bolt.
6. Disconnect the plastic battery ventilation hose
7. Remove the battery.
When installing, do not forget to connect the battery ventilation hose. The battery terminals cannot be mixed up because the positive terminal is larger than the negative one.
8. After connecting the battery, enter the security code into the radio receiver.
Battery - care of poles and terminals
8. Remove crystalline deposits on the terminals with warm water and soda or with the product "Neutralon" produced by the company "Varta".
9. Lubricate the battery poles and terminals with Bosch protective grease "Ft 40v 1". Avoid getting grease on the outer surfaces of the poles that come into contact with the terminals.
Accordingly, the inner surfaces of the terminals in contact with the poles must also be free of grease.
Battery - Checking and Charging
If, despite a sufficient level of electrolyte in the battery cells, there is no power from it, then check its charge. This can be found out by determining the specific gravity of the electrolyte. To do this, you need a hydrometer, which can usually be used at a gas station.
Examination
10. Unscrew the cell plugs.
11. Take up the electrolyte with the hydrometer. The amount of electrolyte collected in the hydrometer should ensure free movement of the float.
12. Read the reading. If the hydrometer reading is 1.28 kg/l, the battery is well charged. A reading of 1.20 kg/l indicates half charge, and 1.12 kg/l indicates the battery is discharged.
Charger
13. Disconnect both terminals from the battery terminals. The battery can be charged without removing it from the car. The battery cell plugs do not need to be unscrewed. The gas formed during charging will escape through the ventilation holes in the plugs.
The charging current should not be more than 10% of the battery capacity. For example, for a battery with a capacity of 40 A/h, the charging current should be 4 A. The battery is considered charged if the density of the electrolyte does not increase in the last two hours.
When charging a battery, distilled water decomposes to form hydrogen and oxygen bubbles, which form detonating gas. For this reason, ensure that the room is sufficiently ventilated. This is especially important if the battery is charged with a high current.
14. Do not smoke near the battery while charging and do not use open flame.
Starting the engine with a discharged battery
It is generally not recommended to push-start the engine of cars equipped with a catalytic converter if the reason for this is a discharged battery. If the reason for the forced engine start is a discharged battery, then pushing the engine does not pose any particular danger. It is a different matter if the ignition system is faulty. In this case, unburned fuel that gets into the catalytic converter can ignite and cause the destruction of the catalytic converter.
15. Turn on the ignition.
16. Engage 1st gear. Using a higher gear is not recommended because the generator will not provide the necessary current when rotating at low speeds.
17. Press the clutch and ask to push the car. Two people can do it.
18. Release the clutch as soon as the speed of the pushed vehicle is sufficient.
19. Depress the clutch and press the accelerator as soon as the engine starts.
Forced starting using another car's battery
20. Place the car with a working and charged battery as close as possible to the one being started to ensure the wiring is routed.
21. Make sure that all electrical consumers are disconnected from a vehicle with a discharged battery.
22. Connect the positive terminals of both batteries.
23. Connect the auxiliary cable first to the negative terminal of the auxiliary battery, and then to the ground (-), for example, to the cylinder block of the engine being started.
24. Start the engine of the auxiliary vehicle and let it run at high speed so that the generator gives a good charge.
25. Start the engine of the car with the discharged battery. If it does not start immediately, pause to avoid overheating the starter. Leave the engine of the auxiliary vehicle to idle. This will allow the discharged battery to recharge.
When removing the jumper cables, first disconnect the terminal from the negative battery terminal of the jumper vehicle.
Starting the engine from a tug
Caution! When the engine is not running, the power steering and brake drive do not work.
26. Turn on the ignition.
27. Engage 2nd gear and depress the clutch. Once both cars reach a speed of approximately 15 km/h, slowly release the clutch and place your right hand on the parking brake lever. Once the engine starts, depress the clutch and press the accelerator.
28. Apply the parking brake. Do this smoothly to avoid the towing vehicle coming to a sudden stop.
29. Signal the towing vehicle.
30. Place the gear shift lever in neutral position and release the accelerator pedal.
31. Apply the parking brake together with the towing vehicle.
Note: When towing a diesel engine vehicle due to solidification of the fuel, remember that such a vehicle cannot be towed over long distances, since the fuel injection pump is not lubricated.
(Text provided by the online resource: audimanual.ru)