
Repair Chevrolet Repair Toyota Repair Honda Repair AvtoVAZ Repair Mercedes-Benz Repair BMW Repair Opel
Home  |  Contacts  |  Sitemap  |    
English Русский
Български
Беларускі
Український
Српски
Hrvatski
Română
Polski
Slovenský
Magyar
AudiManual.ru


  • AUDI 80
  • AUDI 100
  • AUDI A3
  • AUDI A4
  • AUDI A6
  • AUDI A8
  • AUDI Q
  • OTHER
  • ARTICLES
B4 (1991-1996) B3 (1986-1991) B3 (1986-1991, petrol) B2 (1979-1986)

Generator — Checking, Removing and Installing (Audi 80 B4)

  • Home
  • Audi 80
  • B4 (1991-1996)
  • Electrical equipment
  • Electrical system
  • Generator — Checking, Removing and Installing
            0
Table of contents: Checking voltage ↓ Voltage Regulator Carbon Brushes -… ↓ Removal ↓

Checking voltage


1. Connect the voltmeter to the place where the thick wire with red insulation is attached to the generator and to the "ground" (-).

2. Start the engine and bring its speed to medium values. If the voltage regulator is normal, the voltmeter should show a voltage of 13.3-14.6 V. Otherwise, check the carbon contact brushes or replace the voltage regulator. It is possible that the generator itself is faulty if the brushes and regulator are normal. To check the carbon contact brushes, disconnect the ground (-) wire terminal from the battery.

3. Bosch Generators: Remove the rear generator cover if present (see illustration).
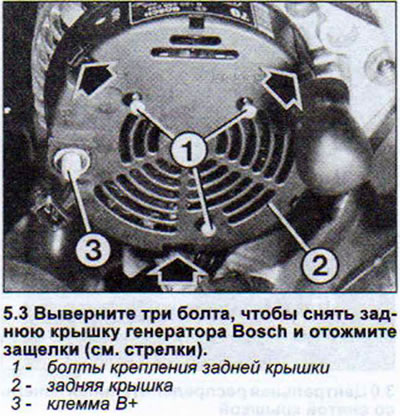
3. Bosch Generators: Remove the rear generator cover if present (see illustration).


4. Remove the two screws securing the voltage regulator (see illustration).
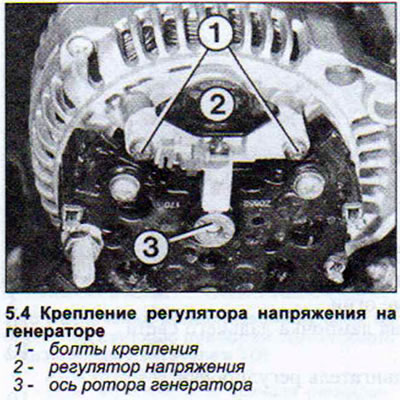
4. Remove the two screws securing the voltage regulator (see illustration).


5. Remove the voltage regulator together with the brushes.


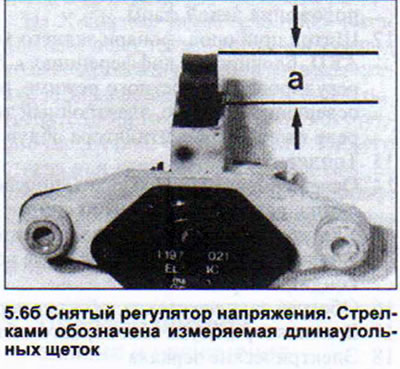
6. Measure the distance the carbon brushes protrude from the regulator housing. The length of new carbon brushes is 13 mm. The remaining length of the brushes is 5 mm (see illustrations).
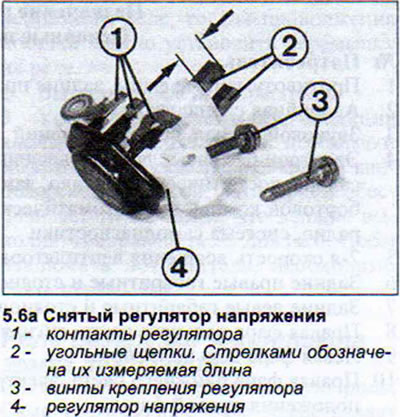
6. Measure the distance the carbon brushes protrude from the regulator housing. The length of new…


6. Measure the distance the carbon brushes protrude from the regulator housing. The length of new…


On the right picture is the voltage regulator of old Bosch generators, a = brush length. It should not be less than 5 mm

7. Valeo generators. Remove both screws securing the voltage regulator on the back of the generator.

8. Remove the regulator.

9. Measure the carbon contact brushes. The permissible residual length of the brushes is 5 mm.

Attention! Carbon brushes for Valeo generators are not supplied separately. They must be purchased together with a new voltage regulator. The same applies to the new generation Bosch generators.


Voltage Regulator Carbon Brushes - Replacement


10. Remove the voltage regulator as described above.

11. Unsolder the braided connecting wires and remove the carbon brushes.

12. Remove the pressure springs from the old brushes and secure them to the new brushes.

13. Solder the braided connecting wires.

Caution! Soldering must be done quickly and do not allow tin to get on the connecting wires. Otherwise, they become hard.


Note! When replacing carbon brushes, you can check the condition of the copper contact rings of the generator anchor, on which the brushes slide. If the rings are significantly worn, the anchor can be given to a workshop for grinding.


Removal


14. Disconnect the negative (-) battery terminal.

15. Four-cylinder engine. Remove the protective cap from the generator mounting bolt, if present.

16. Five-cylinder engine and diesel engines. Remove the engine splash guard.

17. Four- and five-cylinder engines and diesel engines. Disconnect the power cable and the ground (-) cable, if equipped.

18. Loosen the alternator belt tension bolt on the tension bracket.

19. Remove the V-belt or ribbed belt.

20. Remove the generator mounting bolt. While doing this, hold the generator so that it does not fall.

21. Six-cylinder engine. Remove the engine splash guard.

22. Remove the V-belt.

23. Disconnect the power cable and air cooling hose from below.

24. Unscrew the mounting bolts and remove the generator.

Recommendations: If the generator or voltage regulator fails, the trip can be continued. Charging the battery during daytime driving is enough for about five hours of travel. Power is needed for the ignition and fuel injection control unit, as well as the electric fuel pump. In winter, the situation is complicated by the fact that it gets dark early and you have to turn on the low beam headlights.


If possible, do not turn off the engine, so as not to waste battery power on the starter. Turn off the rear window heating, the interior blower and the radio. Do not turn on the windshield wipers unless necessary. At night, drive without switching to high beam headlights. It is recommended to disconnect and insulate the generator wire, so that a faulty generator does not contribute to the discharge of the battery.

For diesel vehicles, the fuel shut-off valve must be turned off (tD engines), see the relevant chapter.

The electronic power supply system of the TDI engine requires a constant supply of electricity. However, the battery charge is sufficient for about five hours of operation.
The article was checked by auto expert Timur Bazhenov
This article is available at russian, bulgarian, belarusian, ukrainian, serbian, croatian, romanian, polish, slovak, hungarian

Share information:
Previous articles
Audi 80 B4: Electrical system
Next articles

Alternator
Fuses — replacement and purpose
Central distribution panel
General description
Alternator Belt — Tension
Rechargeable battery
Starter — Removing and Replacing Brushes
Lighting fixtures


Similar articles on other Audi car models:
Steering Damper — Checking, Removing and Installing Audi 100 C3 (1982-1990, diesel)
Checking, removing and installing the starter traction relay Audi A3 Type 8L (1996-2003)
Checking, removing and installing the thermostat Audi A4 B7 (2004-2008)
Checking the generator's performance Audi A6 C5 (1997-2004)
Checking the exhaust system Audi A8 D2 (1994-2002)
Checking, cleaning, removing the water drainage box and… Audi Q5 Type 8R (2008-2017)
Engine — Checking Oil Level Audi A2 (1999-2005)
Link to this page in different formats


Visitor comments

No comments yet


How much will 34 + 11 =


80(B4, 1991-1996) 
  • General information
  • User manual
  • Maintenance
  • Troubleshooting
  • Power unit
  • Engine
  • Cooling system
  • Heating and ventilation
  • Petrol injection
  • Diesel fuel system
  • Fuel system
  • Exhaust systems
  • Ignition system
  • Transmission
  • Clutch
  • Car gearbox
  • Chassis
  • Brake system
  • Suspension and steering wheel
  • Body
  • Body and trim
  • Electrical equipment
  • Electrical system
  • Electrical circuits
 
80(B3, 1986-1991) 
  • General information
  • Repair characteristics
  • Maintenance
  • Power unit
  • Gasoline engine
  • Diesel engine
  • Engine lubrication system
  • Fuel system (gasoline)
  • Injection system (gasoline)
  • Fuel system (diesel)
  • Ignition system
  • Cooling system
  • Heater
  • Exhaust system
  • Transmission
  • Clutch and gearbox
  • Chassis
  • Steering
  • Brake system
  • Car suspension
  • Body
  • Body elements
  • Electrical equipment
  • Power devices
  • Lighting and appliances
  • Electrical circuits
 
80(B3, 1986-1991, petrol) 
  • General information
  • User manual
  • Maintenance
  • Power unit
  • Engine 4-cylinder
  • Engine 5-cylinder
  • Cooling system
  • Fuel and exhaust systems
  • Ignition system
  • Transmission
  • Clutch
  • Mechanical transmission
  • Automatic transmission
  • Drive shafts
  • Chassis
  • Brake system
  • Suspension
  • Steering
  • Body
  • Exterior
  • Interior
  • Electrical equipment
  • Equipment and devices
  • Electrical circuits
 
80(B2, 1979-1986) 
  • General information
  • User manual
  • Power unit
  • Engine FZ
  • Engine EP, YP, YZ, DT, DS, DZ
  • Transmission
  • Clutch
  • 4 speed gearbox
  • 5 speed gearbox
  • Front wheel drive
  • Chassis
  • Front suspension
  • Rear suspension
  • Steering
  • Brake system
  • Electrical equipment
  • Equipment and devices
  • Electrical circuits
 
AudiManual.ru © 2017-2026 · Mobile version · Feedback · Sitemap: EN BG BY UA RS HR RO PL SK HU · Site search · News and articles
80 B2 · 80 B3 petrol · 80 B3 · 80 B4 · 100 C3 diesel · 100 C3 petrol · 100 C3 · 100 C4 petrol · 100 C4 · A3 Type 8L · A4 B5 petrol · A4 B5 · A4 B6 petrol · A4 B6 · A4 B7 · A4 B8 · A6 C4 · A6 C5 · A6 C5 Allroad · A8 D2 · Q5 Type 8R · Q7 Typ 4L · Audi A2 ·
This site uses cookies 🍪. Click the button to accept this fact.