
Table of contents: Removal the cylinder head on 4- and… ↓ Removal the cylinder head of a… ↓ Checking the removed cylinder head.… ↓ Installation. All types of engines ↓
A torque wrench is required for the job. Next, you will need a long T55 multi-tooth socket wrench (for 4- and 5-cylinder engines) or external star key E14 (6-cylinder engine) and to install the cylinder head - a new gasket.
Removal the cylinder head on 4- and 5-cylinder engines
Remove the negative battery cable.
Engine with Mono-Motronic injection system: remove the air filter.
5-cylinder engine: remove the fan with viscous coupling and poly V-belt. Remove the upper front cross member of the engine compartment, unscrew the fan on the right, tilt it forward and support it.
Drain the coolant, loosen the cooling system hoses on the cylinder head.
Remove the distributor cap together with the high-voltage wires (5-cylinder engine) (see chapter "Ignition system").
Disconnect the throttle cable.
All electrical wires near the cylinder head and injection unit or intake manifold must be marked and disconnected.
Separate the fuel supply pipes of the injection system at the connecting sleeves.
Mark and remove the vacuum hoses from the intake manifold or throttle body, as well as the vacuum hoses from the brake booster.
When working with a 5-cylinder engine, remove the upper part of the exhaust gas pipe (chapter "Injection system KE-III-Jetronic and KE-Motronic"). Also remove the injection nozzles, leaving the high-pressure fuel line hoses connected.
Remove the wire ends from the starting fuel valve, unscrew the valve and set it aside with the fuel line connected.
Mark and remove the injection system plugs. Helps with installation: the plugs have different colors
4-cylinder engine with KE-Motronic injection system and 5-cylinder engine: remove the fuel-air mixture corrector together with the air filter housing.
Disconnect the exhaust pipe from the exhaust manifold.
Unscrew the upper generator mount on a 4-cylinder engine. Before doing this, loosen the V-belt.
Remove the timing belt guard, loosen the timing belt and remove it from the camshaft gear.
Remove the cylinder head cover.
Loosen the cylinder head bolts in the reverse order to that shown in the illustrations on the next page at the top. The engine must cool down before doing this, because a warm cylinder head can become deformed after removal.
Remove the cylinder head together with the intake and exhaust manifolds, as well as the ignition distributor (5-cylinder engine). If it does not come off without effort, help yourself with light blows with a plastic hammer.
Removal the cylinder head of a 6-cylinder engine
The description of the work applies to the left cylinder head. Removing the right cylinder head is done in the same way.
Remove the engine guard and V-belt cover.
Remove the V-belt and timing belt.
Disconnect the exhaust pipe from the exhaust manifold and drain the coolant.
Disconnect the air duct from the exhaust manifold and disconnect the Hall sensor plug.
Disconnect the crankcase ventilation hoses on the left cylinder head and on the right cylinder head.
Disconnect the air intake hose from the air filter.
Disconnect the air conditioning and/or differential lock vacuum line from the left throttle body.
Press the air duct down and remove it together with the crankcase ventilation hoses.
Disconnect the protective fastening of the throttle cable, hang up and release the throttle cable. Disconnect the plug connection of the intake air temperature sensor and the idle speed stabilization valve.
Separate the fuel drain and filler hydraulic lines.
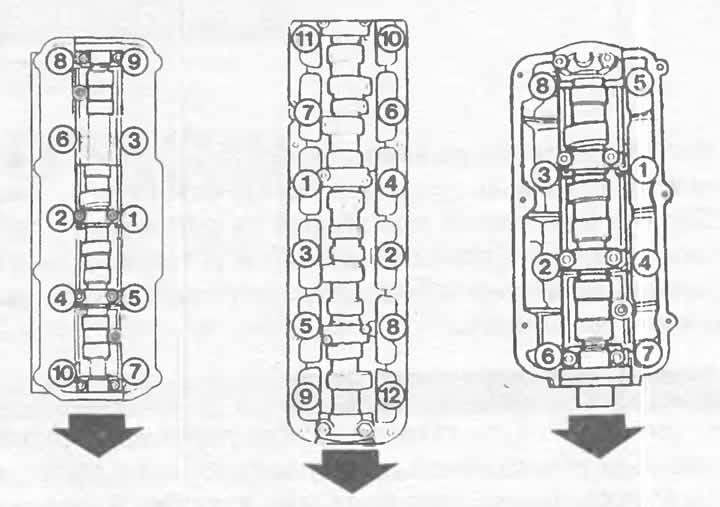
The cylinder head bolts must be tightened in the numerical sequence shown (from left to right) 4-, 5- and 6-cylinder engines. Arrows indicate the direction of travel.
Unscrew and remove the exhaust manifold.
Cover the holes with a clean cloth.
Unscrew the cooling system pipe at the rear of the cylinder head.
Remove the carbon monoxide pickup tube.
Remove the lambda probe.
Disconnect the sheet insulation of the exhaust manifold.
Remove the cylinder head cover.
Remove the rear part of the timing belt guard.
Disconnect the hoses from the coolant reservoir to the pump on the cylinder head.
Loosen the cylinder head bolts in the reverse order to that shown in the figures above. The engine must be cool.
Remove the cylinder head. If it does not come off without effort, help with light blows with a plastic hammer.
Remove the old cylinder head gasket. The sealing surfaces on the cylinder head and cylinder block must be absolutely clean, without any residue of the sealing gasket. Do not scratch the soft sealing surface of the cylinder head with a hard tool.
Check the cylinder head for deformation (important in case of overheating).
Checking the removed cylinder head. All engine types
Place a long metal ruler or a guaranteed straight metal angle lengthwise onto the cleaned sealing surface of the cylinder head.
Check with a feeler gauge whether there is a deflection greater than 0.1 mm at any point. In the latter case, the cylinder head will need to be ground before installation.
A minimum height - measured from the top to the bottom sealing surface - of 132.6 mm for a 4-cylinder engine and 132.75 mm for 5- and 6-cylinder engines must be maintained.
If you are installing a new cylinder head, you will need to lightly oil the hydraulic tappet guides. Oil and install the camshaft as described previously.
If necessary, install the threaded cap on the replacement cylinder head of a 6-cylinder engine.
The threads on the cylinder head bolts and in the corresponding holes on the cylinder block must be clean and undamaged, otherwise the tightening torque will not match when tightening the bolts.
Installation. All types of engines
There must be no oil or water in the cylinder block bolt holes.
Turn the crankshaft slightly back against the direction of rotation so that no piston is in the TDC position, otherwise the open valve may collide with such a piston when putting on the cylinder head.
Place the cylinder head gasket on the cylinder block so that the part number or "Oben" (up) designation points toward the cylinder head.
Install the cylinder head. For this purpose, the workshop uses two guide bolts when working with 4- and 5-cylinder engines.
You can make this tool yourself from two old cylinder head bolts: saw off the bolt head and cut a slot at the top.
After installing a few bolts, the guide bolts can be removed.
Install the cylinder head bolts and tighten in the sequence shown above:

This will finally tighten the bolts and they should not be tightened again under any circumstances.
When assembling, pay attention to the adjustment of the gas cable drive and the installation of injection nozzles for a 5-cylinder engine (chapter on injection).
Important: Pay attention to the tightening sequence when installing the exhaust manifold on a 6-cylinder engine.
In addition, check the ignition setting for 4- and 5-cylinder engines (chapter "Ignition system").