
Repair Chevrolet Repair Toyota Repair Honda Repair AvtoVAZ Repair Mercedes-Benz Repair BMW Repair Opel
Home  |  Contacts  |  Sitemap  |    
English Русский
Български
Беларускі
Український
Српски
Hrvatski
Română
Polski
Slovenský
Magyar
AudiManual.ru


  • AUDI 80
  • AUDI 100
  • AUDI A3
  • AUDI A4
  • AUDI A6
  • AUDI A8
  • AUDI Q
  • OTHER
  • ARTICLES
C4 (1990-1994) C4 (1990-1994, petrol) C3 (1982-1990) C3 (1982-1990, petrol) C3 (1982-1990, diesel)

Valve timing marks — general description and use (Audi 100 C3)

  • Home
  • Audi 100
  • C3 (1982-1990, diesel)
  • Power unit
  • Engine in a car
  • Valve timing marks — general description and use
            0
Table of contents: General description ↓ Setting piston #1 to TDC ↓

General description


1. The camshaft and water pump are driven by a toothed belt from the crankshaft. The camshaft and crankshaft sprockets rotate in unison, which ensures precise valve timing.

2. The design of the engines described in this Section is such that if the crankshaft rotates while the timing belt is removed, the valves may strike the pistons. For this reason, it is important to maintain the correct relative position of the camshaft and crankshaft at all times while the timing belt is removed from the engine. To achieve this, it is necessary to set piston #1 to TDC before removing the timing belt (top dead center) and lock the shafts. If the engine has been removed for overhaul, piston #1 should also be set to TDC during assembly to ensure proper shaft alignment.

3. TDC is the highest point in the cylinder that the piston reaches. In a 4-stroke engine, each piston reaches TDC twice per cycle - on the compression stroke and on the exhaust stroke. The expression "TDC position" means that cylinder No.1 (is located at the front end of the engine) stands at TDC on the compression stroke.

Setting piston #1 to TDC


4. Remove the glow plugs to make it easier to turn the crankshaft.

Note: Some engines have a 32mm hex bolted to the power steering pulley to allow the engine to be turned without the aid of the crankshaft sprocket bolt.


5. Fit the socket onto the crankshaft sprocket bolt and slowly rotate the crankshaft clockwise until the timing mark on the edge of the flywheel/drive plate aligns with the timing rib on the clutch housing and the TDC mark on the fuel pump sprocket aligns with the mark on the pump housing. The moment when piston No.1 begins to move in the cylinder can be determined by the sound of air escaping from the hole for glow plug No.1. Alternatively, remove the camshaft cover to expose the lobes of cylinder No.1. When they both point upward, piston No.1 is at TDC.


Note: Due to the dynamic injection timing setting method (the pump rotates on the mount to make fine adjustments) the TDC mark on the fuel pump pulley may not align exactly with the mark on the pump housing.


6. If the engine is installed at TDC, in order to remove the timing belt, lock the camshaft in this position. To do this, remove its rear sprocket and install a special locking rod in the shaft groove. Unscrew the bolts of the cover installed on the rear of the engine, then remove the sprocket (see chapter 6). On the 3D engine, also lock the fuel pump sprocket using the special locking pin.

7. It is recommended to use a special U-shaped tool to lock the camshaft, but a replacement can be made from a metal rod that fits tightly into the groove of the camshaft (see illustration).
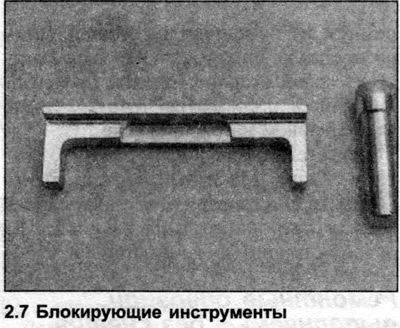
7. It is recommended to use a special U-shaped tool to lock the camshaft, but a replacement can be…


8. Remove the rear sprocket and insert the end of the locking rod into the slot on the end of the camshaft (see illustrations).
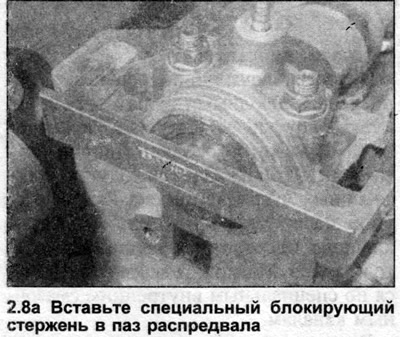
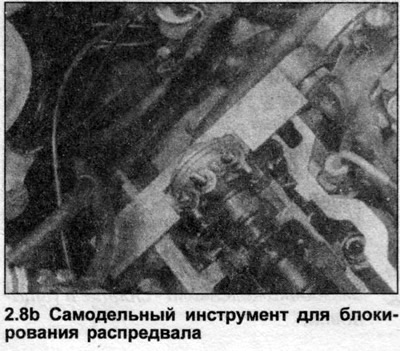
8. Remove the rear sprocket and insert the end of the locking rod into the slot on the end of the…


8. Remove the rear sprocket and insert the end of the locking rod into the slot on the end of the…


9. If there is even the slightest play in the locking rod, turn the camshaft slightly (rotating the crankshaft clockwise), so that one end of the rod rests on the cylinder head. Using a feeler gauge, measure the gap between the other end of the rod and the cylinder head. Now return the camshaft to its original position and remove the feeler gauge. Align the locking rod in the grooves by inserting two feeler gauges (each one is twice as thin as the measured gap) under its ends (see illustration).
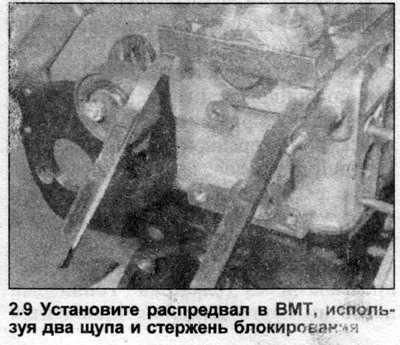


9. If there is even the slightest play in the locking rod, turn the camshaft slightly (rotating the…


10. The engine is now set to TDC.

[The original material is located on the website: AudiManual.ru]
The article was checked by auto expert Nikita Rudakov
This article is available at russian, bulgarian, belarusian, ukrainian, serbian, croatian, romanian, polish, slovak, hungarian

Share information:
Previous articles
Audi 100 C3: Engine in a car
Next articles

General description
Diesel Engine Specifications in Engine Bay
Checking the compression in the cylinders
Toothed drive belt — removal, inspection and installation
Fuel Pump Drive Belt — Removal, Inspection and Installation
Timing Belt and Sprocket Tensioner Mechanism — Removal and…


Similar articles on other Audi car models:
Technical characteristics of the valve timing mechanism Audi 80 B2 (1979-1986)
General information about the setup Audi A3 Type 8L (1996-2003)
Timing marks — general information and use Audi A4 B5 (1994-2001)
Timing marks for valve timing Audi A6 C4 (1994-1997)
General information about the 2.8L petrol engine Audi A8 D2 (1994-2002)
Timing chain covers, valve 1 of timing phase adjustment «N205» Audi Q5 Type 8R (2008-2017)
Checking the valve timing Audi A2 (1999-2005)
Link to this page in different formats


Visitor comments

No comments yet


How much will 10 + 19 =


100(C4, 1990-1994) 
  • General information
  • User manual
  • Power unit
  • Engine repair
  • Ignition system
  • Fuel system (gasoline)
  • Fuel system (diesel)
  • Lubrication system
  • Cooling system
  • Exhaust system
  • Transmission
  • Clutch
  • Car gearbox
  • Drive shafts
  • Chassis
  • Car suspension
  • Steering
  • Wheels and tires
  • Brake system
  • Body
  • Ventilation and heating
  • Body repair
  • Electrical equipment
  • Power devices
  • Lighting and appliances
  • Electrical circuits
 
100(C4, 1990-1994, petrol) 
  • General information
  • Operation and maintenance
  • Power unit
  • Engine repair
  • Exhaust system
  • Cooling system
  • Supply system
  • Air filter
  • Mono-Motronic injection system
  • Digifant injection system
  • KE-III-Jetronic and KE-Motronic
  • MPI and MPFI injection system
  • Transmission
  • Clutch
  • Car gearbox
  • Chassis
  • Suspension and steering
  • Brake system
  • Wheels and tires
  • Body
  • Exterior
  • Interior
  • Electrical equipment
  • Fuses and relays
  • Power devices
  • Ignition system
  • Lighting and signaling
  • Equipment and devices
  • Electrical circuits
 
100(C3, 1982-1990) 
  • General information
  • User manual
  • Maintenance
  • Specifications
  • Power unit
  • Engines 4-cylinder
  • Engines 5-cylinder
  • Diesel engine
  • Cooling system
  • Power system (carburetor)
  • Power system (injector)
  • Fuel system (diesel)
  • Transistor ignition system
  • Electronic ignition system
  • Transmission
  • Clutch
  • 4 speed gearbox 014
  • 5 speed gearbox 013 and 093
  • 5 speed gearbox 016 and 012
  • Shift mechanism KP 016
  • Automatic transmission
  • Front wheel drive
  • Chassis
  • Front suspension
  • Rear suspension
  • Steering
  • Brake system
  • Body
  • Body elements
  • Electrical equipment
  • Lighting and appliances
  • Power devices
  • Electrical circuits
 
100(C3, 1982-1990, petrol) 
  • General information
  • Maintenance and operation
  • 4 cylinder engine
  • Engine repair
  • Cooling and lubrication system
  • Supply system
  • Ignition system
  • 5 cylinder engine
  • Engine repair
  • Cooling and lubrication system
  • Supply system
  • Ignition system
  • Transmission
  • Clutch and drive shafts
  • 4 speed gearbox 014
  • 5 speed gearbox 013 and 093
  • 5 speed gearbox 016 and 012
  • Automatic gearbox
  • Chassis
  • Steering
  • Front suspension
  • Rear suspension
  • Brake system
  • Body
  • Body elements
  • Doors, locks and windows
  • Body repair
  • Electrical equipment
  • Equipment and devices
  • Power devices
  • Electrical circuits
 
100(C3, 1982-1990, diesel) 
  • General information
  • User manual
  • Maintenance
  • Troubleshooting
  • Power unit
  • Engine in a car
  • Engine removed
  • Cooling system
  • Fuel system
  • Exhaust system
  • Starting and charging
  • Preheating
  • Transmission
  • Clutch
  • Mechanical gearbox
  • Automatic gearbox
  • Drive shafts
  • Chassis
  • Brake system
  • Suspension
  • Steering
  • Body
  • Exterior
  • Interior
  • Electrical equipment
  • Equipment and devices
  • Electrical circuits
 
AudiManual.ru © 2017-2026 · Mobile version · Feedback · Sitemap: EN BG BY UA RS HR RO PL SK HU · Site search · News and articles
80 B2 · 80 B3 petrol · 80 B3 · 80 B4 · 100 C3 diesel · 100 C3 petrol · 100 C3 · 100 C4 petrol · 100 C4 · A3 Type 8L · A4 B5 petrol · A4 B5 · A4 B6 petrol · A4 B6 · A4 B7 · A4 B8 · A6 C4 · A6 C5 · A6 C5 Allroad · A8 D2 · Q5 Type 8R · Q7 Typ 4L · Audi A2 ·
This site uses cookies 🍪. Click the button to accept this fact.