
Repair Chevrolet Repair Toyota Repair Honda Repair AvtoVAZ Repair Mercedes-Benz Repair BMW Repair Opel
Home  |  Contacts  |  Sitemap  |    
English Русский
Български
Беларускі
Український
Српски
Hrvatski
Română
Polski
Slovenský
Magyar
AudiManual.ru


  • AUDI 80
  • AUDI 100
  • AUDI A3
  • AUDI A4
  • AUDI A6
  • AUDI A8
  • AUDI Q
  • OTHER
  • ARTICLES
C4 (1990-1994) C4 (1990-1994, petrol) C3 (1982-1990) C3 (1982-1990, petrol) C3 (1982-1990, diesel)

Camshaft Seals — Replacement (Audi 100 C3)

  • Home
  • Audi 100
  • C3 (1982-1990, diesel)
  • Power unit
  • Engine in a car
  • Camshaft Seals — Replacement
            0
Table of contents: Front oil seal ↓ Rear oil seal ↓

Front oil seal


1. Remove the auxiliary drive belt, following the Chapter 7.

2. Remove the timing belt tensioner and camshaft sprocket (see Chapter 6).

3. Unscrew the bolts of the lower timing belt cover.

4. Loosen the bolts and remove the inner timing belt cover.

5. Remove the camshaft cover as described in Chapter 8.

6. There are two methods of removing the seal. The first is to gently pry the seal out with a screwdriver, being careful not to damage the camshaft surface. Clean the seal seating surface in the bearing cap, then apply a small amount of oil to the sealing lips of the new seal. Wrap the end of the camshaft with masking tape, then install the new seal and gently slide it into position, resting a tubular drift or socket against its hard outer edge (see illustrations). Finally, remove the tape.
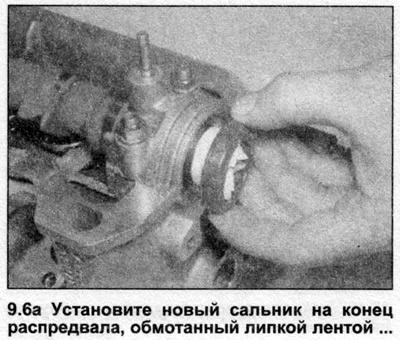
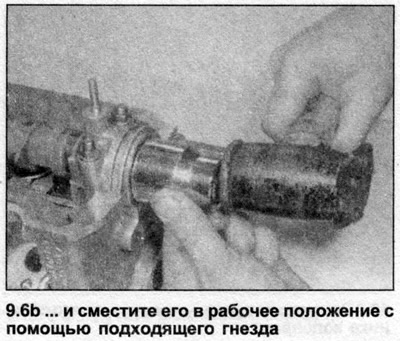
6. There are two methods of removing the seal. The first is to gently pry the seal out with a…


6. There are two methods of removing the seal. The first is to gently pry the seal out with a…


7. If the seal cannot be removed from the bearing cap, use the second method. Then do the following:


  • a) Unscrew the nuts and remove the camshaft bearing cover No.1, then remove the old camshaft oil seal.
  • b) Lubricate the surface of the new camshaft oil seal with clean engine oil and install it onto the end of the camshaft.
  • c) Apply a thin coat of suitable sealant to the contact surface of the bearing cap, then install the cap, ensuring that the seal is fully seated against the bearing surface on the cylinder head and cap. Gradually tighten the mounting nuts to the specified torque Specifications.

8. Install the camshaft cover, following the Chapter 8.

9. Install the inner timing belt cover and tighten the bolts.

10. Install the lower timing belt cover and tighten the bolts.

11. Install the camshaft sprocket and timing belt tensioner (see Chapter 6).

12. Install the auxiliary drive belt (see Chapter 7).

Rear oil seal


13. Remove the camshaft cover as described in Chapter 8.

14. Remove the fuel pump drive belt as described in Chapter 5. On 3D engines, this procedure involves removing the rear camshaft sprocket.

15. On 1T engines, loosen the camshaft sprocket bolt by inserting a suitable tool into its holes. Remove the bolt and remove the sprocket from the shaft.

16. Next, do the following:
  • a) Unscrew the nuts and remove the camshaft bearing cover No.1, then remove the old camshaft oil seal.
  • b) Lubricate the surface of the new seal with clean engine oil and install it on the end of the shaft. To avoid damaging the seal during installation, first wrap the end of the shaft with adhesive tape.
  • c) Apply a thin layer of suitable sealant to the contact surface of the bearing cap, then install the cap, ensuring that the seal is fully seated against the bearing surface on the cylinder head and cap. Gradually tighten the mounting nuts to the specified torque Specifications.

17. Install the camshaft sprocket, then tighten the camshaft sprocket bolt to the torque specified in the Specifications while holding the sprocket stationary.


18. Install the fuel pump drive belt (see Chapter 5).

19. Install the camshaft cover (see Chapter 8).
The article was checked by auto expert Nikita Rudakov
This article is available at russian, bulgarian, belarusian, ukrainian, serbian, croatian, romanian, polish, slovak, hungarian

Share information:
Previous articles
Audi 100 C3: Engine in a car
Next articles

Camshaft Cover — Removal and Installation
Auxiliary drive belt — removal, installation and tensioning
Timing Belt and Sprocket Tensioner Mechanism — Removal and…
Fuel Pump Drive Belt — Removal, Inspection and Installation
Crankshaft seals — replacement
Cylinder head — removal, inspection and installation
Pushers — checking and adjusting clearances
Flywheel/Drive Disc — Removal, Inspection and Installation


Similar articles on other Audi car models:
Camshaft and tappets — removal, inspection and installation Audi 80 B3 (1986-1991, petrol)
Bonnet seals Audi A3 Type 8L (1996-2003)
Checking the drive shaft seals Audi A4 B5 (1994-2001, petrol)
Camshaft oil seals Audi A6 C4 (1994-1997)
Camshaft Audi A8 D2 (1994-2002)
Camshaft chain drives Audi Q5 Type 8R (2008-2017)
Camshaft housing — design description Audi A2 (1999-2005)
Link to this page in different formats


Visitor comments

No comments yet


How much will 30 + 33 =


100(C4, 1990-1994) 
  • General information
  • User manual
  • Power unit
  • Engine repair
  • Ignition system
  • Fuel system (gasoline)
  • Fuel system (diesel)
  • Lubrication system
  • Cooling system
  • Exhaust system
  • Transmission
  • Clutch
  • Car gearbox
  • Drive shafts
  • Chassis
  • Car suspension
  • Steering
  • Wheels and tires
  • Brake system
  • Body
  • Ventilation and heating
  • Body repair
  • Electrical equipment
  • Power devices
  • Lighting and appliances
  • Electrical circuits
 
100(C4, 1990-1994, petrol) 
  • General information
  • Operation and maintenance
  • Power unit
  • Engine repair
  • Exhaust system
  • Cooling system
  • Supply system
  • Air filter
  • Mono-Motronic injection system
  • Digifant injection system
  • KE-III-Jetronic and KE-Motronic
  • MPI and MPFI injection system
  • Transmission
  • Clutch
  • Car gearbox
  • Chassis
  • Suspension and steering
  • Brake system
  • Wheels and tires
  • Body
  • Exterior
  • Interior
  • Electrical equipment
  • Fuses and relays
  • Power devices
  • Ignition system
  • Lighting and signaling
  • Equipment and devices
  • Electrical circuits
 
100(C3, 1982-1990) 
  • General information
  • User manual
  • Maintenance
  • Specifications
  • Power unit
  • Engines 4-cylinder
  • Engines 5-cylinder
  • Diesel engine
  • Cooling system
  • Power system (carburetor)
  • Power system (injector)
  • Fuel system (diesel)
  • Transistor ignition system
  • Electronic ignition system
  • Transmission
  • Clutch
  • 4 speed gearbox 014
  • 5 speed gearbox 013 and 093
  • 5 speed gearbox 016 and 012
  • Shift mechanism KP 016
  • Automatic transmission
  • Front wheel drive
  • Chassis
  • Front suspension
  • Rear suspension
  • Steering
  • Brake system
  • Body
  • Body elements
  • Electrical equipment
  • Lighting and appliances
  • Power devices
  • Electrical circuits
 
100(C3, 1982-1990, petrol) 
  • General information
  • Maintenance and operation
  • 4 cylinder engine
  • Engine repair
  • Cooling and lubrication system
  • Supply system
  • Ignition system
  • 5 cylinder engine
  • Engine repair
  • Cooling and lubrication system
  • Supply system
  • Ignition system
  • Transmission
  • Clutch and drive shafts
  • 4 speed gearbox 014
  • 5 speed gearbox 013 and 093
  • 5 speed gearbox 016 and 012
  • Automatic gearbox
  • Chassis
  • Steering
  • Front suspension
  • Rear suspension
  • Brake system
  • Body
  • Body elements
  • Doors, locks and windows
  • Body repair
  • Electrical equipment
  • Equipment and devices
  • Power devices
  • Electrical circuits
 
100(C3, 1982-1990, diesel) 
  • General information
  • User manual
  • Maintenance
  • Troubleshooting
  • Power unit
  • Engine in a car
  • Engine removed
  • Cooling system
  • Fuel system
  • Exhaust system
  • Starting and charging
  • Preheating
  • Transmission
  • Clutch
  • Mechanical gearbox
  • Automatic gearbox
  • Drive shafts
  • Chassis
  • Brake system
  • Suspension
  • Steering
  • Body
  • Exterior
  • Interior
  • Electrical equipment
  • Equipment and devices
  • Electrical circuits
 
AudiManual.ru © 2017-2026 · Mobile version · Feedback · Sitemap: EN BG BY UA RS HR RO PL SK HU · Site search · News and articles
80 B2 · 80 B3 petrol · 80 B3 · 80 B4 · 100 C3 diesel · 100 C3 petrol · 100 C3 · 100 C4 petrol · 100 C4 · A3 Type 8L · A4 B5 petrol · A4 B5 · A4 B6 petrol · A4 B6 · A4 B7 · A4 B8 · A6 C4 · A6 C5 · A6 C5 Allroad · A8 D2 · Q5 Type 8R · Q7 Typ 4L · Audi A2 ·
This site uses cookies 🍪. Click the button to accept this fact.