
Repair Chevrolet Repair Toyota Repair Honda Repair AvtoVAZ Repair Mercedes-Benz Repair BMW Repair Opel
Home  |  Contacts  |  Sitemap  |    
English Русский
Български
Беларускі
Український
Српски
Hrvatski
Română
Polski
Slovenský
Magyar
AudiManual.ru


  • AUDI 80
  • AUDI 100
  • AUDI A3
  • AUDI A4
  • AUDI A6
  • AUDI A8
  • AUDI Q
  • OTHER
  • ARTICLES
C4 (1990-1994) C4 (1990-1994, petrol) C3 (1982-1990) C3 (1982-1990, petrol) C3 (1982-1990, diesel)

Replacing the camshaft seal (Audi 100 C4)

  • Home
  • Audi 100
  • C4 (1990-1994)
  • Power unit
  • Engine repair
  • Replacing the camshaft seal
            0
Table of contents: Engines with two valves per cylinder ↓ Engines with five or four valves per… ↓
The camshaft seal may be replaced on an installed engine if leaks are found near this location.

The seal is located behind the camshaft drive gear. You will need tool 2085 or press the seal out with a bent lever. You will need to remove the front of the car.

Remove all drive belts of various units from the end of the engine.

Turn the engine until the first cylinder is at TDC. The vibration damper and drive gear must be aligned.

Engines with two valves per cylinder


Loosen the drive belt tensioner roller and remove the drive belt. The belt should be secured in a suitable manner so that it does not slip off the crankshaft gear. However, the belt should not be tied so that it does not break. The engine must not be turned over after this.

Holding the camshaft drive gear in a suitable manner (for example, put an old toothed belt on a gear), loosen the gear bolt. Remove the bolt and washer.

Use pliers to remove the woodruff key from the camshaft.

Screw the camshaft gear bolt with washer as deep as possible into the end of the camshaft.

Take the puller 2085 in your hands, unscrew the inner part (A) by two turns (approximately 3 mm) from the outer part and lock it in this position using the locking screw (B). The same puller can be used to remove the front crankshaft oil seal.
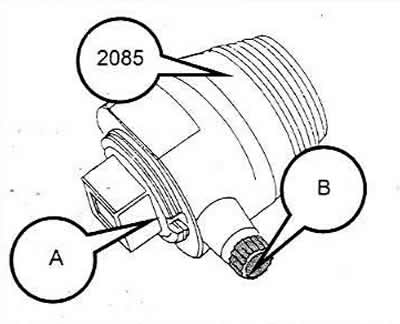
Take the puller 2085 in your hands, unscrew the inner part (A) by two turns (approximately 3 mm)…


Lubricate the threaded head of the device, insert it into the camshaft seal and, while simultaneously pressing on the ratchet, screw the device into the seal.


Loosen the knurled screw (B) on the tool and screw the inner part (A) into the camshaft until the seal comes out.

Clamp the device in a vice and pull out the seal with pliers.
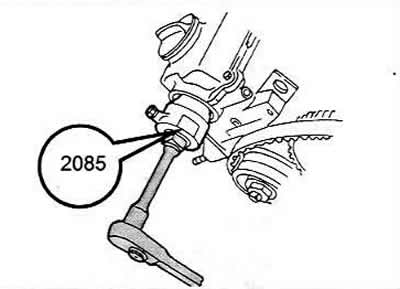
Clamp the device in a vice and pull out the seal with pliers.


Engines with five or four valves per cylinder


Exhaust camshaft oil seal


Remove the timing belt.

While holding the drive shaft gear from turning with a suitable means, loosen the bolt in the center.

Mark the drive gear with a felt-tip pen on the outside so that it can be installed in its original position and then removed from the shaft. Using tool 2085, replace the camshaft seal in the same way as described for the 2-valve-per-cylinder engine.

When installing the gear, pay attention to the previously made mark. Hold the gear properly and tighten the bolt to a tightening torque of 85 Nm.

Intake camshaft oil seal
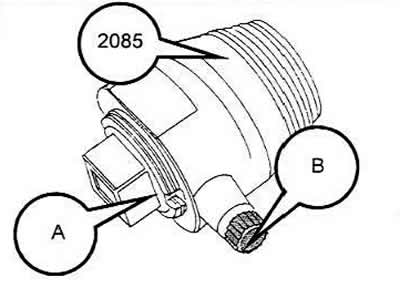


Intake camshaft oil seal


Disconnect the Hall sensor plug and unscrew the Hall sensor housing from the cylinder head.


Unscrew the shutter (blend) of the Hall sensor.

Take the puller 2085 in your hands, unscrew the inner part (A) by two turns (approximately 3 mm) from the outer part and lock in this position using the locking screw (B).

Lubricate the threaded head of the device, insert it into the camshaft seal and, while simultaneously pressing on the ratchet, screw the device into the seal.
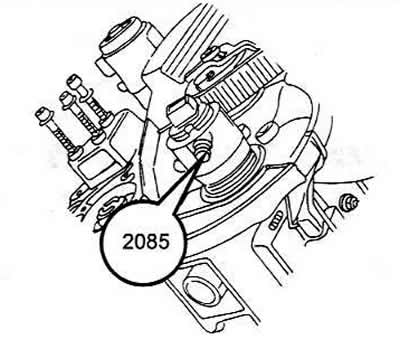
Lubricate the threaded head of the device, insert it into the camshaft seal and, while…


Loosen the knurled screw (B) on the tool and screw the inner part (A) into the camshaft until the seal comes out.

Clamp the device in a vice and pull out the seal with pliers.

Lubricate the edge of the new seal and its outer surface with oil. To install the new seal, use a piece of pipe of a suitable diameter. The pipe must fit completely against the outer surface of the seal around the circumference.

Place the seal evenly and drive it flush with the cylinder head. Do not drive the seal completely, otherwise it will block the oil drain hole. You can replace the seal in the same way as described for replacing the front crankshaft seal.

When attaching the Hall sensor, pay attention to the correct installation of the shaped washer. The curtain must also be installed correctly. This is ensured by the presence of a recess in the camshaft.

[The original text of the material can be found on the website audimanual.ru]
The article was checked by auto expert Georgy Rodionov
This article is available at russian, bulgarian, belarusian, ukrainian, serbian, croatian, romanian, polish, slovak, hungarian

Share information:
Previous articles
Audi 100 C4: Engine repair
Next articles

Repair of cylinder head with five or four valves per cylinder
Checking the cylinder head components
Repair of the cylinder head with 2 valves per cylinder
Distinctive features of installation of cylinder head gasket of…
Hydraulic tappets
Removal and installation the front timing belt cover
Checking the timing belt tension
Replacing the timing belt and cylinder engine


Similar articles on other Audi car models:
Replacing the camshaft seal Audi 80 B2 (1979-1986)
Checking the condition and replacing engine compartment hoses,… Audi A3 Type 8L (1996-2003)
Camshaft Seal — Replacement Audi A4 B5 (1994-2001)
Camshaft oil seal Audi A6 C4 (1994-1997)
Replacing spark plugs Audi A8 D2 (1994-2002)
Removal and installation timing chain covers, replacing the seal… Audi Q7 Typ 4L (2005-2015, diesel)
Replacing the camshaft seal Audi A2 (1999-2005)
Link to this page in different formats


Visitor comments

No comments yet


How much will 30 + 49 =


100(C4, 1990-1994) 
  • General information
  • User manual
  • Power unit
  • Engine repair
  • Ignition system
  • Fuel system (gasoline)
  • Fuel system (diesel)
  • Lubrication system
  • Cooling system
  • Exhaust system
  • Transmission
  • Clutch
  • Car gearbox
  • Drive shafts
  • Chassis
  • Car suspension
  • Steering
  • Wheels and tires
  • Brake system
  • Body
  • Ventilation and heating
  • Body repair
  • Electrical equipment
  • Power devices
  • Lighting and appliances
  • Electrical circuits
 
100(C4, 1990-1994, petrol) 
  • General information
  • Operation and maintenance
  • Power unit
  • Engine repair
  • Exhaust system
  • Cooling system
  • Supply system
  • Air filter
  • Mono-Motronic injection system
  • Digifant injection system
  • KE-III-Jetronic and KE-Motronic
  • MPI and MPFI injection system
  • Transmission
  • Clutch
  • Car gearbox
  • Chassis
  • Suspension and steering
  • Brake system
  • Wheels and tires
  • Body
  • Exterior
  • Interior
  • Electrical equipment
  • Fuses and relays
  • Power devices
  • Ignition system
  • Lighting and signaling
  • Equipment and devices
  • Electrical circuits
 
100(C3, 1982-1990) 
  • General information
  • User manual
  • Maintenance
  • Specifications
  • Power unit
  • Engines 4-cylinder
  • Engines 5-cylinder
  • Diesel engine
  • Cooling system
  • Power system (carburetor)
  • Power system (injector)
  • Fuel system (diesel)
  • Transistor ignition system
  • Electronic ignition system
  • Transmission
  • Clutch
  • 4 speed gearbox 014
  • 5 speed gearbox 013 and 093
  • 5 speed gearbox 016 and 012
  • Shift mechanism KP 016
  • Automatic transmission
  • Front wheel drive
  • Chassis
  • Front suspension
  • Rear suspension
  • Steering
  • Brake system
  • Body
  • Body elements
  • Electrical equipment
  • Lighting and appliances
  • Power devices
  • Electrical circuits
 
100(C3, 1982-1990, petrol) 
  • General information
  • Maintenance and operation
  • 4 cylinder engine
  • Engine repair
  • Cooling and lubrication system
  • Supply system
  • Ignition system
  • 5 cylinder engine
  • Engine repair
  • Cooling and lubrication system
  • Supply system
  • Ignition system
  • Transmission
  • Clutch and drive shafts
  • 4 speed gearbox 014
  • 5 speed gearbox 013 and 093
  • 5 speed gearbox 016 and 012
  • Automatic gearbox
  • Chassis
  • Steering
  • Front suspension
  • Rear suspension
  • Brake system
  • Body
  • Body elements
  • Doors, locks and windows
  • Body repair
  • Electrical equipment
  • Equipment and devices
  • Power devices
  • Electrical circuits
 
100(C3, 1982-1990, diesel) 
  • General information
  • User manual
  • Maintenance
  • Troubleshooting
  • Power unit
  • Engine in a car
  • Engine removed
  • Cooling system
  • Fuel system
  • Exhaust system
  • Starting and charging
  • Preheating
  • Transmission
  • Clutch
  • Mechanical gearbox
  • Automatic gearbox
  • Drive shafts
  • Chassis
  • Brake system
  • Suspension
  • Steering
  • Body
  • Exterior
  • Interior
  • Electrical equipment
  • Equipment and devices
  • Electrical circuits
 
AudiManual.ru © 2017-2026 · Mobile version · Feedback · Sitemap: EN BG BY UA RS HR RO PL SK HU · Site search · News and articles
80 B2 · 80 B3 petrol · 80 B3 · 80 B4 · 100 C3 diesel · 100 C3 petrol · 100 C3 · 100 C4 petrol · 100 C4 · A3 Type 8L · A4 B5 petrol · A4 B5 · A4 B6 petrol · A4 B6 · A4 B7 · A4 B8 · A6 C4 · A6 C5 · A6 C5 Allroad · A8 D2 · Q5 Type 8R · Q7 Typ 4L · Audi A2 ·
This site uses cookies 🍪. Click the button to accept this fact.