
Repair Chevrolet Repair Toyota Repair Honda Repair AvtoVAZ Repair Mercedes-Benz Repair BMW Repair Opel
Home  |  Contacts  |  Sitemap  |    
English Русский
Български
Беларускі
Український
Српски
Hrvatski
Română
Polski
Slovenský
Magyar
AudiManual.ru


  • AUDI 80
  • AUDI 100
  • AUDI A3
  • AUDI A4
  • AUDI A6
  • AUDI A8
  • AUDI Q
  • OTHER
  • ARTICLES
C4 (1990-1994) C4 (1990-1994, petrol) C3 (1982-1990) C3 (1982-1990, petrol) C3 (1982-1990, diesel)

Removal and installation of a manual gearbox (KP) (Audi 100 C4)

  • Home
  • Audi 100
  • C4 (1990-1994, petrol)
  • Transmission
  • Car gearbox
  • Removal and installation of a manual gearbox (KP)
            0
Table of contents: Front-wheel drive models ↓ Tightening torques ↓

Front-wheel drive models


The car must be raised and secured so that you can work both in the engine compartment and underneath the car. The gearbox is removed downwards.

Important: Due to the different lengths and diameters of the screws, be sure to mark their location on the engine/gearbox flange or label them with adhesive tape.

Remove the ground wire from the battery.

Unscrew the wire connecting the gearbox to the body.

Remove the speed sensor plug on the gearbox; to do this, press the plug clamps. Repeat the same with the plug to the reverse light switch.

On a 6-cylinder engine, remove the section of intake pipe between the air filter and intake manifold.

Loosen the bolts accessible from above between the engine and gearbox.

Loosen the wiring clamps and disconnect the plug connection to the lambda probe.

Remove the lower engine compartment panel (Chapter "Body elements").

Unscrew the wire connecting the gearbox to the body.

Disconnect the front exhaust pipe from the manifold.

Remove the crossmember under the gearbox.

Remove the gear shift fork rod.

Disconnect the procon-ten system cables from the gearbox.

Remove the protective sheet of the drive axle shaft on the right (in a 6-cylinder engine - also on the left).

Remove the drive axle shafts to the right and left of the gearbox, unscrew the hinges to the left (while holding the ends of the shafts) and tie up both drive axles.

Remove the clutch hydraulic slave cylinder; the pipeline may remain connected.


If present, unscrew the heat shield of the right rubber-metal support.

Remove the starter.

In vehicles with a 4-cylinder engine, remove the clutch housing protective sheet.

Protect the engine with stands from tipping forward or backward

Place a garage jack under the gearbox from below.

Remove the transmission crossmember/attachment bracket mounting bolts.

Remove the front engine mount (torque support in 5- and 6-cylinder engines).

Remove the lower bolts connecting the engine and gearbox.

Carefully pry the gearbox away from the engine using a crowbar.

Now carefully lower the gearbox using the jack.

To install, clean the splined connection of the gearbox input shaft and lubricate with MoS2 paste or VW-Fett G 000 100 consistent grease.

Check whether the guide bushings for centering the gearbox have entered the engine cylinder block.

Check and, if necessary, adjust gear shifting with the gearbox installed.

Install the clutch slave cylinder only with an integrated gearbox (see chapter "Clutch").

For tightening torques, see the table on the next page.
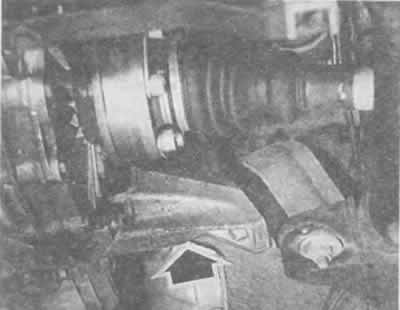
Removing the manual gearbox. At the rear, the gearbox is suspended on the left and right on the…

Removing the manual gearbox. At the rear, the gearbox is suspended on the left and right on the so-called crossmember (arrow). The connection with the bracket of the mounted units is formed by an elastic rubber-metal support.


Tightening torques



Tightening torques
The article was checked by auto expert Nikita Rudakov
This article is available at russian, bulgarian, belarusian, ukrainian, serbian, croatian, romanian, polish, slovak, hungarian

Share information:
Previous articles
Audi 100 C4: Car gearbox
Next articles

Manual transmission (MT)
Noises in the gearbox
Automatic transmission (AT)
Electronic control of automatic transmission
Main gear


Similar articles on other Audi car models:
Manual gearbox — removal and installation Audi 80 B4 (1991-1996)
Visual inspection of the gearbox for leaks Audi A3 Type 8L (1996-2003)
Manual gearbox — design description Audi A4 B6 (2000-2006, petrol)
Manual gearbox Audi A6 C5 Allroad (1999-2005)
Visual inspection of gearbox tightness Audi A8 D2 (1994-2002)
Cylinder block from the gearbox side Audi Q5 Type 8R (2008-2017)
Marking of the manual gearbox 02J Audi A2 (1999-2005)
Link to this page in different formats


Visitor comments

No comments yet


How much will 30 + 34 =


100(C4, 1990-1994) 
  • General information
  • User manual
  • Power unit
  • Engine repair
  • Ignition system
  • Fuel system (gasoline)
  • Fuel system (diesel)
  • Lubrication system
  • Cooling system
  • Exhaust system
  • Transmission
  • Clutch
  • Car gearbox
  • Drive shafts
  • Chassis
  • Car suspension
  • Steering
  • Wheels and tires
  • Brake system
  • Body
  • Ventilation and heating
  • Body repair
  • Electrical equipment
  • Power devices
  • Lighting and appliances
  • Electrical circuits
 
100(C4, 1990-1994, petrol) 
  • General information
  • Operation and maintenance
  • Power unit
  • Engine repair
  • Exhaust system
  • Cooling system
  • Supply system
  • Air filter
  • Mono-Motronic injection system
  • Digifant injection system
  • KE-III-Jetronic and KE-Motronic
  • MPI and MPFI injection system
  • Transmission
  • Clutch
  • Car gearbox
  • Chassis
  • Suspension and steering
  • Brake system
  • Wheels and tires
  • Body
  • Exterior
  • Interior
  • Electrical equipment
  • Fuses and relays
  • Power devices
  • Ignition system
  • Lighting and signaling
  • Equipment and devices
  • Electrical circuits
 
100(C3, 1982-1990) 
  • General information
  • User manual
  • Maintenance
  • Specifications
  • Power unit
  • Engines 4-cylinder
  • Engines 5-cylinder
  • Diesel engine
  • Cooling system
  • Power system (carburetor)
  • Power system (injector)
  • Fuel system (diesel)
  • Transistor ignition system
  • Electronic ignition system
  • Transmission
  • Clutch
  • 4 speed gearbox 014
  • 5 speed gearbox 013 and 093
  • 5 speed gearbox 016 and 012
  • Shift mechanism KP 016
  • Automatic transmission
  • Front wheel drive
  • Chassis
  • Front suspension
  • Rear suspension
  • Steering
  • Brake system
  • Body
  • Body elements
  • Electrical equipment
  • Lighting and appliances
  • Power devices
  • Electrical circuits
 
100(C3, 1982-1990, petrol) 
  • General information
  • Maintenance and operation
  • 4 cylinder engine
  • Engine repair
  • Cooling and lubrication system
  • Supply system
  • Ignition system
  • 5 cylinder engine
  • Engine repair
  • Cooling and lubrication system
  • Supply system
  • Ignition system
  • Transmission
  • Clutch and drive shafts
  • 4 speed gearbox 014
  • 5 speed gearbox 013 and 093
  • 5 speed gearbox 016 and 012
  • Automatic gearbox
  • Chassis
  • Steering
  • Front suspension
  • Rear suspension
  • Brake system
  • Body
  • Body elements
  • Doors, locks and windows
  • Body repair
  • Electrical equipment
  • Equipment and devices
  • Power devices
  • Electrical circuits
 
100(C3, 1982-1990, diesel) 
  • General information
  • User manual
  • Maintenance
  • Troubleshooting
  • Power unit
  • Engine in a car
  • Engine removed
  • Cooling system
  • Fuel system
  • Exhaust system
  • Starting and charging
  • Preheating
  • Transmission
  • Clutch
  • Mechanical gearbox
  • Automatic gearbox
  • Drive shafts
  • Chassis
  • Brake system
  • Suspension
  • Steering
  • Body
  • Exterior
  • Interior
  • Electrical equipment
  • Equipment and devices
  • Electrical circuits
 
AudiManual.ru © 2017-2026 · Mobile version · Feedback · Sitemap: EN BG BY UA RS HR RO PL SK HU · Site search · News and articles
80 B2 · 80 B3 petrol · 80 B3 · 80 B4 · 100 C3 diesel · 100 C3 petrol · 100 C3 · 100 C4 petrol · 100 C4 · A3 Type 8L · A4 B5 petrol · A4 B5 · A4 B6 petrol · A4 B6 · A4 B7 · A4 B8 · A6 C4 · A6 C5 · A6 C5 Allroad · A8 D2 · Q5 Type 8R · Q7 Typ 4L · Audi A2 ·
This site uses cookies 🍪. Click the button to accept this fact.