



Table of contents: Input signals ↓ Managing switching processes ↓ Self-diagnosis ↓ Operation in emergency conditions ↓ Automatic transmission with DSP ↓ Checking the automatic transmission ↓ Monitoring switching processes ↓ Removal the automatic transmission ↓
Input signals
The control unit processes signals from various nodes; information comes from:
Automatic transmission selector lever with multi-function switch. The position of the lever controls the switching on of the reversing lights, the starter lock when the driving mode is engaged, and the control of the driving mode change system.
"Sport" buttons, which include a sports shift program (not in CP with DSP).
Throttle position potentiometer. This element, familiar from the injection system, serves to determine the switching moments.
Speed sensor in the automatic transmission to determine the speed of movement, also for the moments of switching. In case of failure of this sensor, the control unit uses the engine shaft speed (signal from the ignition system) as a backup indicator.
Accelerator pedal limit position sensor (in the gas cable drive, in a 6-cylinder engine it is located separately); it reports if the accelerator pedal has been fully depressed. In this case, upshifting occurs later, and if necessary, the automatic transmission downshifts two ranges.
Brake light switch to release the shift lever lock. The shift lever can only be moved from the "P" or "N" position to one of the driving ranges when the brake pedal is depressed.
ATF temperature sensor, which reports the temperature of the fluid in the automatic transmission. Significant heating of the ATF can occur due to a large difference in the number of revolutions between the engine and the automatic transmission. If the control unit receives a signal of "high temperature", then the automatic transmission in certain ranges switches to a higher gear later. This reduces slippage in the torque converter and lowers the ATF temperature - then the switch to the normal driving program occurs again.
Managing switching processes
When you move the selector lever to the "D" position, the pressurized ATF flows to the shift valves in the valve block, which in turn hydraulically control the multi-plate clutches and multi-plate brakes. The control unit regulates the pressure using electromagnetic valves and thus determines the moment for shifting to a higher or lower gear, as well as the shift transitions. Commands from the control unit then go to the shift lever lock magnet, the starter and reversing light lock relay and the indicator light in the "Sport" button. If the car is equipped with a cruise control system, power is supplied to it from the control unit only when one of the forward ranges is engaged and the speed has crossed the 30 km/h limit for the first time.
Self-diagnosis
The automatic transmission control unit can recognize and record any malfunctions that occur. The control program monitors the input and output signals of almost all sensors and units, as well as their electrical circuits. If you suspect a malfunction in the automatic transmission control, you can only interrogate the fault memory at an Audi workshop.
Operation in emergency conditions
If the control unit detects a malfunction that significantly affects operation, or if the control unit itself is faulty, it switches to the "emergency operation" mode. There are two programs for this:
As before the malfunction was detected, the automatic transmission automatically switches to a higher or lower gear, but the jerks when shifting become much more pronounced.
The automatic transmission no longer automatically shifts up or down. In selector lever positions "D", "3" and "2", only the third range remains available. Only in positions "1" and "R" is the selected range actually engaged.
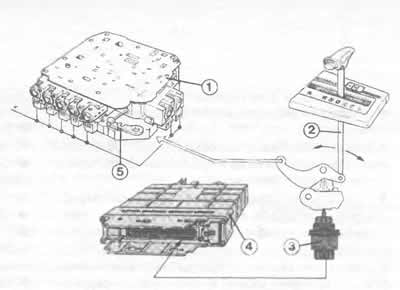
This diagram makes the connections between the shift valve block (1) of the automatic transmission, the selector lever (2), the multifunction switch (3) and the electronic control unit (4) more visual. The manual valve (5) is directly actuated by the shift lever. Depending on the year of manufacture and the engine version, the control unit is equipped with 2 programs for sports and normal driving or is it an automatic transmission with DSP (dynamic switching program), which, depending on the driving style, includes one of 5 programs.
In both cases, you must urgently visit an Audi workshop, where the fault memory will be interrogated first.
Automatic transmission with DSP
Since 7/92, the Audi 100 with 6-cylinder engines has been equipped with a front and quattro drive and a four-speed automatic transmission with the so-called dynamic shift program "DSP". The electronic control unit of this transmission has five modes with their own symbol. The advantage of the automatic transmission with DSP is its "ability to improve": the control unit constantly sums up the frequency of the various running states and automatically selects the mode corresponding to the current style with a directly indicated symbol. By an earlier and, respectively, later shift to a higher or lower gear, the DSP "automatically" switches on with its five modes, as they say, "sporty" as well as a particularly "economical" driving style.
Checking the automatic transmission
The automatic transmission provides almost no opportunities for self-initiated testing at home. Targeted tests, however, help to assess the cause of the malfunction, which is of particular interest when buying a used car:
In case of problems, first of all it is necessary to check the ATF level in the automatic transmission.
If the ATF on the dipstick tip smells burnt, then there is serious damage to the automatic transmission. In this case, the multi-plate clutches or brake bands are defective.
During a test drive, you can check the shift points.
The way the shifting processes occur can be used to draw conclusions about the state of the automatic transmission. O Adjustment of the gas cable with integrated accelerator pedal limit sensor is an important condition for flawless operation.
The same can be said about adjusting the cable drive of the selector lever.
Monitoring switching processes
During the test drive, you should pay attention to the switching processes:
Upshifting: When the accelerator pedal is not fully depressed, the shift is almost imperceptible; when the accelerator pedal is fully depressed or pressed sharply, gear changes become more noticeable, but the upshift should be smooth. A short-term increase in revs when changing gears indicates a problem that needs to be addressed more closely.
Downshifting: With the accelerator pedal released (when coasting) and at very low speeds it is practically unnoticeable. A jerk when downshifting at partial or full throttle is quite normal. Downshifting with the selector lever with the accelerator pedal released takes 1-2 seconds. If the accelerator pedal is simultaneously depressed when shifting with the selector lever, the gear change should occur without delay.
Hint: Audi-100 with automatic transmission cannot be towed further than 50 km, otherwise there is not enough automatic transmission lubrication. For the same reason, when towing, the maximum speed of 50 km/h cannot be exceeded. In doubtful cases, it is better to choose a shorter route or call a tow truck.
Removal the automatic transmission
Front wheel drive vehicles need to be raised and securely supported. Use a large garage jack to support and lower the very heavy automatic transmission.
Disconnect the battery.
Disconnect the wire tip to the tachometer sensor.
For 6-cylinder models, remove the intake duct between the air filter and the intake manifold.
For models with a split ATF filler pipe, loosen it at the top and pull it out. Plug the bottom of the pipe with a lint-free cloth.
Remove the bolts that connect the engine and the automatic transmission that can be reached from above. Note which bolts you removed from which holes (for subsequent assembly).
Place reliable supports under the engine to prevent it from tipping over.
Unscrew the lower panel of the engine compartment.
Remove the heat shield from the drive axle shaft.
Remove the body crossmembers below the exhaust pipe or catalytic converters (depending on the engine type).
Remove the exhaust pipes (for models with 6-cylinder engines together with catalytic converters).
Disconnect the drive shafts from the gearbox (not letting them fall).
Remove the starter. This will give you access to the torque converter mounting bolts.
Loosen a total of three torque converter bolts on the engine side. To do this, hold the center bolt of the pulley or damper (depending on the engine type) using a spanner. Turn the crankshaft accordingly by ⅓ of a turn.
Unscrew the heat shield of the multi-function switch.
Remove the plug on the automatic transmission housing. After that, remove the cable holders of the procon-ten system from the hinges and press the cables upward.
Place a container under the ATF line bolt connections.
Loosen the ATF line fasteners and move the hoses to the side.
Remove the front engine bracket, if present.
Raise the automatic transmission using a garage jack and loosen the automatic transmission mounting bolts.
The engine, connected to the automatic transmission, is tilted slightly backwards; after this, place a strong support under the engine again.
Unscrew the automatic transmission support on the right side of the automatic transmission.
Unhook the retaining brackets of the automatic transmission control lever rod and remove the control lever cable.
Remove the lower connecting bolts securing the automatic transmission to the engine.
Place the cardan shafts back.
Press the automatic transmission away from the engine; use a crowbar if necessary.
Carefully lower the automatic transmission.
When removing the automatic transmission, press the torque converter away from the driven disk.
The torque converter must remain with the automatic transmission! Be careful that it does not fall out (screw with wire).
Installation of automatic transmission
Installation is done in the reverse order of removal. The following points deserve special attention:
Check whether the torque converter is installed correctly in the automatic transmission. Make sure that it does not move forward during installation.
To screw the torque converter to the flywheel, it is imperative to use the original bolts, otherwise the torque converter will be destroyed.
If necessary, add new ATF.
Install the exhaust pipe.
Adjust the selector lever.
Tightening torques for automatic transmission fasteners

The original article is available on the website AudiManual.ru