
Table of contents: Removal the radiator ↓ Radiator cleaning ↓ Removal the cooling system hoses ↓ Draining the coolant ↓ Filling the cooling system ↓
The radiator is equipped with so-called plastic tanks. They are located on the right and left of the radiator in models with 4- and 6-cylinder engines, and at the bottom and top of the 5-cylinder. From these tanks, the coolant rushes through aluminum radiator tubes, which are made of aluminum to increase their surface area (and thus the cooling area) equipped with cooling fins. Through the cooling fins, the coolant releases heat into the atmosphere. If you suspect a leaky radiator, you should carry out the described pressure test in a workshop. If the defect is obvious, you can immediately remove the radiator yourself and bring it in for repair.
Removal the radiator
Remove the lower engine compartment protection (chapter "Body elements").
Drain the coolant.
Remove all hoses from the radiator.
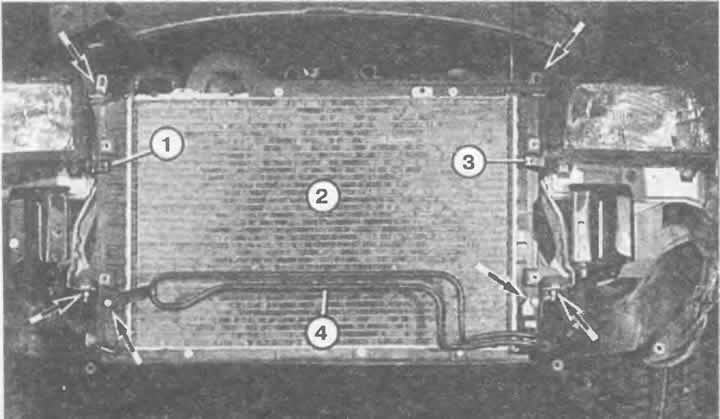
The bolts and nuts indicated here by the arrows must be unscrewed so that the radiator (2) can be removed with the bumper and protective cover removed. In addition, it is recommended to remove the holders (1 and 3) for the decorative strips located under the headlights. In cars with air conditioning, in addition to the radiator coil for the power steering (4), there is an air conditioning evaporator in front of the radiator; it should also be unscrewed.
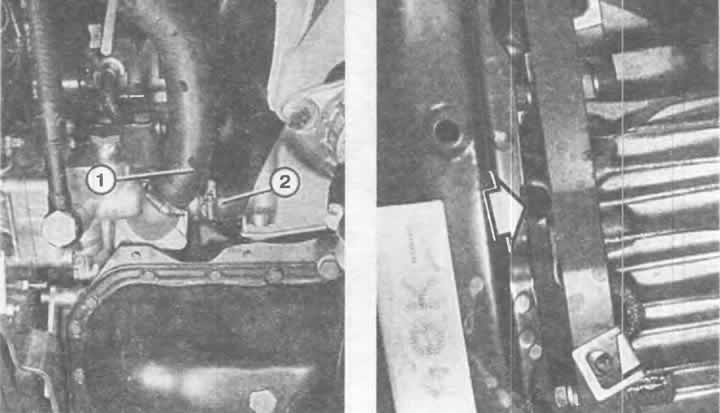
Left: To drain the coolant, remove the hoses (1 and 2) from the thermostat housing in a 4-cylinder engine. Additionally, open the drain hole in the radiator.
Right: The 6-cylinder engine has an additional coolant drain hole (arrow), which is located at the bottom of the engine near the gearbox housing connector.
Disconnect the wire ends on the cooling fan thermal switch.
Remove the cooling fan plugs.
Unscrew the radiator at the top (left and right) from the front of the engine compartment (chapter "Body elements").
Remove the bumper in front of the radiator (chapter "Body elements").
Unscrew the radiator (right and left) from the holders for the decorative strips located under the headlights.
Unscrew the oil cooler coil for the power steering.
If you have an air conditioner, you need to remove its evaporator, which is attached in front of the radiator.
Unscrew the lower radiator mount.
Remove the radiator upwards.
Radiator cleaning
Before and after the warm season, the radiator surface must be cleaned of insect residues that have settled there, otherwise the cooling effect will deteriorate.
Open the hood, for a 5-cylinder engine, additionally remove the protective radiator cover from above.
Spray dried insect remains with a protein-dissolving agent (e.g "Summer Screen" holts companies)
After a certain period of action, spray the back of the radiator with the same product. Rinse the radiator with a gentle stream of water. A hard brush or sharp tool can damage the surface of the radiator.
Direct a hose with water into the holes around the cooling fan. Lift the rubber protective plugs where they are installed and direct a stream of water into the holes located behind them.
Removal the cooling system hoses
As spare parts, find original hoses of the required shape and new clamps.
Drain the coolant.
Loosen the unscrewing clamps using a screwdriver.
Press the spring clamps together at both "ears" using pliers until they stop. Remove the hoses.
Loosen tightly seated ends of hoses by inserting a screwdriver between the hose and the branch pipe and carefully using it as a lever.
Place new hoses on the fittings deep enough so that they cannot slip off.
Tighten the screw clamps without applying too much force, otherwise the threads may be stripped.
Note: A torn or bitten hose can rarely be replaced immediately. You can temporarily help the problem by using "Pannenband" weyer or "Hoseweld Baldage" by Holts. Both tapes adhere well to clean and dry rubber hoses. In the case of a large leak, it is sometimes useful to open the expansion tank cap one turn so that pressure cannot build up in the cooling system that the bandage cannot withstand. Now you can drive very carefully to the workshop, constantly monitoring the temperature and coolant level sensors.
Draining the coolant
Allow the engine to cool down, otherwise there is a high risk of burns!
Open the expansion tank screw cap.
Remove the lower engine compartment protection (chapter "Body elements").
Place a wide container under the engine to drain the coolant.
Under the black cover in the fluid reservoir is a threaded plug for the ventilation hole in the heater hose (arrow). This should be opened before filling the cooling system (see below in the text).
Open the drain plug at the bottom of the radiator or remove the lower radiator hose.
Additionally: Models with a 4-cylinder engine: in the direction of travel, on the left side of the engine, remove and drain all liquid from the thick hose to the radiator and the thinner one to the heating system heat exchanger, respectively, on the thermostat housing.
Models with 5-cylinder engine: Remove the coolant hose leading to the heater from the rear of the cylinder block.
Next, remove the hose from the lower coolant line.
6-cylinder models: Drain the coolant through the drain hole on the bottom of the cylinder block.
Note: Antifreeze is toxic, so you can't just flush it down the drain. Instead, you need to collect it in a special container and dispose of it as special waste.
Filling the cooling system
Since there is always some coolant remaining in the engine, it may not be possible to fill the entire amount of coolant listed in the table at the beginning of the chapter.
Before filling, open the threaded plug of the ventilation hole in the heater hose.
6-cylinder engine only: Unscrew the screw plug on the coolant line at the rear of the engine.
First add antifreeze, then, if possible, distilled water, until the level rises to the top edge of the expansion tank.
Pour in liquid until it comes out of the plug. Then top it up completely.
4-cylinder engine only: Lift the upper water hose to the radiator slightly while adding coolant.
Tighten the expansion tank cap.
Start the engine and let it run until the electric cooling fan comes on.
Turn off the engine and add coolant. The coolant level should be between the "min" and "max" marks on the expansion tank; when the engine is warmed up to operating temperature, slightly above the maximum mark.