
Removal
Remove the lower engine compartment protection.
Disconnect and remove the small insert elements of the radiator grille, starting from the right, at the bottom of the bumper.
Unscrew the fog lights where applicable.
In the recess of the bumper grille, unscrew one hex bolt on the right and left.
Open the hood.
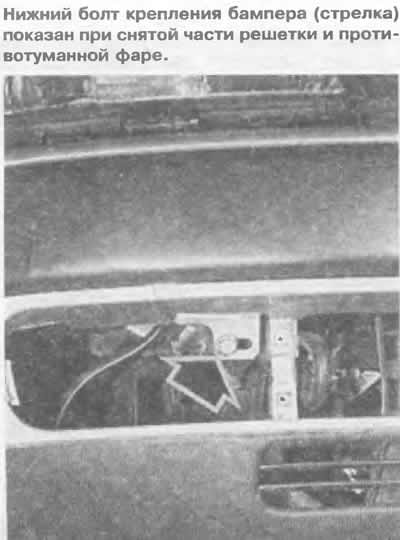
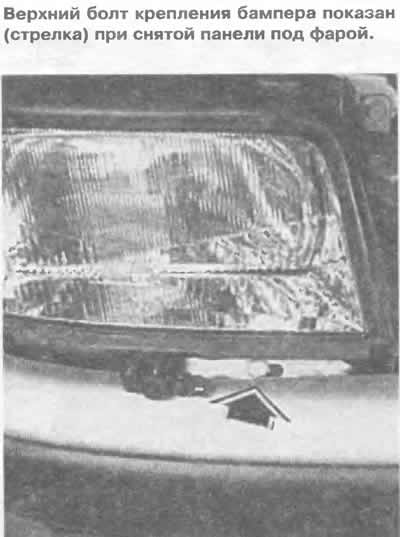
Unscrew the panels under both headlights and remove them from the wings along the outer edge.
In vehicles with a headlight washer system, manually remove the nozzle telescopes and disconnect the varnished plastic panel of the emulsion tube.
And take it off.
Unscrew 2 hex bolts from above under the headlight.
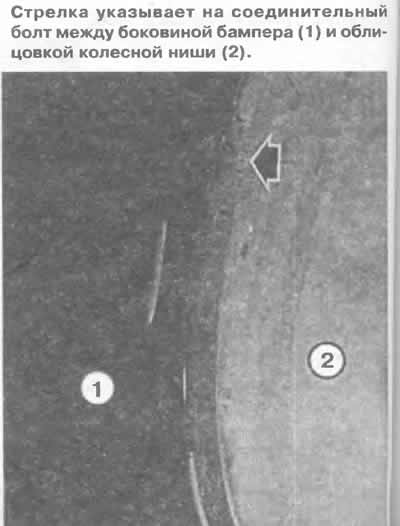
Remove the Phillips head screw in the wheel well - approximately at the height of the top edge of the bumper. This screw is not present in models from March 1992 onwards. When installing a new bumper in such a car, a small fastener must be riveted under this screw.
Disconnect the end sections of the bumper from the body brackets on the wing. To do this, press the side of the bumper down, while simultaneously moving it away from the body.
Lift the ends of the bumper over the wheel arches and remove them forward. Now you can remove the bumper forward.
Cars with a temperature sensor: remove the temperature sensor from the bumper.
The front bumper trims can be removed separately:
The license plate holder in the middle of the front bumper is secured with two bolts.
Once the license plate holder has been removed, the two side panels can be removed from the retainers individually using a flat plastic spatula or a blunt knife. To do this, press down on both small retaining wedges while gently prying the trim apart with your hand.
Installation
Strengthen the temperature sensor.
First install the bumper into the brackets.
Now insert the sides of the bumper so that the ends of the bumper do not collide with the wheel arch trim.
First hang the side panels by the lower edge on the mounts on the wing. Then press on the bumper from the side; this way the top edge is fixed
Tighten the screws.
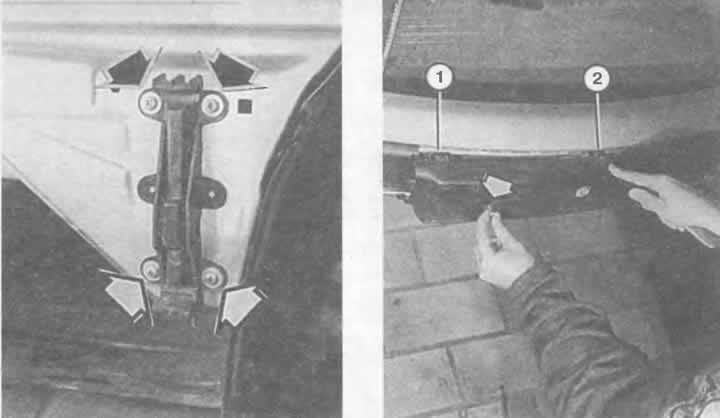
Left: The position of the bumper side mounting bracket can be changed by loosening the bolts indicated by arrows in the illustration to adjust the bumper height.
Right: The front bumper covers are removed by pressing the small retaining wedges (1) with a blunt knife (2). The license plate holder in the middle of the bumper is additionally secured with two screws (arrow).
Alignment of bumpers
After installing the bumper, you should check whether the gap between the metal strip located just below the headlights and the bumper is the same everywhere.
The decisive factor, however, is the size between the lower edge of the bonnet and the bumper.
This distance should be 5-10 mm.
Otherwise, you should remove the bumper again, loosen its brackets and move them slightly in the longitudinal holes.
(The original version of the article is posted on the website audimanual.ru)