Repair Chevrolet Repair Toyota Repair Honda Repair AvtoVAZ Repair Mercedes-Benz Repair BMW Repair Opel
Home  |  Contacts  |  Sitemap  |    
English Русский
Български
Беларускі
Український
Српски
Hrvatski
Română
Polski
Slovenský
Magyar
AudiManual.ru


  • AUDI 80
  • AUDI 100
  • AUDI A3
  • AUDI A4
  • AUDI A6
  • AUDI A8
  • AUDI Q
  • OTHER
  • ARTICLES
Type 8L (1996-2003)

Removal and installation the radiator and fan (Audi A3 8L)

  • Home
  • Audi A3
  • Type 8L (1996-2003)
  • Power unit
  • Cooling system
  • Removal and installation the radiator and fan
            0
Table of contents: Removal ↓ Installation ↓

Removal


1. Disconnect the negative (–) battery cable with the ignition off.

Warning: This will erase information from electronic memory units, such as the radio code. Without the code, the radio can only be switched on by the manufacturer or an AUDI service station. Therefore, please read the information in the subsection Entering the radio code.


2. Remove the front bumper, refer to the subsection Removal and installation bumpers.

3. Drain the coolant.

4. Disconnect the hoses from the radiator by removing the clamps on the side.

5. Disconnect the thermostat connector (near the radiator) and a fan.

5. Disconnect the thermostat connector (near the radiator) and a fan.


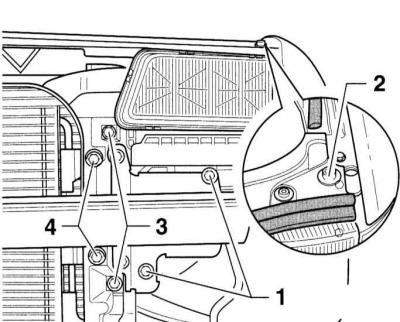
6. Remove the mounting bolts –1– of the bumper on both sides of the vehicle.

7. Loosen the mounting bolts –2– on both sides without unscrewing them.

Especially for cars with air conditioning:

Warning: Do not open the air conditioner cooling circuit. Liquid coming into contact with skin may cause frostbite.


Warning: Do not twist, squeeze or bend air conditioning pipes and hoses.


8. Loosen the mounting bolts –4– and remove the condenser from the radiator, referring to the accompanying illustration.


9. Secure the condenser to the body (hang it) so as not to put any load on the cooling system pipes/hoses.

All cars:

10. Remove 4 bolts –3– securing the radiator. Lower the radiator with the fan down.

Installation


11. If new parts are being installed, secure them as follows:

11. If new parts are being installed, secure them as follows:


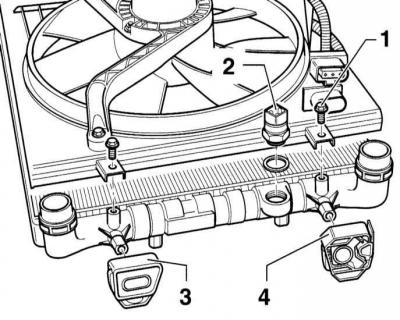
12. Fan holder torque 10 Nm, bolts –1–.

13. Thermal switch –2– torque 35 Nm.

14. Place holders –3– and –4– on the radiator.

15. Install the radiator with the help of an assistant and tighten to a torque of 10 Nm.

16. Cars with air conditioning: Tighten the condenser to a torque of 10 Nm.

17. Install the front panel, referring to the subsection Removal and installation the hood lock panel.

18. Connect the connector of the thermal switch and the fan.

19. Place the coolant hoses on the radiator with new sealing rings and secure with clamps.

20. Install the front bumper, referring to the subsection Removal and installation bumpers.

21. Connect the negative (–) cable to the battery.

Warning: Activate the automatic safety window lifts, enter the radio code, set the clock, and refer to the subsection Entering the radio code.


22. Fill the system with coolant, referring to the subsection Replacing the coolant.
The article was checked by auto expert Nikita Rudakov
This article is available at russian, bulgarian, belarusian, ukrainian, serbian, croatian, romanian, polish, slovak, hungarian

Share information:
Previous articles
Audi A3 Type 8L: Cooling system
Next articles

Removal, installation and checking the thermostat
Replacing the coolant
Antifreeze is a means of protection against freezing
Engine cooling system device
Removal and installation the coolant pump
Checking the cooling system under pressure
Checking the cooling fan thermal switch


Similar articles on other Audi car models:
Radiator grille — removal and installation Audi 80 B3 (1986-1991, petrol)
Radiator — removal, inspection, cleaning and installation Audi 100 C3 (1982-1990, diesel)
Radiator — removal and installation Audi A4 B5 (1994-2001, petrol)
Removal and installation the radiator Audi A6 C4 (1994-1997)
Removal and installation the radiator Audi A8 D2 (1994-2002)
Removal and installation the radiator, its casing and fans Audi Q7 Typ 4L (2005-2015, diesel)
Removal and installation an oil radiator Audi A2 (1999-2005)
Link to this page in different formats


Visitor comments

No comments yet


How much will 38 + 41 =


A3(8L, 1996-2003) 
  • General information
  • User manual
  • Maintenance
  • Power unit
  • Engine repair
  • Lubrication system
  • Cooling system
  • Supply system
  • Fuel injection system
  • Exhaust system
  • Ignition system
  • Transmission
  • Manual transmission
  • Automatic transmission
  • Clutch and drive shafts
  • Chassis
  • Brake system
  • Front suspension
  • Rear suspension
  • Steering
  • Body
  • Ventilation and heating
  • Exterior (external elements)
  • Interior (internal elements)
  • Doors, covers and windows
  • Electrical equipment
  • Power devices
  • Lighting and appliances
  • Electrical circuits
 
AudiManual.ru © 2017-2026 · Mobile version · Feedback · Sitemap: EN BG BY UA RS HR RO PL SK HU · Site search · News and articles
80 B2 · 80 B3 petrol · 80 B3 · 80 B4 · 100 C3 diesel · 100 C3 petrol · 100 C3 · 100 C4 petrol · 100 C4 · A3 Type 8L · A4 B5 petrol · A4 B5 · A4 B6 petrol · A4 B6 · A4 B7 · A4 B8 · A6 C4 · A6 C5 · A6 C5 Allroad · A8 D2 · Q5 Type 8R · Q7 Typ 4L · Audi A2 ·
This site uses cookies 🍪. Click the button to accept this fact.