
Removal
1. Drain the coolant.
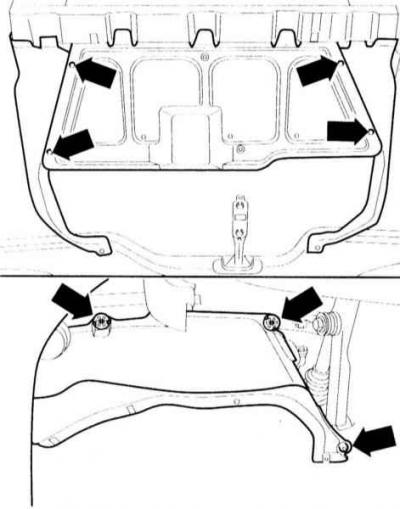
2. Loosen the mounting screws and remove the lower and right side engine compartment covers (arrow on the illustration). The illustration shows the version with a gasoline engine. Removing the bottom cover of a diesel engine is discussed in the subsection Removal and installation the lower engine compartment cover.
3. Remove the coolant pump drive V-belt, refer to subsection Removal and installation a ribbed V-belt.
4. Remove the 3 Allen screws and remove the tensioner from the holder.
5. Set the piston of the first cylinder to TDC. Loosen the tension of the toothed belt and remove it only at the top from the camshaft pulley, refer to subsection Removal, installation and tensioning the timing belt.
Warning: The vibration damper and lower belt cover do not need to be removed.
6. To protect the timing belt from leaking coolant, cover the belt with a rag.
Gasoline engine
7. Engine 150 hp: Unscrew the mounting bolts and remove the expansion tank. Move it aside with the hoses attached. Remove the air injection pipe in the area of the coolant pump by loosening the clamps.
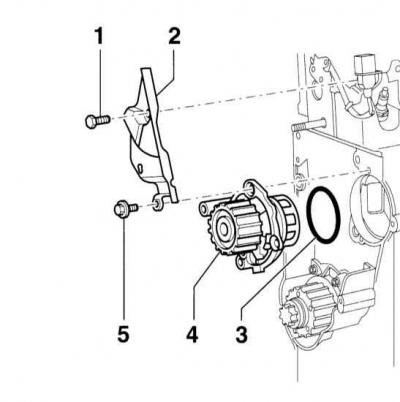
8. 1.6L engines: Remove bolts –1– and –5– and remove the rear timing belt cover –2–.
9. All engines: Unscrew the 3 coolant pump mounting bolts –4– and remove it by carefully sliding it along the engine support. Remove the sealing ring –3–.
10. Remove the timing belt covers.
Installation
11. Clean the sealing surfaces for the ring thoroughly.
12. Wet the new O-ring with coolant and insert.
13. Install the coolant pump. Installation position for all engines: Plug in housing points down.
14. 1.6L Engine: Reinstall the rear timing belt cover. Tighten bolt –1– to 20 Nm, refer to illustration.
15. Secure the coolant pump with three bolts to a torque of 15 Nm.
16. Install the toothed belt, referring to the subsection Removal, installation and tensioning the timing belt.
17. Secure the V-belt tensioner with three Allen screws to a torque of 25 Nm.
18. Install the V-belt, referring to the subsection Removal and installation a ribbed V-belt.
19. Fill the system with coolant, referring to the appropriate subsection.
20. Engine 150 hp: Secure the expansion tank. Insert the air intake pipe in the area of the coolant pump, secure the clamps.
Diesel engine

21. Disconnect the fuel hoses (arrows of the accompanying illustration) at the high-pressure fuel pump. To do this, open the clamps and move them back. Close the fuel hoses, for example, with polyethylene and rubber rings, to prevent dirt from getting into the system.
22. Disconnect connector –2– of the suction pipe temperature/pressure sensor.
23. Remove the air supply pipe –1– by loosening the clamps.
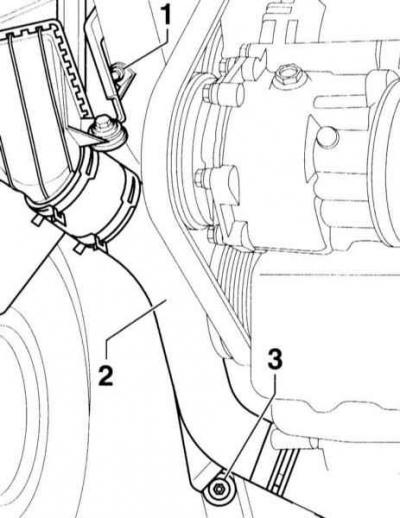
24. Remove the lower air supply pipe –2– by loosening the bolts –1– and –3–.
25. Remove the toothed belt from the camshaft and injection pump pulleys, refer to subsection Setting the piston of the first cylinder to TDC.
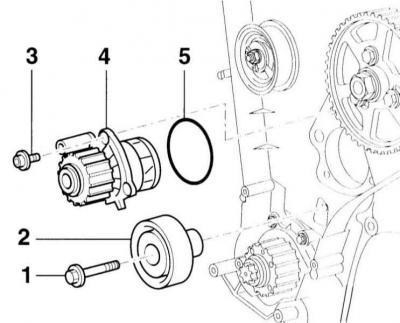
26. Disconnect the deflection roller –2–.
27. Remove the mounting bolt –1– of the deflection roller and press the roller down approximately 30 mm.
28. Loosen the 3 mounting bolts –3– of the coolant pump –4– and carefully remove it. Remove the sealing ring –5–.
Installation
29. Clean the surface under the sealing ring thoroughly.
30. Wet the new O-ring with coolant and install it in place.
31. Install the coolant pump. Pump position: the plug in the housing should be facing down.
32. Secure the pump with three bolts to a torque of 15 Nm.
33. Secure the deflection roller with a new bolt –1–. Tighten the bolt first to 40 Nm, then tighten the bolt further by 90° with a rigid wrench (1/4 turn).
34. Install the timing belt, refer to subsection Setting the piston of the first cylinder to TDC.
35. Tighten the 3 tensioner mounting screws to 25 Nm.
36. Fix the air supply pipe to the holder, secure the clamps.
37. Install the V-belt, refer to subsection Removal and installation the V-belt.
38. Fill the system with fluid, refer to subsection Replacing the coolant.