
Fuel pump for cars produced before 1988
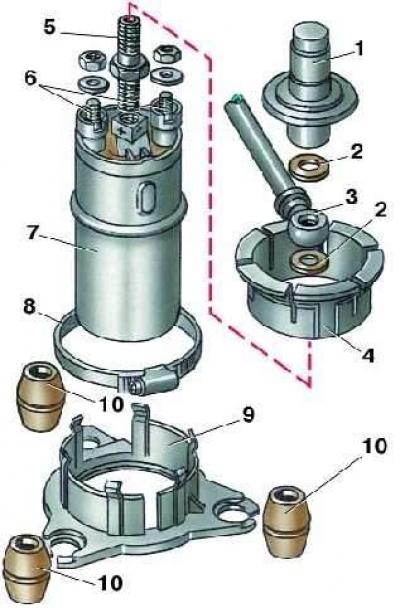
- 1 - silencer;
- 2 - gasket;
- 3 - fuel line;
- 4 - retainer;
- 5 - valve;
- 6 - electrical terminals;
- 7 - Electric fuel pump;
- 8 - clamp;
- 9 - pump holder;
- 10 - rubber cushion
Fuel pump since 1988
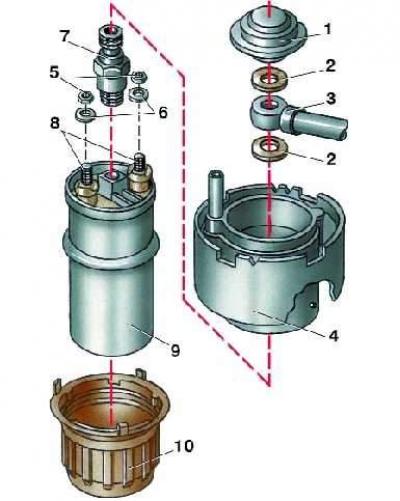
- 1 - silencer;
- 2 - gasket;
- 3 - fuel line;
- 4 - pump holder;
- 5 - nut;
- 6 - washer;
- 7 - valve;
- 8 - electrical terminals;
- 9 - Electric fuel pump;
- 10 - mesh filter
The fuel pump manufactured since 1988 has a positive terminal with an M6 thread, and a negative terminal with an M5 thread. The fuel pump is non-separable, so it is replaced when it fails.
Execution order
1. On models produced before 1988, remove the sensor (see Fig. Fuel tank parts for cars produced before 1988) fuel level is similar to models with carburetor engines (see paragraphs 1–5 of subsection 6.1.9). Remove the pump from the tank through the hole for the fuel level sensor.
2. Install the pump in the reverse order. When installing, make sure that the rubber pads of the pump are positioned on the pins of the bracket located on the bottom of the tank, and that the spring holders snap into place.
3. On models produced since 1988, to remove the pump (see Fig. Fuel tank parts for cars produced after 1988) a special tool (VAG 3214) is required. Turn the pump 15 mm to the left and pull it out of the tank together with the holder, disconnecting the fuel line and electrical wires.
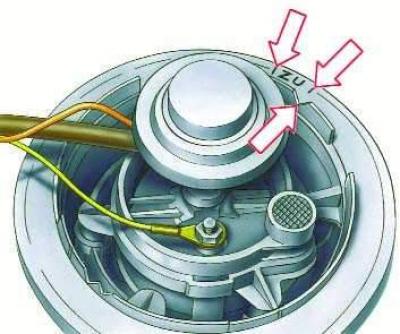
4. Install the pump into the tank so that the mark on the holder (see Fig. Fuel pump since 1988) coincides with the first mark on the fuel tank, as shown in the figure. Fix the pump by turning it with a special device so that the mark on the holder coincides with the second mark on the fuel tank.
(The original version of the article is posted on the website «AudiManual.ru»)