
Table of contents: Removal ↓ Installation ↓
Rear axle
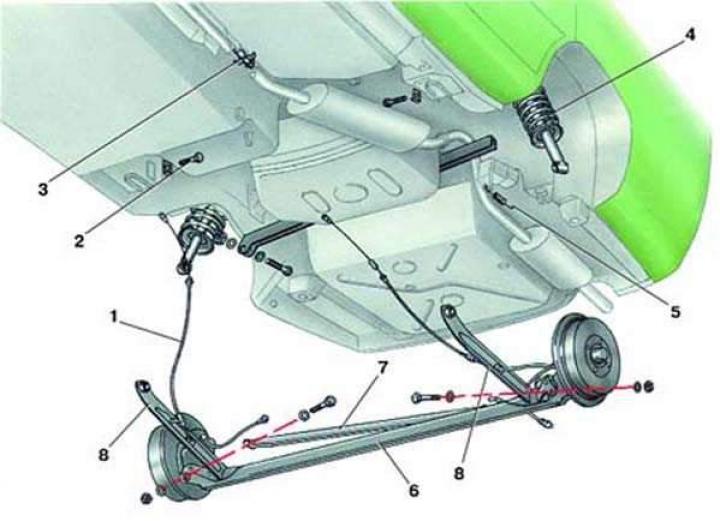
- 1 - parking brake drive cable;
- 2 - bolt;
- 3 - equalizer;
- 4 - telescopic stand;
- 5 - pressure regulator spring;
- 6 - rear axle;
- 7 - transverse jet thrust;
- 8 - longitudinal lever
Body stabilization system

- 1 - telescopic stand;
- 2 - outlet pipeline;
- 3 - tank;
- 4 - tank lid;
- 5 - conductive bolt;
- 6 - receiver;
- 7 - supply hose;
- 8 - hose to valve;
- 9 - pressure regulator;
- 10 - traction;
- 11, 13 - pressure accumulators;
- 12 - control valve
Rear axle parts

- 1 - rubber-metal hinge;
- 2 - pressure regulator spring;
- 3 - rear axle beam;
- 4 - transverse jet thrust;
- 5 - rubber-metal hinge;
- 6 - oil seal;
- 7 - inner hub bearing;
- 8 - brake drum with hub;
- 9 - outer hub bearing;
- 10 - adjusting washer;
- 11 - hub nut;
- 12 - retainer;
- 13 - protective cap;
- 14 - cotter pin;
- 15 - brake shield;
- 16 - trunnion;
- 17 - bushing;
- 18 - bolt
Removal
1. Place the vehicle on an inspection ditch.
2. Place chocks under the front wheels.
3. Loosen the rear wheel mounting bolts.
4. Place a support under the rear axle and lower the vehicle.
5. Loosen the tightening nut of the parking brake drive equalizer and disconnect the drive cables from the equalizer.
6. Disconnect both parking brake cables from the brackets on the body by removing the clamps and loosening the lock nuts.
7. On models with a body stabilization system, unscrew the two nuts securing the pressure accumulator bracket and hang the pressure accumulator on a wire to the body without disconnecting the hoses from it.
8. Disconnect the brake hoses from the pipes by unscrewing the fastening nuts on both sides of the rear axle. Plug the holes in the pipes and disconnect them from the holders on the rear axle.
9. Loosen the mounting nut, remove the bolt and disconnect the transverse reaction rod from the rear axle.
10. Loosen the nut and disconnect the pressure regulator spring from the rear axle bracket.
11. Loosen the nuts and remove the bolts of the lower mounting of the telescopic struts on both sides.
12. Loosen the mounting bolts and disconnect the longitudinal arms from the side members on both sides.
13. Raise the rear of the car and roll the rear axle out from under it.
Installation
1. Install the rear axle.
2. Connect the longitudinal arms to the side members and tighten the mounting bolts by hand, without tightening.
3. Raise the rear axle, insert the lower telescopic strut mounting bolts and tighten the new nuts by hand, without tightening.
4. Connect the transverse reaction rod to the rear axle, insert the shock absorber mounting bolt and tighten the new nuts by hand, without tightening.
5. Connect the pressure regulator spring to the rear axle bracket and tighten the mounting nut to a torque of 25 N·m (2.5 kgf·m).
6. Connect the brake hoses to the brake pipes. Insert the brake pipes into the holders on the rear axle.
7. Connect the parking brake cables.
8. Install the pressure accumulator in place and tighten the nuts securing its bracket.
9. Tighten the wheel mounting bolts on the vehicle while it is on the ground evenly to a torque of 110 N·m (11.0 kgf·m).
10. Tighten the transverse reaction rod mounting nut and new nuts for the lower shock absorber mounting bolts to a torque of 90 N·m (9.0 kgf·m), and the longitudinal rod mounting bolts to a torque of 95 N·m (9.5 kgf·m).
11. Adjust the parking brake (see subsection 10.13.1) and bleed the brake system (see subsection 10.15).
10. Lower bolts securing the clutch housing to the cylinder block.
The original text is available on the website: AUDImanual.ru