
Table of contents: TO No.40 ↓ Replacing the poly V-belt in a… ↓ Replacing the poly V-belt on models… ↓ Replacing the Poly V-Belt on Models… ↓
TO No.40
It has already been mentioned that the alternator V-belt must be replaced on a 4-cylinder engine built before August 91. However, the following also applies to replacing other V-belts.
Replacing the poly V-belt in a 4-cylinder engine
A new V-belt should never be "pulled" onto the pulleys using a screwdriver, because the resulting cuts, so to speak, predetermine the next belt break.
Loosen the old belt for replacement.
Now you can easily remove it from the pulleys, and the new belt can be conveniently put on them.
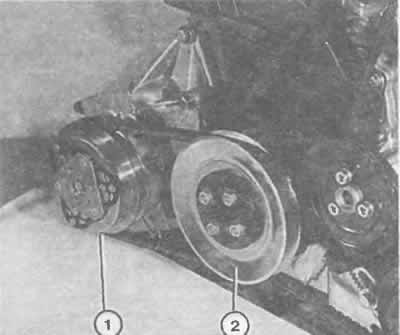
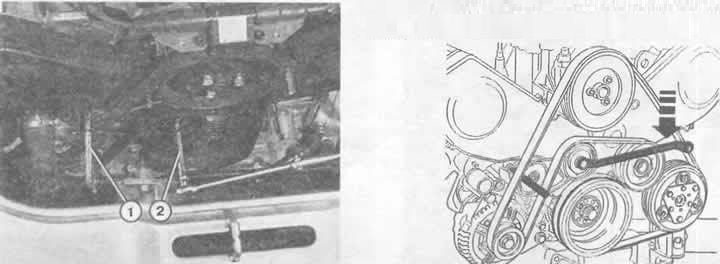
Left: Illustration shows the installation position of the air conditioning compressor (1) of a 4-cylinder engine. The 4-cylinder engine has an additional pulley (2) mounted at the front, which is where the belt tension is adjusted.
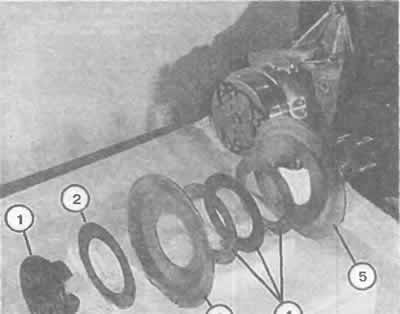
Right: Crankshaft pulley components for 4-cylinder models with air conditioning. Numbers represent:
1 - pulley hub;
2 - extra adjusting washers;
3 - front half of the pulley;
4 - adjusting washers;
5 - rear half of the pulley.
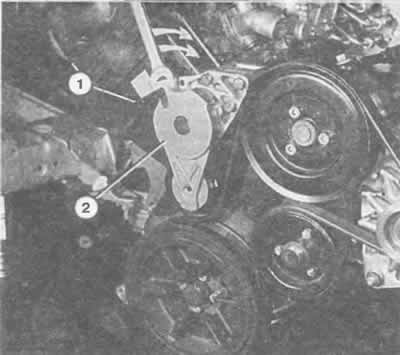
To remove the poly V-belt on a 5-cylinder engine, use a spanner as shown in the figure, installed in the tensioner (2) and turned in the direction of the arrows. To secure the tensioner when the belt is loose, insert the punch (1) into the hole provided for it, as well as into the hole in the panel below.
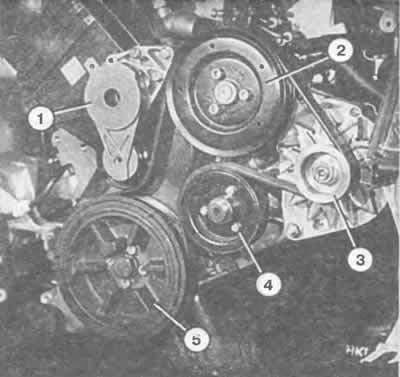
This shows the position of the poly V-belt in a car with a five-cylinder engine (without air conditioning). Parts and pulleys:
1 - tensioning device;
2 — power steering pump pulley;
3 - generator;
4 - fan pulley;
5 — crankshaft pulley.
Please note: if necessary, you will have to remove other V-belts or you will have to disconnect the front engine mount.
Finally, tighten the belts, drive about a hundred kilometers and then tighten them further (v-belt tension, see earlier in this chapter).
The same section describes how to tension the poly V-belt for the generator (since 9/91).
You can find out which V-belt should be installed where in the Audi-100 from the table on the previous page.
Replacing the poly V-belt on models with a 5-cylinder engine
Remove the protective cover.
Disconnect the air duct from the air filter.
Remove the fan with a viscous coupling, for which you will need a special tool (see chapter "Cooling system").
Place the fan in the rings (frame) near the radiator.
Unscrew the radiator frame and remove it upwards together with the fan.
Place the wrench on the tensioner and move it to the right.
Insert the pin (for example, a suitable bolt, etc.) into the hole provided for this purpose and thereby secure the tensioning device.
Mark the direction of rotation of the belt with chalk or a felt-tip pen.
Remove the poly V-belt.
When installing with the poly V-belt applied, lift the tensioner with a key and remove the pin.
Observe the prescribed fan tightening torque (see chapter "Cooling system").
Left: The tension roller for the poly V-belt in a 6-cylinder engine is secured with a star bolt, onto which a star head (2) with a suitable open-end wrench is placed for turning. Pin (1; in the illustration this role is performed by a punch) is inserted into the hole provided for this purpose on the tensioner, due to which the tensioner is fixed in this position.
Right: In the picture, the tension roller is fixed with a hex punch, which allows it to be turned with a spanner.

So the poly V-belt is put on different pulleys in models with a 6-cylinder engine without air conditioning.
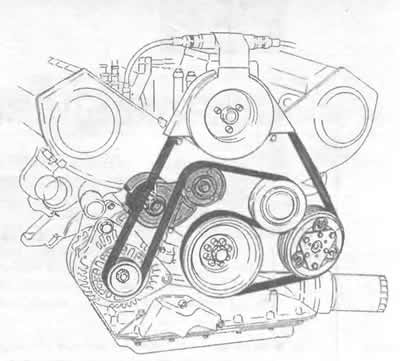
The figure shows the routing of the poly-pin belt on a model with a 6-cylinder engine equipped with air conditioning.
Replacing the Poly V-Belt on Models with a 6-Cylinder Engine
Remove the poly V-belt cover.
In the older version: Place a 15mm open-end wrench on the tensioner hex.
In newer versions: Remove the tension roller cover and install a TORX key or a 10 mm Allen key on the central screw inside the roller.
For all: Move the tensioner to the right.
Secure the tensioner by inserting the pin into the holes provided for this purpose.
Mark the direction of rotation of the belt with chalk or a felt-tip pen.
Remove the poly V-belt.
When installing, place the poly V-belt first on the drive and guide rollers; lastly, on the tension roller.
Raise the tensioner again with the key and remove the pin.
Install the casing.
[The original article is located on the online resource: AUDIMANUAL.ru]