



Table of contents: Starting device ↓ Idle and transition system ↓ Main dosing system ↓ Accelerator pump ↓
Starting device
When starting a cold engine, under the influence of the thermostatic bimetallic spring of the automatic starting device, the air damper 1 (see diagram) blocks the air supply through the carburetor duct. The throttle valve 3 of the 1st chamber, under the influence of the pneumatic drive 2, opens slightly through the rod system, providing a significant vacuum in the channel 4 of the main metering system of the 1st chamber and enrichment of the fuel-air mixture, which facilitates starting a cold engine.
After starting the engine, the vacuum that occurs in the engine intake manifold acts on the pneumatic actuator 2, which moves the throttle valve of the 1st chamber to the position corresponding to idle speed. The lever 5 rests against the cam 6, driven by the automatic starting device, which slightly opens the throttle valve of the 1st chamber by the amount necessary to increase the crankshaft speed of the cold engine at idle speed.
When the engine warms up, the vacuum acts on the pneumatic drive, which opens the air damper.
The system of rods and cams 7, which are driven by the throttle valve of the 1st chamber, opens the air valve 1, which causes the depletion of the combustible mixture and ensures the smooth operation of the engine.
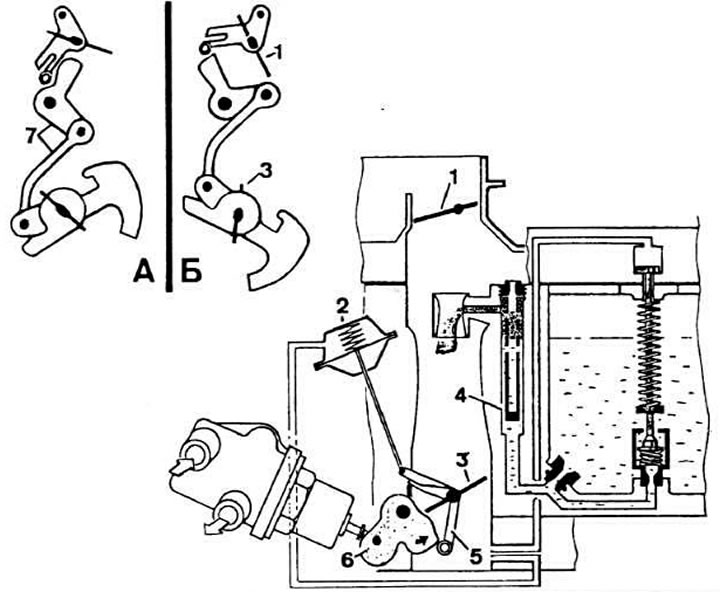
Keihin carburetor operation diagram when starting a cold engine: 1 - air damper; 2 - position of the pneumatic drive of the throttle valve of the 1st chamber when starting a cold engine; 3 - throttle valve 1st chamber; 4 - channel of the main dosing system of the 1st chamber; 5 - 1st chamber throttle valve opening lever; 6 - 1st chamber throttle valve opening cam; 7 - a system of rods, levers and cams for controlling the air and throttle valves; A - position of the levers in cold engine start mode; B - slightly opening the air damper in idle mode of a cold engine
Idle and transition system
From the float chamber, fuel is taken through the main fuel jet 8 (see diagram) of the 1st chamber, passes through the idle fuel jet 9 and forms an emulsion, mixing with air entering through the idle air jet 10. The emulsion is fed to the outlet of the idle system under the throttle valve through an opening adjusted by the mixture quality (composition) screw 11.
When the throttle valve 3 is smoothly opened, the combustible mixture enters the channels of the transition system and through the gaps of the transition system enters the 1st chamber, which leads to a gradual increase in the rotation frequency of the engine crankshaft. When the throttle valve of the 2nd chamber is opened, the transition system of the 2nd chamber operates in a similar manner.
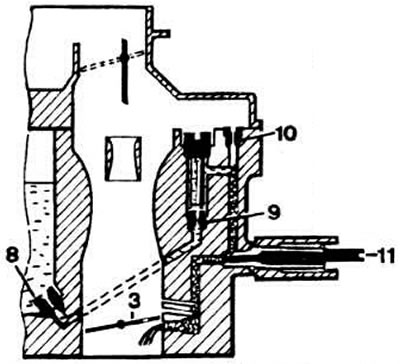
Idle system diagram: 3 - throttle valve 1st chamber; 8 - main fuel jet of the 1st chamber; 9 - idle fuel jet; 10 - idle air jet; 11 - mixture quality (composition) adjustment screw
Main dosing system
Fuel enters the float chamber 12 (see diagram), the fuel level in which is regulated by a needle valve and a float.
From the float chamber, the fuel is sucked through the main fuel jet 8 of the 1st chamber into the emulsion tube 13, where it is mixed with air entering through the air jet 14. Then the fuel-air mixture fills the mixing chamber formed by the small diffuser and the large diffuser 15.
The main dosing system of the 1st chamber has a channel of the economizer of power modes. When the throttle valve of the 1st chamber is slightly opened, a significant vacuum is created under it, which is supplied to the piston 17 of the economizer through channel 16. Under the action of the piston, the channel of the fuel jet of the economizer of power modes 18 is closed. After this, the fuel enters the 1st chamber only through the main fuel jet.
When the throttle valve 3 of the 1st chamber opens 3/4, the vacuum in the channel 16 begins to decrease, and when the throttle valve 3 is fully opened, it becomes zero. The piston 17 goes down. The piston spring opens the shut-off valve of the fuel jet 18 of the economizer. Through the opened jet, a larger amount of fuel enters the emulsion tube, enriching the fuel-air mixture.
The throttle valve 19 of the 2nd chamber can be opened under the action of two systems. The cam on the axis of the throttle valve of the 1st chamber blocks the opening of the throttle valve of the 2nd chamber until the valve of the 1st chamber opens at an angle of 53°. The throttle valve of the 2nd chamber is unlocked in this position, which allows the throttle valve of the 1st chamber to be fully opened. Another system, which directly ensures the opening of the throttle valve of the 2nd chamber, is formed due to the vacuum, which acts on the thermopneumatic valve 21 and on the pneumatic drive 22 via channel 20, actuating the rods of the control lever of the throttle valve of the 2nd chamber. While the engine is cold, the teripneumatic valve 21 is slightly open and the vacuum does not enter the pneumatic drive 22, blocking the opening of the throttle valve of the 2nd chamber. This prevents the fuel-air mixture from becoming too lean.
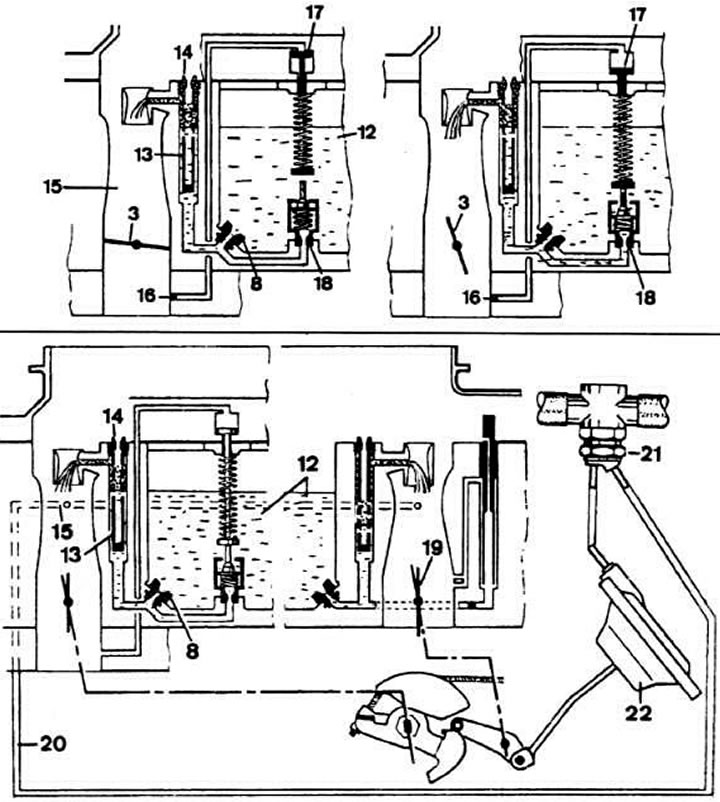
Schematic diagram of the main dosing systems: 3 - throttle valve 1st chamber; in - main fuel jet of the 1st chamber; 12 - float chamber; 13 - emulsion tube; 14 - main air jet of the 1st chamber; 15 - diffuser; 16 - vacuum supply channel; 17 - piston of power mode economizer; 18 - fuel jet of the power mode economizer; 19 - 2nd chamber throttle valve; 20 - vacuum channel for controlling the throttle valve of the 2nd chamber; 21 - thermal pneumatic valve; 22 - pneumatic drive of the throttle valve of the 2nd chamber
Accelerator pump
When the throttle valve of the 1st chamber is opened, the lever 23 is set in motion, under the action of which the accelerator pump 24 begins to operate. The pump forces fuel, filling the float chamber, into the mixture formation zone through the check valve 25 and through the sprayer 26.
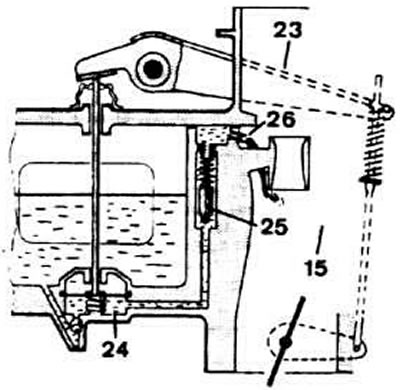
Accelerator pump diagram: 1 - diffuser; 23 - Accelerator pump control lever; 24 - accelerator pump; 25 - check valve; 26 - Sprayer
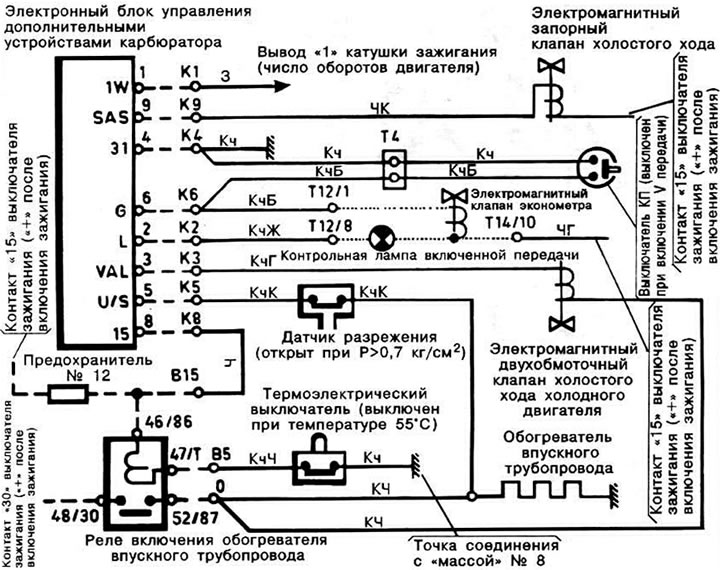
Connection diagram of additional devices of the Keihin carburetor. Wire color designation: B - white; G - blue; Y - yellow; 3 - green; K - red; Kch - brown; H - black. The first letter indicates the color of the wire itself, the second-the color of the strip on the wire.