
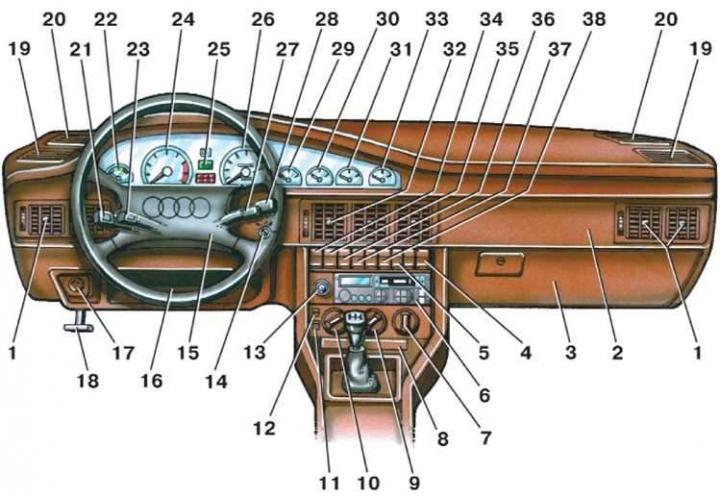
1 – side air blower. The vertical air flow direction is adjusted by turning the air blower grille, horizontally – by the handle on the air blower grille. The position of the air blower flap is adjusted by the disk near the air blower grille;
2 – instrument panel;
3 – storage box for small items;
4 – Front passenger seat and rear seat heating control knob. Turning the knob turns on the heating and regulates the temperature of the seats. The rear seat heating turns on when passengers are sitting on it;
5 – switch for electric headlight corrector. The corrector handle has four positions: 0 – there is a driver and a front passenger in the car; 1 – there are five people in the car without cargo in the trunk; 2 – full load; 3 – there is a driver in the car, the trunk is fully loaded;
6 – radio receiver;
7 – the control handle for the distribution flaps has three positions.
When the handle is in the position corresponding to the symbol
When the handle is in the position corresponding to the symbol
When the handle is in the position corresponding to the symbol
8 – ashtray;
9 – the handle for adjusting the temperature of the air entering the cabin. When turning the handle clockwise, the air temperature increases, counterclockwise – decreases;
10 – heater fan electric motor switch. For cars without air conditioning, the switch has five positions: in position 0 the fan is off, in position the fan is on, in position IIII the maximum fan speed is on; positions I, II and III are intermediate;
11 – air circulation mode switch (only for cars with air conditioning). When you press the switch button, the flap closes the air supply from outside. In this case, air from the passenger compartment enters the air conditioner. When you press the button again, the flap opens and air from outside enters the air conditioner;
12 – air conditioner switch, turns on the air conditioner when you press the button. At the same time, the green light in the button lights up. When you press the button again, the air conditioner turns off, the light goes out;
13 – cigarette lighter, turns on by pressing the handle all the way. The cigarette lighter coil heats up in 10–20 sec, and the cigarette lighter returns to its original position with a click. The cigarette lighter can be turned on again after about 20 sec;
14 – ignition switch (lock), has three key positions: I – all consumers are switched off, the key is removed. When the key is removed, the steering is locked by an anti-theft device; II – ignition and all electrical consumers are on (lighting, radio equipment, windshield wipers, etc.). The key cannot be removed. The steering is not locked; III – ignition and starter are on. The key cannot be removed. The steering is not locked. This key position is not fixed: if the key is released, it returns to position II under the action of the return spring;
15 – horn switch, located under the soft steering wheel pad. Pressing the pad turns on the horn;
16 – storage shelf;
17 – cold engine crankshaft speed control handle (cars with diesel engines). When you turn the knob clockwise, the rotation speed increases, counterclockwise - decreases. Changing the rotation speed reduces the vibration of an unheated engine;
18 – hood lock drive handle. To open the hood, pull the handle towards you;
19 – decorative grille for side window blower nozzles;
20 – decorative grilles of the instrument panel. Loudspeakers are installed under them;
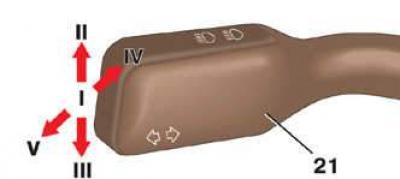
21 – the lever of the turn signal and headlight switch, can be set to the following positions: I – all consumers are off (when position III of lever 23 is on, the low beam headlights are on); II – right turn signals are on; III – left turn signals are on; IV – high beam headlights are on (at position III of lever 23); V – high beam headlights are on, non-fixed position, used to give a light signal with the headlights;
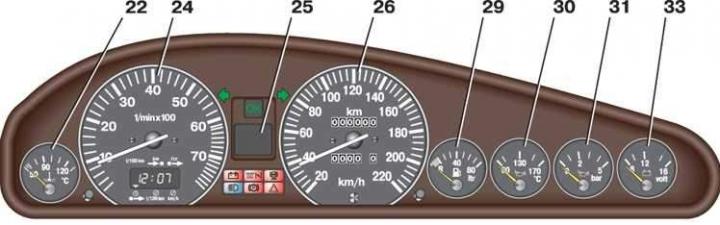
22 – coolant temperature indicator, works when the ignition is on. The engine warm-up zone is marked at the beginning of the instrument scale. The zone between 80 and 100°C is the normal engine thermal mode zone. The zone above 100°C is the engine overheating zone. In case of emergency engine overheating, a warning sound signal is activated;
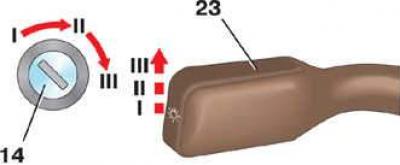
23 – central light switch lever, can be set to the following positions: I – all consumers are off; II – the parking lights are on. When the lever 21 is in position II, the lights on the right side of the car are on, and when in position III, the lights on the left side are on; III – high or low beam headlights are on (depending on the position of the lever 21);
24 – the tachometer shows the engine crankshaft speed. The scale of the device has divisions from 0 to 80. The division value is 2. To find out the crankshaft speed, the tachometer readings are multiplied by 100. Between divisions 63 and 80 there is a red zone corresponding to the dangerous engine operating mode in this range of crankshaft speeds. Depending on the vehicle configuration, an analog clock may be installed instead of a tachometer. An electronic clock is installed at the bottom of the tachometer dial. The hours are adjusted using the instrument cluster backlight brightness control knob, located in the instrument cluster between the tachometer and the coolant temperature gauge. To adjust the hours, pull the knob towards you and turn it to the left; to adjust the minutes, pull the knob towards you and turn it to the right;
25 – trip computer display;
26 – speedometer. The speedometer scale has divisions from 0 to 260 km/h. The division value is 5 km/h. The total mileage counter and the daily mileage counter are built into the speedometer. The counters show the distance traveled by the car in hundreds of meters. The daily mileage counter is set to zero by pressing the button at the bottom of the speedometer when the car is stationary;
27 – Hazard warning light switch lever, turns on the alarm when moved upwards. At the same time, the control lamp in the instrument cluster lights up with a red flashing light;
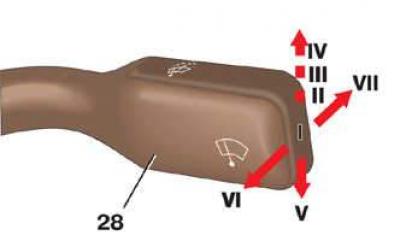
28 – windshield wiper and washer switch lever, can be set to the following positions: I – all consumers are off; II – intermittent windshield wiper mode is enabled; III – low speed windshield wiper is on; IV – maximum windshield wiper speed is enabled; V – single wiper stroke mode is on. This position is not fixed. When released, the lever returns to position I; VI – (towards you) the washer and windshield wiper are on. This position of the lever is not fixed. When released, the lever returns to its original position, the washer turns off, and the windshield wiper continues to work for about 4 s; VII – (away from you) "rear door" glass washer and wiper on (on station wagons). The washer and wiper operate in intermittent mode. When you press the lever again (away from you), the washer and wiper turn off;
29 – fuel level indicator, works when the ignition is on. The scale has a reserve zone (R), corresponding to the reserve fuel level in the tank (about 12 l);
30 – oil temperature indicator in the engine lubrication system;
31 – oil pressure indicator in the engine lubrication system;
32 – central air blower. The vertical air flow direction is adjusted by turning the air blower grille, horizontally – by the handle on the air blower grille;
33 – voltmeter, shows the voltage in the vehicle's on-board network;
34 – Driver's seat heating control knob. Turning the knob turns on the heating and regulates the seat temperature;
35 – Rear window heating switch. Heating is switched on when the ignition is on, and the lamp in the switch lights up. For cars with electrically heated outside rear-view mirrors, this switch also switches on the mirror heating simultaneously with the rear window heating;
36 – Fog light switch. When the fog lights are turned on, the lamp in the switch lights up. The headlights turn on when the outside lighting is on;
37 – Rear fog light switch. When the lights are turned on, the lamp in the switch lights up. The fog lights are turned on when the main headlights are on;
38 – ABS switch, turns off the anti-lock system when you press the switch button. The lamp in the switch lights up. When you press the switch button again, the system turns on.