
Table of contents: Speedometer and tachometer ↓ Fuel gauge and fuel reserve K/L ↓ Coolant temperature indicator and… ↓ Digital clock and its setting buttons ↓ Odometers and reset button,… ↓ "CHECK" button ↓ Maintenance indicator and its button ↓ Control lamps and indicators ↓
The arrangement of control and measuring instruments is shown in Figure 15.1.
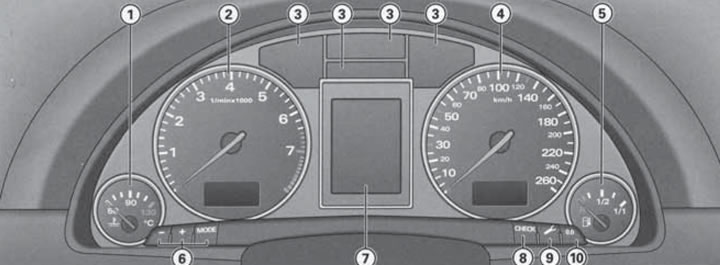
15.1. Location of control and measuring instruments.1. Coolant temperature gauge; 2. Tachometer with digital clock; 3. Control lamps and indicators; 4. Speedometer with mileage counters and; malfunction indicator; 5. Fuel gauge; 6. Buttons "-" and "MODE" for setting time and date; 7. Central display (see Section 16); 8. "CHECK" button; 9. Maintenance indicator button; 10. Button "0.0" for resetting the resettable mileage counter.
The "+" buttons and digital clock settings are used to manually adjust the instrument lighting. A photoresistor installed in the instrument cluster regulates the instrument lighting (arrows and scales), lighting of the central console and displays. When the ignition is on, the instrument cluster needles are illuminated, and when the side lights are on, the scales are additionally illuminated. If the photoresistor detects a decrease in background brightness, the machine operators reduce the brightness of the instrument lighting, and when the interior lighting is low, the instrument lighting is turned off, reminding the driver of the need to turn on the low beam headlights.
Speedometer and tachometer
The speedometer shows the speed of the car in km/h.
The tachometer shows the engine crankshaft speed in thousands of rpm and is designed to monitor engine speed. Try not to bring the speed to the beginning of the red zone of the scale, and in no case allow the needle to move into the red zone. At less than 1500 rpm, you should switch to a lower gear.
Note: To protect the engine, when the needle moves into the red zone, the fuel supply is cut off, which is accompanied by a sharp loss of power. Early switching to a higher gear allows you to save fuel and reduce the noise of the power unit. During the break-in period, avoid excessively high crankshaft speed.
Fuel gauge and fuel reserve K/L
The fuel gauge serves for visual monitoring of the fuel remaining in the tank. The error of the fuel gauge readings is minimal when the vehicle is in a strictly horizontal position, and increases when the vehicle is moving on winding or hilly roads. The gauge works when the ignition is on. When the fuel supply drops to the reserve volume (approximately 8-10 l) the corresponding indicator lamp lights up on the central display. In this case, you should refuel as soon as possible to prevent damage to the catalytic converter due to misfires when the fuel is completely used up.
Coolant temperature indicator and engine overheating K/L
The coolant temperature gauge operates when the ignition is on and serves to visually monitor the coolant temperature and prevent it from rising above the critical level. When the needle is in the left area of the scale, avoid running the engine at high speeds and under heavy load. At the engine operating temperature, the needle is in the central area of the scale. When the engine is running under significant load, as well as at high outside air temperatures, the needle may enter the right area of the scale. This should not cause concern until the K/L engine overheating light comes on on the central display.
The reason for the activation of the engine overheating K/L may be overheating or a drop in the coolant level. The appearance of this K/L is accompanied by the message "Motor abstallen und Kuhlmittel prufen" (turn off the engine and check the coolant level). When this K/L is turned on, you should stop the car at the first opportunity, turn off the engine, and check the coolant level (see Section 4 Chapter 1). Add coolant if necessary. Continue driving only after the K/L goes out. If the coolant level is normal, the cause of overheating may be a fan failure. If the charging system K/L lights up together with the overheating K/L, the cause of the malfunction may be a break in the auxiliary drive belt. To quickly reduce the coolant temperature with the engine running, turn off all powerful electrical consumers, open the windows and turn on the climate control system to maximum temperature and maximum fan speed. This way, the engine heat will be removed through the climate control system radiator.
Digital clock and its setting buttons
The time and date are displayed on the display at the bottom of the tachometer when the ignition is on. To display the time and date for a few seconds when the ignition is off, press the "CHECK" button (8 in illustration 15.1).
To set the time or date, press the "MODE" button the required number of times until the corresponding display starts flashing (hours, minutes or calendar date), and then change this value using the "+" and "-" buttons.
Note: The transition to setting the month and year is performed automatically after setting the calendar date.
To hide/restore the date display, press the "MODE" button the required number of times until the month and year display start flashing simultaneously, and then press the "-" or "+" key, respectively.
If the car is equipped with a clock with the ability to set the time via radio signal, and a signal for setting the time is received from the radio station, then the corresponding pictogram appears in the upper left corner of the clock. However, manual setting of the time and date is not possible. If the corresponding radio signal is not received for three days, the pictogram disappears and the clock can be set manually.
Odometers and reset button, malfunction indicator
The mileage counters are displayed on the display at the bottom of the speedometer when the ignition is on. To display the time and date for a few seconds when the ignition is off, press the "CHECK" button (8 in illustration 15.1).
The display shows two values: the odometer reading (km) at the bottom, and the resettable trip meter reading at the top (in kilometers, swelling up to 0.1 km). The odometer is designed to indicate the total mileage of the vehicle, and the resettable mileage counter allows you to monitor the vehicle's mileage, starting from the moment its readings are reset (for example, for the current trip). To reset the readings of the resettable counter, press the "0.0" button (10 in illustration 15.1).
The reset button is also used to reset the service indicator (see description of maintenance indication below).
If the automatic system detects a malfunction in the instrument cluster, the "dEF" indicator appears in place of the resettable mileage counter.
"CHECK" button
The CHECK button performs the following functions:
- when the ignition is off, it allows you to display the time/date and mileage counters for a few seconds (see relevant subsections above);
- when the ignition is on, it allows you to turn on the diagnostic system (see Section 16) both with the engine off and running, at speeds up to 5 km/h;
- when the 1st level warning symbol flashes on the central display or when a lamp malfunction indication appears, allows you to display an explanatory instruction on the central display for 5 seconds;
- while the vehicle is moving, it allows you to program the threshold value of warning level No.1 of the overspeed alarm (the threshold value of warning level No.2 of the overspeed alarm can only be programmed when the ignition is off) - see the subsection "Overspeed alarm" below).
Maintenance indicator and its button
Short press on the button (9 in illustration 15.1) when the ignition is switched on, the central display shows the mileage and the approximate number of days until the upcoming maintenance: "SERVICE IN XXXX KM YYY TAGEN" ("Service in XXX km or YYY days"). The display can be displayed both when the engine is switched off and when the engine is running (at a speed of no more than 5 km/h). The mileage and time until maintenance are updated each time the ignition is turned on after the first 500 km since the indicator was reset. During these 500 km, dashes are displayed instead of numbers. When the remaining mileage is 2000 km or less, dashes are displayed instead of the remaining time, and the indication appears each time the ignition is turned on. If the maintenance period has come or passed the next time the ignition is turned on, the message "SERVICE!" is displayed. The indication appears for about 5 seconds.
After performing maintenance, you should reset the remaining mileage and time until the next maintenance. At the service station, this is done using diagnostic equipment. You can also reset the indicator readings yourself, without a diagnostic device. To do this, turn off the ignition, press the maintenance indicator button and, without releasing it, turn on the ignition - the message "SERVICE IN ---- KM" or "SERVICE!" appears on the central display. Then press the reset button (Yuna illustrations 15.1) and hold it until the message appears on the display "SERVICE IN ---- KM --- TAGEN" or "SERVICE!" If the reset button is not pressed within 5 seconds, the display switches to the normal indication mode.
Note: After disconnecting the battery, the maintenance indicator readings are not reset. If there is a 1st degree fault, it is not possible to call up the maintenance indicator.
Control lamps and indicators
The indicator lamps (K/L) and indicators are displayed in the upper part of the instrument cluster (see illustration 15.2), and also in the central display (7 in illustration 15.1) instrument cluster. The meanings of the K/L and the indicators of the upper area of the instrument cluster are described in the captions to Illustration 15.2, and the description of the K/L and the indicators of the central display is given in Section 16. The K/L and indicators marked with "*" should light up for a few seconds when the ignition is turned on, after which they should go out. If these K/L do not light up, do not go out, or turn on at any other time, then the corresponding system is faulty. The K/L and indicators that have some special features in their operation are described below.
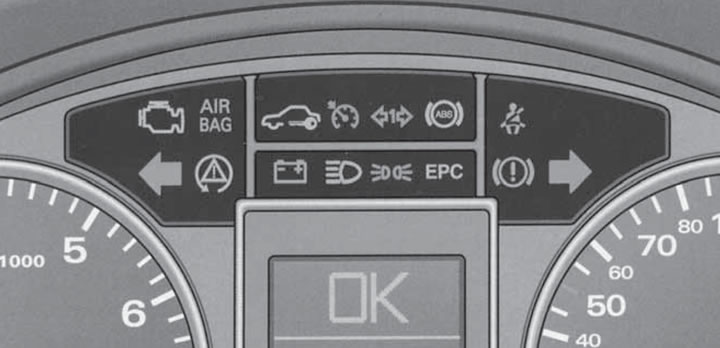
15.2. Indicator lamps in the upper part of the instrument cluster.
ABS system K/L indicates a malfunction of this system (including electronic differential lock) and turns on simultaneously with the ESP K/L. At the same time, the main brake system continues to operate normally. If the ABS K/L lights up together with the brake system K/L (with the parking brake released), then there is a failure not only of the ABS control function, but also a malfunction of the entire brake system. First of all, check the brake fluid level. In case of a functional failure of the brake system, the K/L brake system light is on in the central display. Detailed information about the ABS system is provided in Section 20.
When the ESP system LED is switched on under normal conditions, it indicates a malfunction of the system. In addition, this LED flashes when the ESP is activated, lights up when the ESP system is switched off and for a certain distance after the battery is disconnected. The ESP LED also switches on together with the ABS LED. When the LED is switched on immediately after starting the engine, the ESP may be switched off protectively - switch on the ESP manually so that the LED goes out. Detailed information about the ESP system is provided in Section 20.
The charging system K/L indicates a faulty generator (for example, the alternator drive belt may be torn) or electrical wiring. If you need to drive with the charging K/L on, turn off all electrical consumers that you can do without to slow down the discharge of the battery. If the charging system K/L lights up at the same time as the engine overheating K/L, then the water pump is faulty.
The preheating system K/L indicates that this system is operating before starting the engine. When the engine is warm and the outside air temperature is more than 8°C, the K/L should come on for one second to check that the system is functioning properly. Wait until the K/L goes out before starting the engine. If the K/L comes on while driving, there is a fault in the engine management system.
The brake system K/L flashes when the brake fluid level is low, the ABS is faulty or the parking brake is engaged. When driving with the parking brake engaged for more than 3 seconds at a speed of more than 5 km/h, a warning signal also sounds and a warning message is displayed on the central display.
The original article is posted on the resource audimanual