
General information
Depending on the configuration, a climate control system without a cooling function may be installed (see illustration 17.1) or with this function. If there is a cooling function, between the (F) and (G) keys there is an "ECON" key for turning off the refrigeration unit compressor, instead of the "TEMP" keys there are "AUTO" keys for turning on the automatic mode, and instead of the "OFF" key there may be an automatic circulation mode key.
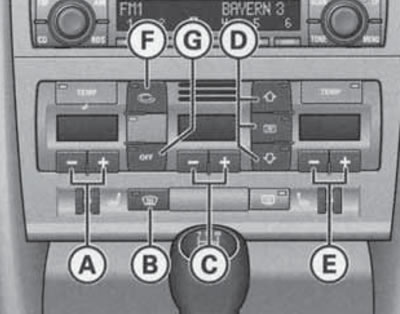
17.1. Climate control panel A - Temperature control buttons on the driver's side; B - Window heating/blowing switch; C - Fan speed control keys; D - Air distribution adjustment keys; E - Temperature control buttons on the front passenger side; F - Circulation mode switch; G - Climate control switch
The climate control system allows you to separately regulate the air temperature for the left and right parts of the cabin. All trim levels have an air circulation mode, as well as automatic and manual control modes. If the cooling function is available, there is also an automatic air circulation control mode. An additional heater can be installed as additional equipment (see the relevant subsection below). Diesel models can be equipped with an additional heater designed to quickly warm up the interior. This heater turns on and off automatically (depending on coolant temperature) when the outside air temperature is less than 5°C and the engine is running. If additional heating is required, the heater can be switched off using the "ECON" button.
Air is drawn in through the windshield fairing grille and enters the cabin, passing through the cabin filter and, if the cooling function is on, through the evaporator (air cooling and dehumidification), and if the heater is on, then through its radiator (air heating). Keep the windshield grille clear of snow, leaves, and other debris, and replace the cabin filter periodically to ensure maximum ventilation efficiency from the climate control system. Air exits the cabin through the exhaust vents under the rear window.
Note: The cabin filter prevents potentially harmful airborne particles from entering the passenger compartment (for example, pollen, road dust, industrial emissions). The cabin filter, made of activated carbon, additionally removes unpleasant odors and harmful gases from the air.
To create a certain direction of air flows in the cabin, deflectors are used: two side and two central (3 and 4 in Illustration 17.2), as well as non-adjustable windshield/front window deflector deflectors (1 and 2) and footwell air deflectors (5). The rear footwell air deflectors are located under the front seats. The central and side deflectors can be individually smoothly opened and closed using vertical controls located on the side of each deflector, and also rotated using horizontal controls located in the center of the deflector grille. The side deflectors can be used to deflector the side windows by rotating the deflectors upwards and towards the glass.
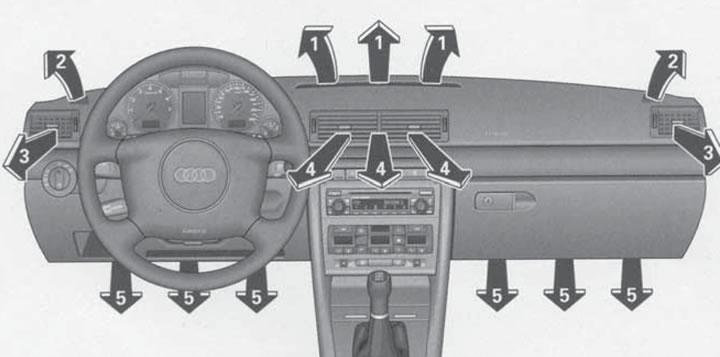
17.2. Dashboard deflectors
For maximum heating of the cabin, direct warm air to foot level, and for maximum cooling, set the cold air supply to chest level (to avoid catching a cold, direct the flow of cold air not directly onto your chest, but slightly to the side); in both cases, it is recommended to use the maximum air supply intensity.
Rear window defroster switch (19 in illustration 14.1) and the windshield heating switch (In illustration 17.1) are described in Section 14. Some models have a control in the main storage compartment that allows you to open or close the air supply to the storage compartment, - see Section 14. The temperature in the glove compartment depends on the climate control system settings.
On models with the cooling function, the current climate control settings are automatically stored in the memory of the ignition key used. When the ignition is turned on with this key, the settings stored in its memory are automatically restored if they were changed using a different key.
When the vehicle is equipped with a sunroof with a cover with a built-in solar battery, with sufficient solar radiation after the ignition is turned off, the air conditioning fan continues to operate on solar energy in fresh air supply mode with the sunroof closed/raised (even if the circulation mode was on when the ignition was turned off).
Features of control of a conventional climate control system
The climate control system is controlled by keys and controls located on the control panel (see illustration 17.1). To indicate the settings and selected functions, there are indicators in the corresponding keys, as well as displays. To switch between°F and°C on models with the cooling function, press the recirculation mode switch and, while holding it, press the "+" button on the driver's side. In the upper central part of the control panel there is a grille behind which the air temperature sensor in the cabin is located. Do not cover this grille to ensure correct operation of the automatics.
Turning the climate system on/off (i.e. turning on/off its fan) is performed automatically when the ignition is switched on/off. On models with a cold weather cooling function, the air conditioning fan is switched on only after the coolant has warmed up to a certain temperature, unless the windshield heating mode is switched on. If necessary, the air conditioning system can be switched off using the "OFF" button. To switch on the air conditioning system that has been switched off in this way, press the "OFF" button again, or press any of the fan control or temperature control buttons (on models with a cooling function, switching on also occurs when pressing the "AUTO" button or the air flow direction control button).
On models with a cooling function, for optimal operation of the climate control system, it is recommended to set the temperature to 22°C (or another temperature suitable for better well-being, except for "LO" or "HI") and press the "AUTO" button. The climate control system will automatically maintain the set temperature, adjusting the intensity and direction of air supply, turning on/off the refrigeration unit and the circulation mode. The system determines the intensity of solar radiation, the air temperature outside and the air temperature in the cabin, so there is no need to make manual changes. If it is still necessary to change the parameters during operation in automatic mode, these parameters will no longer be adjusted automatically. To return to fully automatic mode, press the "AUTO" button.
Use the keys to adjust the temperature (A and E in Illustration 17.1). The set temperature is displayed on the display above the corresponding keys: on models without a cooling function - as a segment indication, and on models with a cooling function - as a numerical value from 18°C to 29°C. When setting the maximum/minimum temperature, "MAX"/"MIN" or "HI"/"LO" lights up on the display, respectively, for models without or with a cooling function. When "HI"/"LO" is displayed, the climate control system operates in the maximum heating/cooling capacity mode (the set temperature is not maintained). On models without a cooling function, pressing and holding the "+" and driver or front passenger side buttons simultaneously switches the temperature setting from the driver side to the passenger side, and vice versa. On models with a cooling function, hold down the "AUTO" button to perform this procedure. To return to the previously set temperature, reset the temperature on the corresponding side.
Air entering the cabin via a regulator (1 in illustration 17.2a) can be directed at the glass (the upper D key in illustration 128), to the feet (the lower D key in illustration 128) or in the chest area (middle key D in illustration 128). Combinations of the indicated directions are also available.
To manually adjust the air flow intensity, use the keys (From the illustration 17.1). The set value is displayed on the display above the specified keys in the form of a segment indicator.
To turn the windshield heating on/off, press the button (In illustration 17.1). When the windshield is heated, the temperature is regulated automatically, the circulation mode is switched off, and maximum air supply is provided through the windshield deflectors.
If necessary, you can shut off the supply of outside air to the passenger compartment using the button (F in illustration 17.1). In this case, the air in the cabin circulates in a closed circle, and the indicator lights up in the specified key. The circulation mode should be used when driving on dusty roads or in heavy traffic to prevent dust, unpleasant odors and exhaust gases from entering the cabin. In addition, the circulation mode allows you to significantly speed up the temperature reduction in the cabin when using the air cooling function.
Warning: Do not turn on the air circulation mode for a long time, because this will make the air in the car interior stale and condensation will appear on the windows. To turn off the circulation mode, press the specified button again, or turn on the windshield heating (see above), or turn on the "AUTO" mode (on models with refrigeration unit). On models with a cooling function, an automatic circulation mode button can be installed instead of the "OFF" button. When this function is turned on, the circulation is turned on and off automatically by a signal from the outside air quality sensor. The maximum duration of the automatically turned on circulation mode is 12 minutes, and with the "ECON" mode turned on and the outside air temperature below -8°C - 12 seconds.
The air cooling function only works when the engine is running and the outside air temperature is above a certain value. When the air cooling function is on, the air entering the passenger compartment is cooled and dehumidified, and then, depending on the temperature setting, heated again. This speeds up the removal of condensation from the glass when the air humidity is high. To get the maximum efficiency from the air cooling function, close the windows and the sunroof when using it. To switch off the refrigeration unit, press the "ECON" button (on diesel models, the additional heater is switched off at the same time). The refrigeration unit also switches off automatically when you start driving with the accelerator pedal fully depressed (to realize the full power of the engine), and also when the coolant temperature is too high (to ensure normal engine cooling under increased load).
Note: The moisture taken from the air during its cooling condenses and drains out through the drain hose, so it is normal for a puddle to form under the car after it is parked with the air cooling function on. The operating compressor of the air conditioning system consumes the engine's energy, which leads to an increase in fuel consumption - turn off the air cooling function if it is not necessary. If you suspect a malfunction of the refrigeration unit, turn on the "ECON" mode.
Autonomous heater and fan
Warning: Do not operate the independent heater indoors, during refueling, or when the vehicle is running on biodiesel fuel (RME). When parking the vehicle and then turning on the independent heater, make sure there are no flammable objects under the vehicle (for example, dry leaves), which can ignite from hot heater exhaust gases escaping from under the engine casing.
The independent heater/fan can operate independently of the vehicle engine. However, for the heater to operate, the fuel supply in the tank must be greater than the reserve, and the battery must not be discharged. To prevent the battery from discharging, it is recommended to turn on the heater again if the engine has not been started after its first activation.
The autonomous heater runs on fuel and is designed primarily to warm up the interior and facilitate defrosting of the glass. It can be used as an additional heater both when the engine is off and when driving (for example, at the engine warm-up stage).
An independent fan effectively helps reduce the temperature in the interior of a car left in the sun.
Autonomous heating/ventilation is controlled manually using the remote control or via the menu "Einstellen"—"Standheizung/Luftung" central display in the instrument cluster (see Section 16). In the specified menu, the time and duration are set (from 15 to 60 minutes) turn on. You can set three different turn on times. The device to be turned on (heater or fan) is determined by comparing the temperature set for the climate control system with the actual temperature in the passenger compartment. The maximum switching time is 30 days: if a larger value is entered, the setting marker is set to the maximum possible date. If a date that has already expired is set, the setting marker is set to the current date: if the entered clock time has already expired, it automatically switches to tomorrow's date. When the heating/ventilation is switched on directly (via menu or remote control) the duration of their operation is determined by the value set for the switching time No.1.
When the independent heating/ventilation switch-on time is activated, two corresponding symbols light up in the upper right corner of the tachometer display, and when the heating or ventilation is running, one of these symbols flashes.
Using the remote control (see illustration 17.3) you can turn on and off the independent heating/ventilation - hold down the on or off key until the indicator lights up. If you need to turn on the independent heating/ventilation after they have finished working, first press the off key, and only then the on key. The remote control uses three power elements, located under the cover on the back of the remote control.

17.3. Remote control for autonomous heating/ventilation 1. Turning on; 2. Indicator; 3. Switching off
The original text of the material can be found on the website: AUDIMANUAL.ru