
Table of contents: Diagnostic system ↓ Trip computer ↓ Tire inflation pressure control ↓ Menu indication ↓ Einstellen (setup, installation) ↓
Central display (7 in illustration 15.1) is designed to display the menu, as well as data from the driver information system. Depending on the vehicle configuration, this data includes (see illustration 16.1):
- radio information;
- outside air temperature;
- fuel range and trip computer data;
- warning of open doors, hood and luggage compartment;
- alarm about exceeding the set speed limit;
- diagnostic system information;
- selected AT or CVT mode (see Section 23);
- parking brake engaged warning (see Section 15);
- mileage and time until next maintenance (see Section 15).
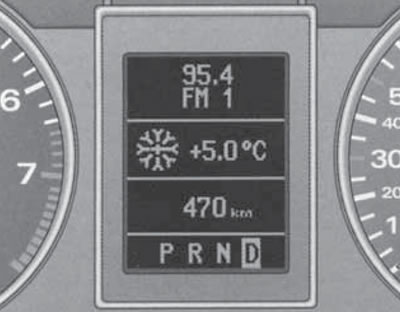
16.1. Central display with indication of radio, temperature, power reserve and AT mode
On models with AT or CVT, driver information system data is displayed on the central display only after the "D" mode is engaged.
Models with Audi navigation or Audi telematic are equipped with a high-resolution multi-color display. A description of this display in the above systems is provided in a separate operating manual supplied with the vehicle equipped with one of these systems.
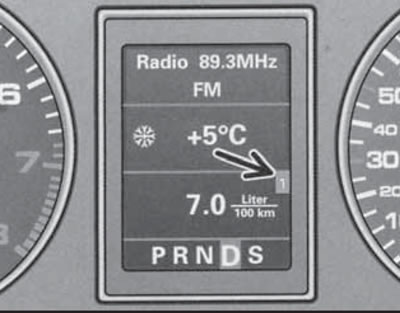
In addition to the display on the audio system, the name of the radio station or its frequency with additional information can be displayed in the upper field of the central display. This occurs if there is no indication of a 2nd level fault and the radio is switched on, after the "OK" indication on the display goes out.
The outside air temperature is displayed in the second field from the top of the central display when the ignition is on. On models with AT, the "D" mode must be selected. At temperatures from -5 to +5°C, a snowflake symbol appears to the left of its value, warning of the possibility of ice formation.
Note: When the vehicle is stationary or driving at very low speeds, the temperature reading may be slightly higher than the actual value due to the heat absorbed by the engine. If the climate control system has a cooling function, switching the temperature units on it leads to a corresponding change in the outside air temperature reading.
Fuel range value (in kilometers) is displayed in the second field from the bottom of the central display. This value gives an approximate idea of the distance that the car can travel on the fuel remaining in the tank in the current driving mode. The power reserve is determined by discrete values, counted at intervals of 10 km. The calculations are based on fuel consumption over the last 30 km of the route. With more economical subsequent movement, the power reserve increases.
A warning about open doors, bonnet or luggage compartment appears in the central area of the central display as a schematic image of the vehicle.
Note: An open bonnet or luggage compartment is indicated by the corresponding area flashing. The warning disappears after all doors, the bonnet and the luggage compartment are closed. If a trip computer is installed, this warning can be temporarily switched off by pressing any trip computer control key. The warning reappears after changing the position of the doors, bonnet or luggage compartment lid.
Diagnostic system
With the ignition on and while the vehicle is moving, the automatic fault monitoring diagnostic system continuously monitors certain functions and the technical condition of the vehicle systems. The ignition on diagnostic system can be turned on with the engine off or running (at speeds up to 5 km/h) using the "CHECK" button (8 in illustration 15.1).
The system notifies about any malfunctions or the need for urgent repair and maintenance work with a sound signal, accompanied by red and yellow symbols (depending on the degree of importance), displayed on the central display. Red symbols have the 1st level of importance and indicate danger, while yellow symbols have the 2nd level of importance and warn of less significant events. If a red symbol is present, pressing the "CHECK" button causes a text explanation to appear for 5 seconds. Text explanations are also displayed in the following situations:
- when driving with the parking brake engaged at a speed of more than 5 km/h for more than 3 seconds, an audible signal and an explanation are given "Handbremse angezogen" ("the parking brake is engaged");
- when the ignition is turned on, when the AT or CVT mode selector lever is in the "P" or "N" position, a message is displayed "Beim einlegen einer Fahrstufe im Stand Fussbremse betatigen" ("To engage the driving mode, press the brake pedal");
- together with the switching on of the K/L lamp malfunction, for the first 5 seconds a message is issued indicating a specific faulty lamp, for example, "Blinkerhinten links" ("left rear turn signal").
After the ignition is switched on (on models with AT or CVT - after moving the selector lever to the "D" position), the diagnostic system automatically checks the functions. If all the checked functions are OK, the message "OK" appears on the display for a while. If there are any faults, instead of "OK", a corresponding indication and a sound signal are issued. If there is no "OK" message or indication of faults, the diagnostic system itself must be checked.
When a red symbol appears, three warning signals sound. In this case, you should stop the car at the first opportunity, turn off the engine and check the corresponding system. If there are several 1st level faults at once, the corresponding red symbols will replace each other every 2 seconds. The red symbols include:
 Brake system malfunction - check brake fluid level;
 Coolant level drops or engine overheats (see Section 15);
 Engine oil pressure drop - check the oil level. If the level is normal and the indicator is on, further movement with the engine running is not allowed.
When a yellow symbol appears, one warning signal sounds. In this case, you should stop the car at the first opportunity to check the corresponding system. If there are several 2nd level faults at once, the corresponding yellow symbols will replace each other every 2 seconds. The yellow symbols include:
 The reserve fuel supply is used;
 Check the engine oil level;
 Engine oil level sensor is faulty;
 The brake pads are worn out;
 Speeding #1 (see below);
 or
or  Dynamic headlight range adjustment malfunction;
 Low washer fluid level;
 Speeding #2 (see below):
 Charging system malfunction. - check alternator drive belt, voltage regulator and battery;
 One of the lamps is faulty - check the lamps, fuses and wiring;
The speed alarm warns the driver when the set speed values are exceeded. As soon as the actual speed exceeds the entered value by approximately 10 km/h, a warning signal sounds and a corresponding yellow symbol appears on the central display. The speed alarm allows you to set two speed values that function independently of each other and perform not exactly the same tasks.
Value No.1 is set while driving and is stored in the memory until the ignition is switched off or this value is cancelled or changed. This value can be used, for example, as a reminder when driving on a road section with a limited speed. The yellow overspeed symbol No.1 appears when the value for speed No.1 is exceeded and goes out when the actual speed falls below the set value. The symbol also disappears when the set value is exceeded by 40 km/h or more for more than 10 seconds. To set the current maintained speed as value No.1, press the "CHECK" button below the instrument cluster - the overspeed symbol No.1 lights up briefly. To cancel the overspeed alarm No.1, hold the "CHECK" button pressed for at least one second at a speed of more than 5 km/h. To change the value, simply set a new value.
Value No.2 can only be changed when the ignition is switched off. Programming speed warning No.2 is recommended when a general reminder to the driver to maintain a certain maximum speed is required. For example, when driving in a country with a speed limit or the maximum speed when driving with winter tires. The speed warning symbol No.2 appears on the display when the actual speed exceeds the entered value and only goes out when the speed drops below the set value. To program value No.2, switch off the ignition and press the "CHECK" button under the instrument cluster - the displays in the speedometer and tachometer will come on. Press the "CHECK" button again and hold it down for at least 2 seconds so that the already set value No.2 or the crossed-out speed warning symbol No.2 appears on the central display (if value No.2 has not been set). To change or reset value #2, press the top or bottom edge of the button on the end of the right steering column switch (see illustration 16.2), - each time you press it, the value changes by 10 km/h; to cancel speed control #2, press the "RESET" button on the right steering column switch. A few seconds after canceling or resetting, the displays in the speedometer and tachometer turn off.
Trip computer
Using the trip computer, the driver can obtain data on:
- range on remaining fuel (see description above);
- travel time;
- average fuel consumption;
- average speed of movement;
- instantaneous fuel consumption.
The trip computer data is displayed on the central display in the instrument cluster in the metric system of measurement, and in some export versions - in the English system of measurement.
The buttons on the right steering column switch are used to control the trip computer (see illustration 16.2). Switching between readings is performed by pressing the upper or lower edge of the end key (A) with the ignition on in the sequence specified above. When the ignition is on, the information displayed when the ignition was off is displayed.
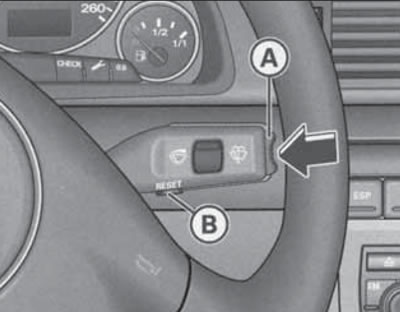
16.2. Trip computer control keys
The trip computer is equipped with two automatically operating memory devices: one-time (No. 1) and general (No. 2). The number of the current memory device is displayed in the upper right corner of the trip computer reading field (see illustration 16.3). To switch between these memory devices and the navigation system, and to turn off the display, briefly press the "RESET" button (In illustration 16.2) the required number of times.
Note: If you press and hold the "RESET" button while the trip computer displays "travel time", "average fuel consumption" or "average speed", they will be reset to zero.
The one-time memory device records information from the moment the ignition is turned on until the moment it is turned off. When driving resumes within 2 hours after turning off the ignition, new information is added to the information already recorded. If the driving is interrupted for more than 2 hours, the data from the memory device is automatically erased.
For a general storage device, automatic erasure of data from its memory is impossible. This is how it differs from a one-time storage device. Thanks to this, the driver can set the time interval for analyzing information himself.
When the battery is disconnected, the data in both storage devices is erased.
The following describes the features of calculation and presentation of trip computer data.
The "Travel time" display reminds you of the need to take a break from driving. The display shows the travel time counted from the moment of the last reset of the memory data of the memory device. In the case of a one-time memory device, if the break in driving is more than two hours, the display is automatically reset. In the case of a general memory device, the travel time value is saved when the ignition is off, and if you continue driving, the subsequent travel time is added to it. Two hours after the start of driving, regardless of the programmed function, an automatic switch to the travel time display occurs. A flashing display of the type "2:00" reminds the driver of the need to take a break from driving. This display can be turned off by briefly pressing any key of the trip computer control. If you continue driving or if the break is less than 10 minutes, then every subsequent two hours the reminder of the need to stop for a rest will be repeated with the travel time display of the type "4:00", "6:00" etc. If the break lasts more than 10 minutes with the ignition off, the travel time countdown data is reset.
The "Average fuel consumption" display (l/100 km) helps when planning your trip. The value is calculated from the moment the memory data was last reset. When driving the first 30 m after the reset, the display shows a zero value. Using this display, you can select the driving mode that corresponds to the optimal fuel consumption. In the case of a one-time memory device, if the break in driving is more than two hours, the display is automatically reset. In the case of a general memory device, the average fuel consumption value is saved when the ignition is switched off, and when driving continues, the data for the subsequent consumption is added to it.
The "Average speed" (km/h) reading helps with planning your trip. It is calculated from the last memory data reset. In the case of a one-time memory device, if the break in driving is more than two hours, the reading is automatically reset. In the case of a general memory device, the average speed is saved when the ignition is off, and when driving continues, the data of the subsequent speed is added to it.
The "Instantaneous fuel consumption" (l/100 km) display helps save fuel. Using this display, you can select the driving mode that corresponds to the optimal fuel consumption. Consumption is calculated for each 30-meter section of the road. When the car is stopped, the last of the calculated values is displayed. If the instantaneous fuel consumption function is called up after starting the engine, then its average value is displayed for the first 30-40 meters of the road.
Tire inflation pressure control
The tire pressure monitoring system gives a warning signal when the pressure in at least one tire drops significantly while the vehicle is moving. For normal operation of the system, it must be initialized. Initialization should be performed every time the tire inflation pressure changes. To initialize, press the "RESET" button (In illustration 16.2), select "Tyre pressure monitor", and then select "Store tyre pressures".
Menu indication
It is possible to set up, activate and control individual vehicle functions via the corresponding menu commands displayed on the central display of the instrument cluster (for example, an autonomous heater). In addition, the menu can be used to display the necessary information. The device only operates when the ignition is on. Control is performed by pressing the "Menu" button (call menu) and a rotary push switch in the console between the seats (see illustration 16.3). Rotating the rotary push switch is used to navigate through the menu and change settings (selected parameters are highlighted in red); pressing the rotary push switch is used to enter the set parameters and confirm the selection.
16.3. Storage device number
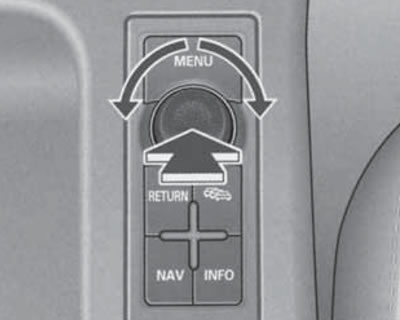
16.3. Menu and navigation control panel
To the left of the menu items that can be turned on or off there is a square. If the square is empty, the item is turned off, and if there is a check mark in the square, the item is turned on. Triangular arrows at the top or bottom of the menu list indicate that there are menu items that do not fit on the display. Selecting these arrows opens the previous or next menu page. To go to the previous menu level from the current submenu, select "Zuruck" ("Cancel").
The name of the current menu is displayed in the top line. The initial menu has the name "Anzeigeart". The menu structure is shown below. The main menu items are in bold, their sub-items are in italics, their sub-items are in the main font, and the final settings are indented.
Einstellen (setup, installation)
Standheizung/-luftung (autonomous heater/fan, see Section 17) Heizung Ein (direct switching on/off of heating)
Luftung Ein (direct ventilation on/off)
Timer 1 2 3 (select and enable the desired timer: 1, 2 or 3) [time/date of switching on according to the selected timer]
Dauer xx Min (duration of operation when switched on by the selected timer or when switched on directly) Incl. Motor (switching on/off the function of using the residual heat of the heater to warm up the engine) Uhr (clock) [time display] - can be changed
Datum - date display [date] - can be changed
Computer (trip computer, see subsection above) - switching on/off the displayed readings of the corresponding memory device of the trip computer
Computeri (storage device #1)
Reichweite (power reserve)
Fahrzeit (travel time)
0 1/100km (average fuel consumption)
0 km/h (average speed)
l/100km (instantaneous fuel consumption)
Computer2 (storage device #2, same parameters as "Sot-puterl")
Tempoalarm (Geschwindigkeitswarnung) (speed alarm, see description above)
Abfragen (request)
Service (maintenance)
Menu aus (menu shutdown) - the normal indication appears on the display.
Hilfe (help) - describes the meaning of symbols; to exit, press the rotary push switch (the "Zuruck" ("Cancel") option is automatically highlighted).
(The original text of the material can be found on the website: AUDImanual)