
Table of contents: Removal ↓ Disassembly ↓ Inspection and defect detection of… ↓ Assembly ↓ Installation ↓
Brake caliper from Teves
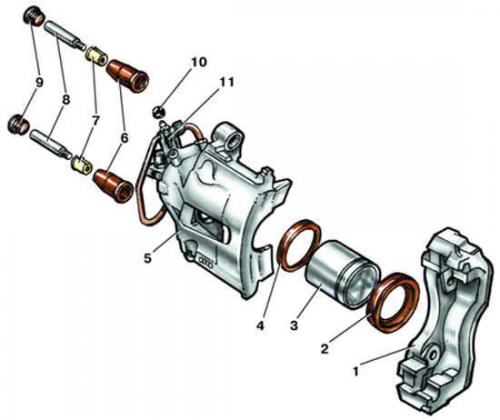
- 1 - base of the bracket;
- 2 - protective cover;
- 3 - piston;
- 4 - sealing ring;
- 5 - bracket body;
- 6 - rubber bushing;
- 7 - plastic sleeve;
- 8 - guide pin;
- 9 - mudguard cap;
- 10 - protective cap;
- 11 - air release valve
Removal
1. Set the vehicle to the parking brake.
2. Install support blocks under the rear wheels.
3. Loosen the front wheel mounting bolts.
4. Raise the front of the vehicle and place it on supports.
5. Remove the wheel.
6. Unscrew the fastening nut, disconnect the brake hoses and plug the hole of the brake hose remaining on the car.
7. Unscrew the two guide pins (see Fig. Brake caliper from Teves), having first removed the dirt-protective caps, and remove the bracket body.
Disassembly
1. Remove the protective cover (see fig. Brake caliper from Teves) piston. Clamp the body of the caliper in a vice with soft metal jaw pads. Remove the piston from the cylinder by supplying compressed air through the brake hose nipple and holding the piston with your hand or placing a wooden strip underneath.
2. Remove the sealing ring from the cylinder using a wooden spatula. Using metal objects is not recommended, as this may damage the groove in the cylinder for the sealing ring.
3. Unscrew the bleed valve.
4. Flush the piston and cylinder with fresh brake fluid.
Inspection and defect detection of bracket body parts
1. Inspect the working surface of the piston and cylinder. If there are signs of wear, corrosion, cavities and nicks on the working surfaces of the piston and cylinder, replace the bracket housing together with the piston.
2. The sealing ring and piston protective cap must be replaced.
Assembly
1. Lubricate the inner surface of the cylinder with fresh brake fluid.
2. Lubricate the new sealing ring with fresh brake fluid and insert it into the cylinder groove.
3. Lubricate the new protective boot with fresh brake fluid and insert it into the groove on the piston.
4. Insert the piston into the cylinder using your fingers, without using any tools, and using a screwdriver, carefully insert the outer edge of the protective cover into the groove in the cylinder.
5. Lubricate the bleed valve with fresh brake fluid and screw it into the caliper body.
Installation
Install the caliper body in the reverse order of removal. In this case, tighten the two guide pins to a torque of 25 N·m (2.5 kgf·m), while holding the guide pin with a wrench. After installation, bleed the repaired brake (see subsection 10.15).