
Table of contents: Model 100 ↓ Model 200 ↓
Note: If for any reason the flywheel has been removed from the crankshaft, tighten the mounting bolts as follows: bolts without a flange - 98 Nm bolts with a flange - 73 Nm. Lubricate the threads with sealant for fixation.
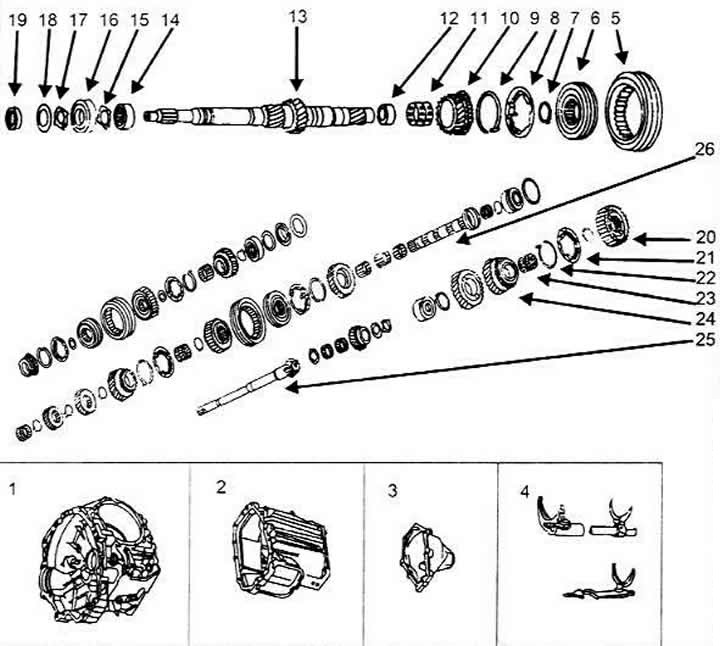
Gearbox components (Quattro)
1 Gearbox housing (main)
2 Gearbox housing (intermediate)
3 Gearbox housing (rear)
4 Shift fork
5 Toothed sleeve
6 Bushing
7 Retaining ring
8 Blocker
9 Spring
10 3rd gear pinion
11 Needle bearing
12 Cuff
13 Primary shaft
14 Needle bearing
15 Retaining ring
16 Ball bearing
17 Retaining ring
18 Cone washer
19 Seal
20 Synchronizer bushing
21 Blocker
22 Spring
23 Needle valve
24 4th gear pinion
25 Roller with cone gear
26 Gear shaft
Model 100
Removal
Disconnect the negative cable from the battery.
Remove the upper gearbox-to-engine mounting bolts.
Attention: When removing, mark all the bolts, and when installing, put them back in their original places, since they are all different sizes.
Disconnect the ground bus from the gearbox, if equipped.
Disconnect the connectors from the speedometer sensor and the multifunction switch.
Support the engine.
Disconnect the oxygen sensor and oxygen sensor heating element wires.
Raise and securely support the vehicle. Remove the mudguard if applicable.
Disconnect the exhaust pipe from the manifold.
Separate the exhaust pipe behind the catalytic converter and remove the pipe and catalytic converter.
Remove the gearshift rod bolt from the gearbox and separate it.
Remove the heat shield from the right inner CV joint.
Remove the axle shafts from the flanges and move them to the side.
Support the gearbox with a suitable object.
Remove the spacer at the rear of the gearbox.
Remove the clutch slave cylinder. Do not remove the pipe from it.
Remove the additional frame.
Remove the lower gearbox mounting bolts from the engine.
Press the gearbox back and lower it.
Remove the gearbox.
Installation
Install the gearbox, making sure that the guide bushings are in the cylinder block
Tighten the gearbox mounting bolts as follows:
- Bolts M8 - torque 24 Nm.
- Bolts M1—torque 45 Nm.
- M12 bolts - torque 65 Nm.
Install an additional frame.
Tighten the additional frame mounting bolts to a torque of 34 Nm and an additional 90°.
Install a spacer on the rear of the gearbox. If necessary, support the gearbox.
Install the clutch slave cylinder.
Please note: The bolt for fastening the clutch slave cylinder is made by Audi pointed to facilitate installation.
Install the half-shafts. Tighten the bolts that secure them to the flanges with a torque of 45 Nm and to the gearbox with a torque of 54 Nm.
Install the gear shift rod on the gearbox.
Install the exhaust system.
Install all wires, heat shield and engine protection plate.
Install the ground bus, if there is one. Connect the wires to the battery. Bleed the air from the brakes. Test drive the car.
Model 200
Removal
Disconnect the negative cable from the battery.
Remove the upper gearbox-to-engine mounting bolts.
Remove the plug from the speedometer sensor by squeezing the clamps.
Remove the clamp from the clutch slave cylinder and pull out the spring pin, if there is one. Remove the clutch slave cylinder mounting bolt and the cylinder itself, leaving the hydraulic line connected.
Support the engine. Tie up the coolant hoses and wires if necessary.
Remove the protective plate on the right.
Disconnect the axle shafts from the flanges and leave them on the additional frame.
Mark and disconnect the wire from the reverse light switch. Disconnect the vacuum hoses from the brake booster, if equipped.
Disconnect the gear shift rods and the adjusting rod.
Remove the lower bolts securing the gearbox to the engine.
Remove the starter.
Remove the protective plate from the additional frame.
Using a suitable jack, slightly raise the gearbox.
Remove the two gearbox support bolts from the additional frame.
Remove the bracket from the gearbox, pull the tensioning system cable and bracket off the mount (clamp) on the gearbox. The clamp can only be removed when the gearbox is removed from the vehicle.
Remove the right gearbox bracket.
Press the gearbox off the guide bushings.
Lower the gearbox and remove it from below.
Installation
Installation is performed in the reverse order of removal. Before installing the gearbox, leave both axle shafts on the upper part of the additional frame.
Lubricate the splines of the gearbox input shaft.
Install the gearbox onto the mounting pins and install the lower bolts.
Install the tension system bracket and cable on the gearbox.
Tighten the gearbox bracket bolts and the upper bolts of the additional frame to 39 Nm.
Check the alignment of the gearbox and tighten the bolts that mount it on the engine to a torque of 54 Nm.
Tighten the bolts securing the additional frame to the body to a torque of 108 Nm.
Tighten the axle shaft mounting bolts on the drive flanges to a torque of 79 Nm.
The original article is posted on the resource AudiManual