
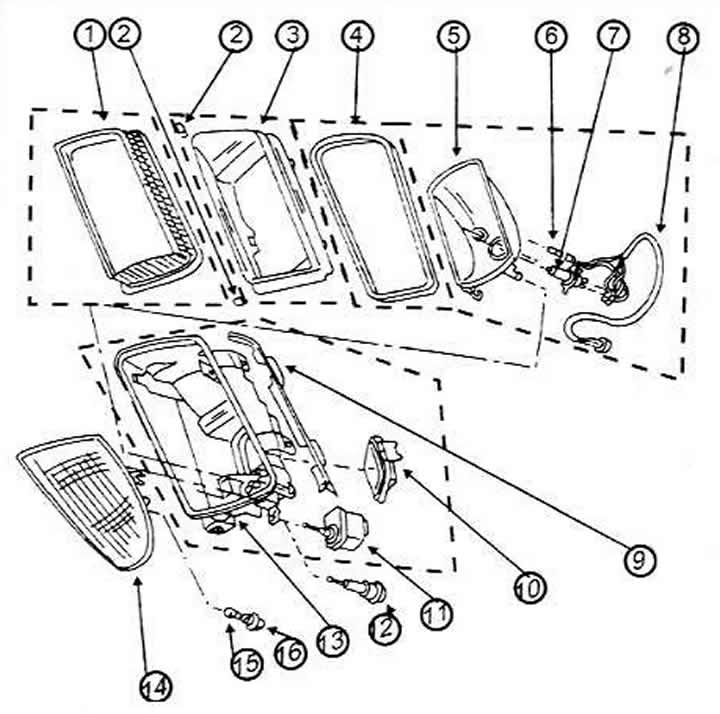
Headlight parts without fog lights installed
1 Headlight glass
2 Fastening clamp (7 pcs)
3 Headlight frame
4 Sealing rubber
5 Reflector
6 Side light bulb, 4 W
7 Combination headlight lamp
8 Connecting the wires
9 Facing
10 Lid
11 Servomotor for headlight tilt adjustment
12 Fixing support for reflector
13 Headlight housing
14 Direction indicator
15 Direction indicator lamp, 21 W
16 Lamp holder
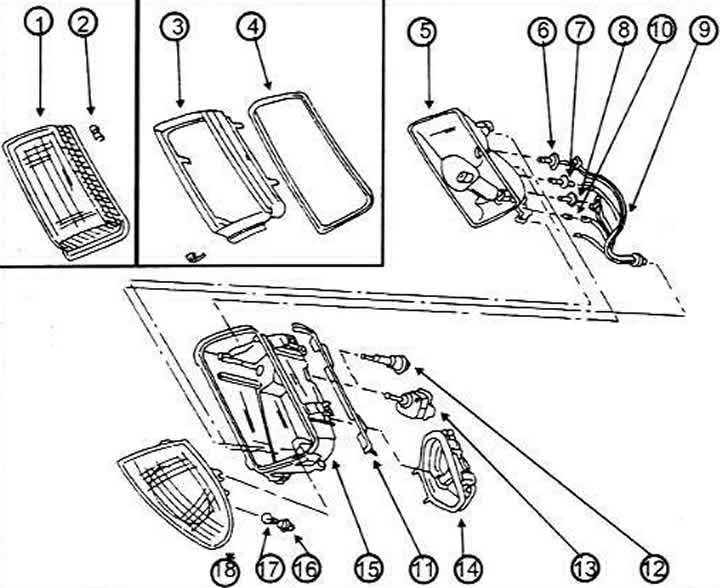
Headlight parts with integrated fog light
1 Headlight glass
2 Fastening clamps 15 pcs,
3 Headlight frame
4 Sealing rubber
5 Reflector
6 High beam lamp, H7, 55 W
7 Fog light bulb, H1, 55W
8 Low beam lamp, H7, 55 W
9 Connecting the wires
10 Side light bulb, 5 W
11 Facing
12 Fixing support for reflector
13 Servomotor for headlight tilt adjustment
14 Lid
15 Headlight housing
16 Lamp holder
17 Direction indicator lamp, 21 W
18 Direction indicator
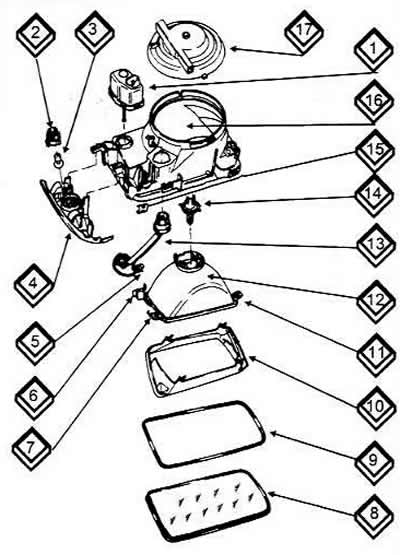
Headlight details (early models)
1 Servomotor for headlight tilt adjustment
2 Cartridge
3 Direction indicator lamp
4 Direction indicator
5 Cartridge
6, 7, 11 Retainer
8 Headlight glass
9 Sealing rubber
10 Headlight frame
12 Reflector
13 Wiring harness
14 Combination headlight lamp
15 Staples
16 Headlight housing
17 Lid
Individual headlight installation parts are not shown in the assembly diagrams. The shock absorber must be removed or the shock absorber around the headlight must be covered to avoid scratches.
Remove the turn signal as described below.
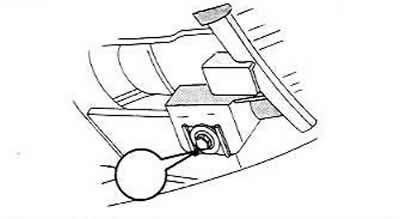
Unscrew the headlight mounting bolts, one of which is located at the bottom.
The other two headlight mounting bolts are located on the lock carrier.
Remove the headlight center plug, headlight tilt servo plug, or plug group (with fog lights) on the back of the headlight.
Carefully pull the headlight out of the guides on the side (no more than 15 mm), lift it slightly and then pull it forward. This may require turning the headlight.
Installation is performed in the reverse order of removal. Before tightening, align the headlight relative to the surrounding parts of the body to ensure the same distance between the headlight and the body. Then tighten the bolts shown in the pictures first.
When disassembling, do the following:
Remove the trim above the headlight glass and carefully pry up the mounting brackets with a screwdriver around the circumference of the headlight glass. Depending on the design, there may be 5 or 7 of them.
Remove the headlight glass together with the sealing rubber.
Carefully push the chrome trim away from the reflector and remove it.
Now remove the reflector. For a design without fog lights, carefully pry the reflector out of the mounting rings; for a design with fog lights, unscrew the two adjusting bolts until the reflector is free and can be removed.
If installed, remove the servo motor as described in the next section.
The headlight assembly is carried out in the reverse order. Please note the following:
Do not touch the inside of the reflector with bare hands. To install, carefully press it into the mounting rings or turn the bolts to set it in the correct position
The rubber seal on the headlight glass should always be replaced.
Press the headlight glass mounting clamps into the correct position by hand.
After installing the headlight, you need to check its adjustment in each case.
[The original article is posted on the resource: AUDIMANUAL.ru]