
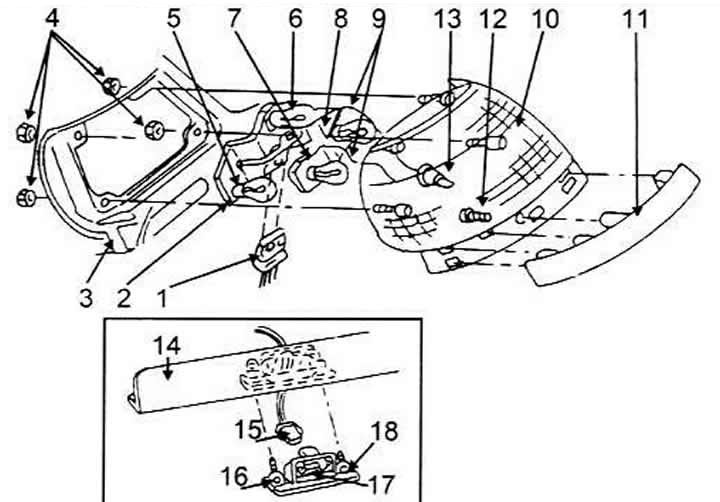
Disassembled rear lights with license plate lights
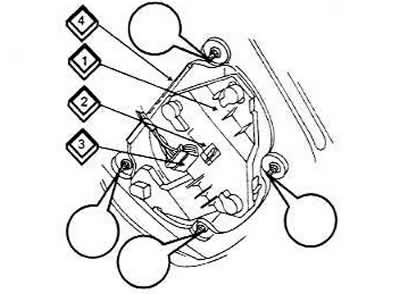
1 Tail Light Plug
2 Lamp holder
3 Seal on the body
4 Nuts, 4 pcs
5 Brake light bulb, 21/5 W
6 Direction indicator lamp, 21 W
7 Reversing light bulb, 21 W
8 Fog lamp bulb, 21W
9 Wires for the rear light
10 Rear light
11 Facing under the lantern
12 Self-tapping screw
13 Rear side light bulb holder
14 Trunk lid handle
15 License plate light plug
16 Self-tapping screw
17 License plate light bulb
18 License plate light
Replacing lamps
Remove the trunk trim behind the taillight and move it to the side.
Disconnect the plug (3).
Press the fastening tab (2) and pull the lamp holder (1) towards the trunk. This is done by pressing, turning to the left and pulling at the same time. Release the wire (4) from the clamps.
Insert the new bulb in the reverse order, i.e. by pressing and turning it to the right. Do not touch the bulb with bare fingers (only through a cloth or napkin).
Removal the rear light
Remove the lamp holder as described above.
Detach the trunk trim near the rear light.
Unscrew the 4 nuts securing the rear light, pull the light housing out from the outside of the car. The gasket is glued to the light housing, i.e. the light may be glued tightly. If a screwdriver is used for removal, then you need to be careful and use a knife like a shoemaker.
When replacing the lamp, you also need to replace the body-colored trim at the bottom of the lamp. It is attached with clips on the inside (press out with a screwdriver) This lining can also be attached with a screw - a self-tapping screw from the inside. Installation is carried out in the reverse order of removal. Install the lining and strengthen it from the inside.
License plate light
The license plate lights are secured with Phillips head screws on the underside of the trunk lid. The spotlight bulb can be replaced after the light has been removed. To replace the light, remove the plug.
(The original article is available on the website: AUDIMANUAL)