
Table of contents: Toggle switches ↓ Key switches ↓ Replacement of switch backlighting ↓ Switches in the left armrest ↓
Toggle switches
The lever switches (toggle switches) located behind the steering wheel are assembled in the Audi-100 into a complex unit and can therefore only be replaced as a set. Below is a description of the removal:
Remove the steering wheel (chapter "Suspension and steering"). Particular care is required when working with the steering wheel of models equipped with an airbag.
Insert a hex key or Phillips head screwdriver into the recess on the steering column trim at the bottom right and locate the screw.
Loosen the screw slightly, but do not remove it completely.
Additional work on cars with adjustable steering column: press the lever for longitudinal adjustment down and press the spring clip down with a small screwdriver.
Remove the longitudinal adjustment lever.
Loosen the Allen screw on the transverse adjustment lever and remove the lever
Remove the upper casing of the lever switch, unscrew the fastening bolt of the corrugated cover.
For all: Pull out the toggle switch element.
Disconnect the multi-pin plugs.
If it is necessary to replace the switch, then you should unscrew the two screws at the bottom of the trim and remove the upper part.
Release the lower part of the trim from the engagement.
Key switches
Typically, three key switches are located in the Audi 100 under the central air vents on the instrument panel.
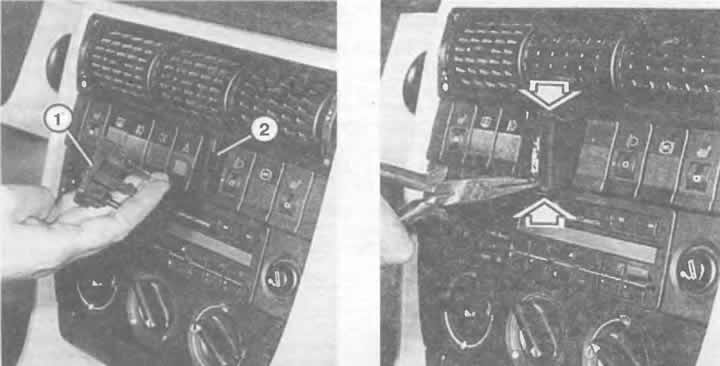
Pull out the plug to access the back of the nearby switch.
If this is not possible: remove the car radio (for a description of this, see below in this chapter) and with the wires connected, pull it out of the installation socket.
In any case: from the back side, push the switch out of the mounting hole.
Disconnect the multi-pin plug.
Left: Installing the switch on the switch panel after removing the plug (1) from the socket (2).
Right: With the switch button raised, you can pull the switch out of the panel with pliers, as shown here. The switches are held in place by spring clips (arrows).
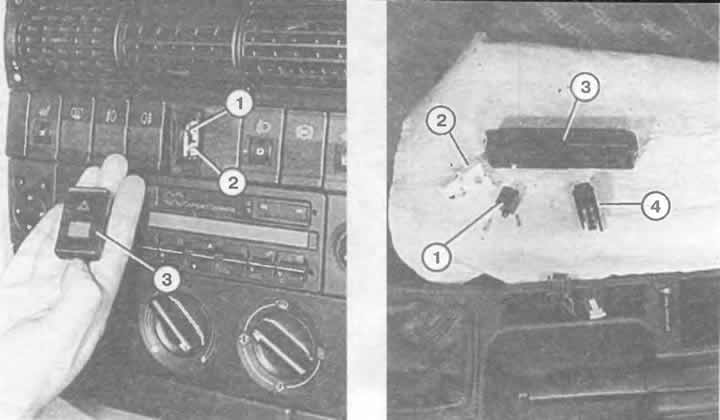
Left: To replace the symbol bulb (1) and check the function (2), lift the switch (3).
Right: Parts of the differential lock switch (quattro):
1 — plug housing;
2 - lamp socket with electronics;
3 - switch cover;
4 — switch.
Replacement of switch backlighting
The key switches have small bulbs with a glass base to illuminate the symbols, and in some of them, additional bulbs to illuminate the "switch on" arrow symbol. Replacing the bulbs:
Carefully pry up the key with a small screwdriver.
Remove the glass-base light bulb using sharp pliers or strong tweezers.
Insert a new light bulb with a glass base.
To turn off the hazard warning lights, a 2 W bulb is used; for all others, a 0.8 W bulb is used.
This method is not suitable for all switch versions. If you can't change the bulb, you have to change the entire switch.
Switches in the left armrest
The electric window switches are located in the upper strip of the left door. Removal:
Insert a narrow screwdriver or a blunt knife from behind between the switch block and the door trim.
This releases the retaining clip along the rear edge of the switch block.
Remove the switch block and disconnect the multi-pin plug.
Remove individual switches from the unit, using a very narrow screwdriver to pry them along the switch housing. Then remove the switch housing.
The rear window lifter locking switch can be accessed in the same way. Both slots for the locking pins are located on the narrow sides of the switch.
The original article is located on the online resource: audimanual