Repair Chevrolet Repair Toyota Repair Honda Repair AvtoVAZ Repair Mercedes-Benz Repair BMW Repair Opel
Home  |  Contacts  |  Sitemap  |    
English Русский
Български
Беларускі
Український
Српски
Hrvatski
Română
Polski
Slovenský
Magyar
AudiManual.ru


  • AUDI 80
  • AUDI 100
  • AUDI A3
  • AUDI A4
  • AUDI A6
  • AUDI A8
  • AUDI Q
  • OTHER
  • ARTICLES
C4 (1990-1994) C4 (1990-1994, petrol) C3 (1982-1990) C3 (1982-1990, petrol) C3 (1982-1990, diesel)

Other lighting fixtures (Audi 100 C4)

  • Home
  • Audi 100
  • C4 (1990-1994, petrol)
  • Electrical equipment
  • Lighting and signaling
  • Other lighting fixtures
            0
Table of contents: Interior lighting ↓ Door limit switch for interior… ↓ Interior lighting with delayed… ↓ Reading light ↓ Luggage compartment ↓ Engine bay ↓

Interior lighting


Spotlight lamp (10W, length 41mm, DIN form K) should be lit when the doors are open and the switch is in the appropriate position. It is supplied with power constantly.

Remove the interior lighting fuse, otherwise there is a high risk of short circuit.

Cars without sliding roof: lamp on the right side (opposite to the switch) carefully remove from the grooves.

For vehicles with a sliding sunroof: Carefully detach the sliding sunroof motor cover (it is built into the flashlight) in front (i.e. from the windshield side) and take it out of the recess in the ceiling. To do this, you will need either a long, strong fingernail, a wide screwdriver, or a flat spoon handle.

When installing, first insert the hooks on the back of the light bulb housing into the recess in the ceiling.

Door limit switch for interior lighting


If the interior light bulb does not light, despite the switch being in the appropriate position and the door being open, the corresponding door limit switch should be checked. It connects the interior light bulb, which is constantly energized, to ground (housing) and thus closes the electrical circuit - the bulb can light. Switch malfunctions are possible if:

Left: In vehicles with an electrically sliding sunroof, the interior light bulb is integrated into…

Left: In vehicles with an electrically sliding sunroof, the interior light bulb is integrated into the sunroof motor cover (2) at the front. To replace a burnt-out bulb, pry the cover from the front and detach it from the fastening hooks at the rear edge (arrows). Then remove the lamp cover (1).

Right: The door limit switch (1) is secured with a Phillips head screw and is housed in a rubber housing (2).


Left: The outer mirror attachment (1) on vehicles with an illuminated mirror is carefully removed…

Left: The outer mirror attachment (1) on vehicles with an illuminated mirror is carefully removed from the frame in the sun visor. The microswitch (2) and both light bulbs (3 and 4) are shown.

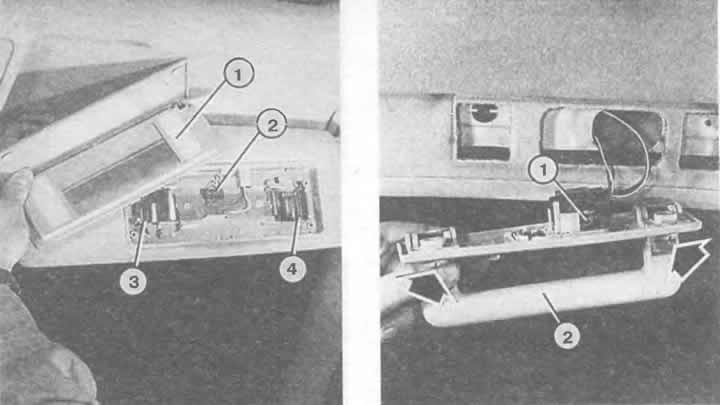
Right: Replacing the reading light (1) after pressing the holding handle (2) and loosening both mounting screws (arrows).


The switch button is jammed in the guide or is bent - replace the switch.


The tip of the wire has come off. Bend the plug a little for better contact and reconnect.

The contact surface between the switch and the mounting bolt or plug connection has oxidized. Rub off the oxidized layer with sandpaper or a screwdriver with sharp edges. The door limit switch is screwed to the door post with only one Phillips-head screw. Dismantling - remove the rubber shell, unscrew the bolt and pull out the switch.

Interior lighting with delayed switch-off


Depending on the equipment, the interior lighting works in combination with the centrally controlled locking system via a special module as follows:

With a centrally controlled locking system:

Remove the key from the ignition and the interior light will come on.

After unlocking the car, the light inside comes on.

When the ignition is turned on, as well as when the locks are locked, the light turns off.

With delayed shutdown:

After the door is closed, the light remains on for about 30 seconds if the ignition was previously turned on or the central lock was activated.

If the door remains open for more than 4 minutes, the interior lighting turns off.

Reading light


Pull back the handle and remove the two protective caps.

Remove the two Phillips head screws located under the caps

Remove the handle and light fixture.

Replace the lamp (5 W).

Luggage compartment


Luggage compartment light (spotlight 5W, length 36mm, DIN-form L) drowned in

Remove the trunk lid or rear door

Insert a screwdriver into the recess on the side of the lamp housing, pry it up and remove the lamp.


After replacing the incandescent lamp, reinsert the lamp housing - first from the wire side.

Engine bay


Squeeze the glass of the lamp slightly on the left and right sides and remove it.

The 10W bulb has a bayonet connection.
The article was checked by auto expert Nikita Rudakov
This article is available at russian, bulgarian, belarusian, ukrainian, serbian, croatian, romanian, polish, slovak, hungarian

Share information:
Previous articles
Audi 100 C4: Lighting and signaling
Next articles

License plate lighting
Rear lights
Front direction indicators
Do-it-yourself installation of fog lights
Instrument panel lighting
Checking the direction indicators and hazard warning lights
Checking the brake light
Brake light switch


Similar articles on other Audi car models:
Lighting fixtures Audi 80 B4 (1991-1996)
Lighting fixtures Audi A3 Type 8L (1996-2003)
Dismantling and installation of interior lighting fixtures and… Audi A4 B6 (2000-2006, petrol)
External lighting fixtures Audi A6 C4 (1994-1997)
Replacing external lighting lamps Audi A8 D2 (1994-2002)
Removal and installation of interior lighting fixtures and their… Audi Q7 Typ 4L (2005-2015, diesel)
Removal and installation vanity mirror lighting lamps Audi A2 (1999-2005)
Link to this page in different formats


Visitor comments

No comments yet


How much will 42 + 32 =


100(C4, 1990-1994) 
  • General information
  • User manual
  • Power unit
  • Engine repair
  • Ignition system
  • Fuel system (gasoline)
  • Fuel system (diesel)
  • Lubrication system
  • Cooling system
  • Exhaust system
  • Transmission
  • Clutch
  • Car gearbox
  • Drive shafts
  • Chassis
  • Car suspension
  • Steering
  • Wheels and tires
  • Brake system
  • Body
  • Ventilation and heating
  • Body repair
  • Electrical equipment
  • Power devices
  • Lighting and appliances
  • Electrical circuits
 
100(C4, 1990-1994, petrol) 
  • General information
  • Operation and maintenance
  • Power unit
  • Engine repair
  • Exhaust system
  • Cooling system
  • Supply system
  • Air filter
  • Mono-Motronic injection system
  • Digifant injection system
  • KE-III-Jetronic and KE-Motronic
  • MPI and MPFI injection system
  • Transmission
  • Clutch
  • Car gearbox
  • Chassis
  • Suspension and steering
  • Brake system
  • Wheels and tires
  • Body
  • Exterior
  • Interior
  • Electrical equipment
  • Fuses and relays
  • Power devices
  • Ignition system
  • Lighting and signaling
  • Equipment and devices
  • Electrical circuits
 
100(C3, 1982-1990) 
  • General information
  • User manual
  • Maintenance
  • Specifications
  • Power unit
  • Engines 4-cylinder
  • Engines 5-cylinder
  • Diesel engine
  • Cooling system
  • Power system (carburetor)
  • Power system (injector)
  • Fuel system (diesel)
  • Transistor ignition system
  • Electronic ignition system
  • Transmission
  • Clutch
  • 4 speed gearbox 014
  • 5 speed gearbox 013 and 093
  • 5 speed gearbox 016 and 012
  • Shift mechanism KP 016
  • Automatic transmission
  • Front wheel drive
  • Chassis
  • Front suspension
  • Rear suspension
  • Steering
  • Brake system
  • Body
  • Body elements
  • Electrical equipment
  • Lighting and appliances
  • Power devices
  • Electrical circuits
 
100(C3, 1982-1990, petrol) 
  • General information
  • Maintenance and operation
  • 4 cylinder engine
  • Engine repair
  • Cooling and lubrication system
  • Supply system
  • Ignition system
  • 5 cylinder engine
  • Engine repair
  • Cooling and lubrication system
  • Supply system
  • Ignition system
  • Transmission
  • Clutch and drive shafts
  • 4 speed gearbox 014
  • 5 speed gearbox 013 and 093
  • 5 speed gearbox 016 and 012
  • Automatic gearbox
  • Chassis
  • Steering
  • Front suspension
  • Rear suspension
  • Brake system
  • Body
  • Body elements
  • Doors, locks and windows
  • Body repair
  • Electrical equipment
  • Equipment and devices
  • Power devices
  • Electrical circuits
 
100(C3, 1982-1990, diesel) 
  • General information
  • User manual
  • Maintenance
  • Troubleshooting
  • Power unit
  • Engine in a car
  • Engine removed
  • Cooling system
  • Fuel system
  • Exhaust system
  • Starting and charging
  • Preheating
  • Transmission
  • Clutch
  • Mechanical gearbox
  • Automatic gearbox
  • Drive shafts
  • Chassis
  • Brake system
  • Suspension
  • Steering
  • Body
  • Exterior
  • Interior
  • Electrical equipment
  • Equipment and devices
  • Electrical circuits
 
AudiManual.ru © 2017-2026 · Mobile version · Feedback · Sitemap: EN BG BY UA RS HR RO PL SK HU · Site search · News and articles
80 B2 · 80 B3 petrol · 80 B3 · 80 B4 · 100 C3 diesel · 100 C3 petrol · 100 C3 · 100 C4 petrol · 100 C4 · A3 Type 8L · A4 B5 petrol · A4 B5 · A4 B6 petrol · A4 B6 · A4 B7 · A4 B8 · A6 C4 · A6 C5 · A6 C5 Allroad · A8 D2 · Q5 Type 8R · Q7 Typ 4L · Audi A2 ·
This site uses cookies 🍪. Click the button to accept this fact.