
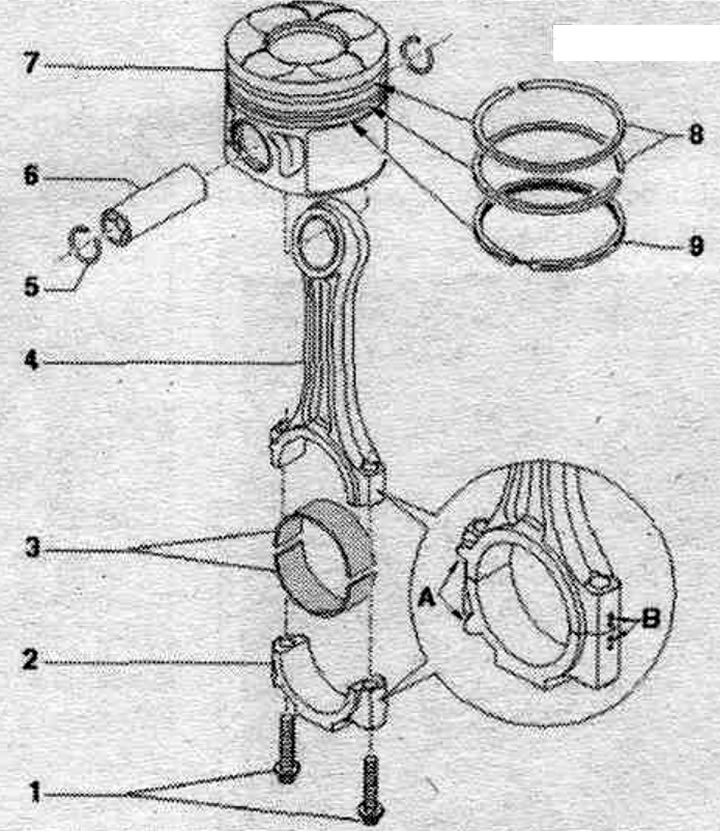
1. Bolt: replace; lubricate the threads and mating surface with oil; 30 Nm + 90°.
2. Connecting rod head cap: Thanks to the connecting rods made using the constructive breaking (cracking) method, the connecting rod cap is installed in only one position and only on the corresponding connecting rod; mark the cylinder's compliance with paint "B"; installation position: marks "A" facing the belt pulleys.
3. Bearing shell: Replace worn bearing shells; take into account the design: upper liner (facing the piston) made of more wear-resistant material - a characteristic feature of the new liners; black line on the work surface near the separation point; check the reliability of the fastening.
4. Connecting rod: replace only the entire set; with a broken connecting rod bearing cap; disconnect the new connecting rod; mark the cylinder's compliance with paint "B"; installation position: marks "A" facing the belt pulleys; axial displacement: wear tolerance limit: 0.37 mm.
5. Retaining ring: replace.
6. Piston pin: if the pin enters with difficulty, heat the piston to 60°C: remove and install using the "VW 222 A" tool.
7. Piston: with combustion chamber; the image does not correspond to the version in the car; mark mont. position and belonging to the cylinder; check; install using a piston ring clamp; measure the inner diameter of the cyl.; measuring the piston protrusion at TDC.
8. Piston rings: compression rings; place the locks at a 120° offset; remove and install using piston ring pliers; installation position: the "TOP" mark or the inscribed side faces the piston bottom; measure the thermal gap.
9. Piston ring: oil scraper ring; shift the joint by 120° to the lower compression ring; remove and install using piston ring pliers; measure the thermal gap.
[Read the original source on the website «AUDIMANUAL»]