
Table of contents: Removal the rear part of the center… ↓ Removal the front part of the center… ↓ Removal the threshold strips ↓
Removal the rear part of the center console
Apply the parking brake.
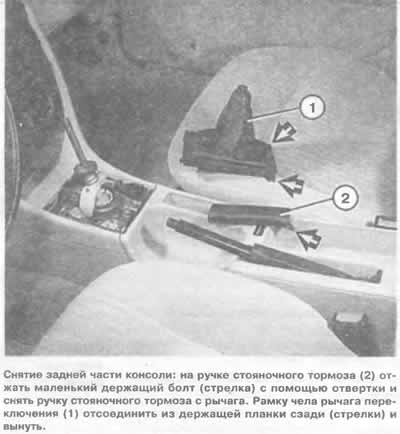
Use a screwdriver to press the small parking brake lever mounting bolt and separate it.
Pull the lever forward.
Release and pull back the felt (felted) covering of the shelf along the back edge.
Remove the Phillips-head screw underneath.
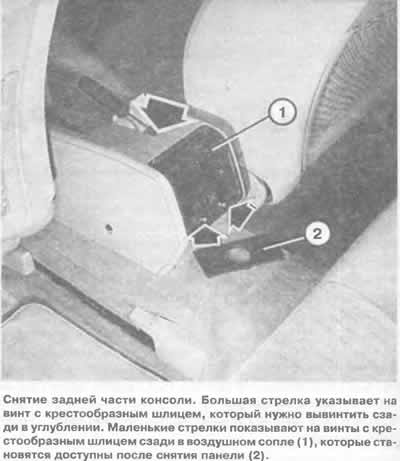
On the back of the console, press the panel around the cigarette lighter and unscrew the 2 Phillips-head screws underneath it.
The rear nozzle with the cigarette lighter can now be removed.
Remove 2 hex bolts on the outside right and left of the console.
Release the gear shift lever frame at the rear edge and press the cuff upward.
Remove the 2 Phillips head screws at the rear of the lever sleeve recess.
Pull the console section up by the front edge and remove it forward over the parking brake lever.
Removal the front part of the center console
Disconnect the battery ground wire.
Remove the rear section of the center console completely.
Remove the gear shift lever or selector lever.
Remove the gear shift knob cover or trim.
Disconnect all three heating/ventilation controls.
Unscrew the two screws of the heating panel and remove it.
For vehicles equipped with automatic air conditioning, remove the control panel completely.
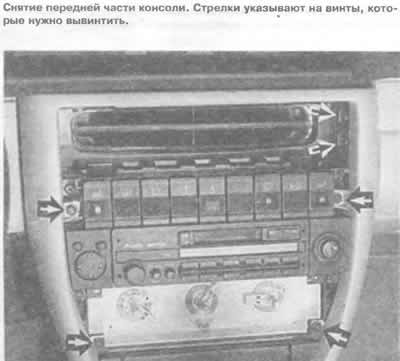
At the bottom, on the right and left, in the cutout of the heating panel, unscrew one screw.
Press the console with the ashtray down and remove.
Remove the lamp holder.
Disconnect both small plugs on the right and left in the switch strip.
Unscrew the 2 hex screws underneath them.
Press and remove the nozzle together with the rotating regulators.
In the hole for installing the air nozzle, unscrew one screw on the right and left.
Next to the gear shift lever, unscrew one screw on the right and left.
In the footwell on the left, press down the small cap and unscrew the screw underneath it.
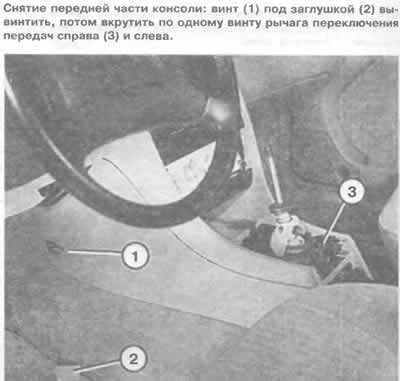
Pull the console backwards to detach it.
When installing, the guides on the instrument panel and center console must fit into each other.
Removing the trim in the leg work
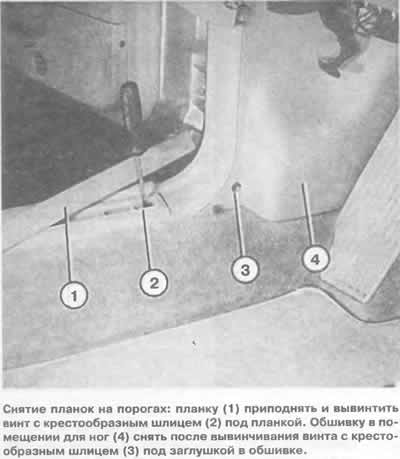
Open the door, unscrew the threshold strip.
Remove the plug, unscrew the screw underneath.
Remove the trim from the top next to the instrument panel from the spring clips by moving it backwards.
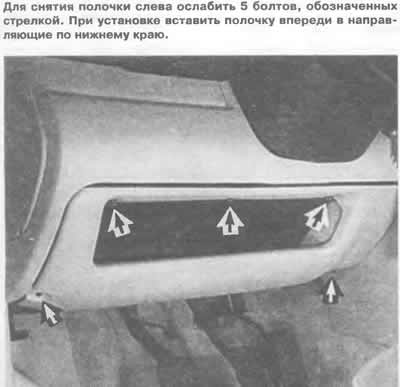
It may be necessary, with special equipment, to remove the left trim, to additionally remove the left shelf and the hood release handle.
Removal the threshold strips
Use a knife to lift the covering in the middle of the strip and remove it.
Remove the Phillips head screw.
Disconnect and remove the threshold strip from the middle pillar trim.
(The original version is on the portal: «AUDIMANUAL.RU»)