
Carburetor parts 1B3
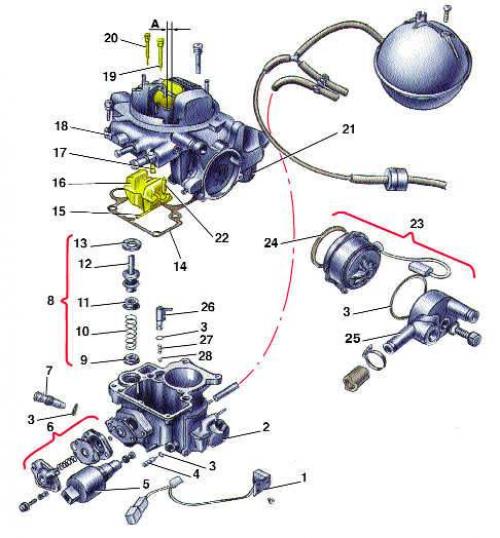
- 1 - heating element;
- 2 - carburetor body;
- 3 - sealing ring;
- 4 - mixture quality (composition) adjustment screw;
- 5 - electromagnetic valve;
- 6 - power mode economizer;
- 7 - mixture quantity adjustment screw;
- 8 - accelerator pump;
- 9 - valve seat;
- 10 - spring;
- 11 - piston cuff;
- 12 - Accelerator pump piston;
- 13 - piston guide;
- 14 - gasket;
- 15 - float axis;
- 16 - float;
- 17 - main fuel jet;
- 18 - carburetor cover;
- 19 - fuel jet economizer;
- 20 - idle fuel jet;
- 21 - pneumatic drive of the air damper;
- 22 - needle valve;
- 23 - Automatic starting device;
- 24 - gasket;
- 25 - lid;
- 26 - accelerator pump nozzle;
- 27 - spring;
- 28 - Sprayer ball valve;
- A - starting clearance of the air damper
Execution order
1. Disconnect the accelerator pump drive lever.
2. Loosen the screws securing the carburetor cover to the body and remove the cover. Remove the gasket.
3. Remove the float shaft, remove the float and remove the needle valve.
4. Unscrew the main fuel jet.
5. Unscrew the idle fuel jet and the economizer fuel jet.
6. Remove the automatic starting device by unscrewing the mounting bolts.
7. Remove the accelerator pump.
8. Unscrew the solenoid valve.
9. Remove the heating element.
10. Unscrew the accelerator pump nozzle. Remove the spring and ball valve.
11. Unscrew the mixture quality adjustment screw and the mixture quantity adjustment screw.
12. Remove the power economizer by unscrewing the mounting bolts.
13. Wash all carburetor parts and units in gasoline. If there are abundant resinous deposits on the parts, wash them in acetone or nitro paint solvent. Do not clean the jets with wire, even soft, so as not to disturb the calibration. Blow the washed parts and carburetor channels with compressed air. Replace torn gaskets and sealing rings, as well as failed parts.
14. Assemble the carburetor in reverse order.
(This article was previously published on the resource: «AudiManual.ru»)