
You can check the exhaust system for exhaust leaks as follows: start the engine, cover the exhaust pipe with a rag for a short time and inspect the system.
If you need to replace any part of the exhaust system, it may be easier to remove the entire system from the vehicle and then disassemble it.
Execution order
1. Loosen the nuts and disconnect the exhaust pipe (see Fig. Exhaust system) from the exhaust manifold.
2. Loosen the bolts securing the intake pipe to the bracket on the gearbox.
3. Remove rings (1) and (4), and then the entire exhaust system from the vehicle.
4. If the exhaust pipes cannot be separated, they can be heated at the junction with a blowtorch.
5. Assemble the pipe (12) with the pipe (9) (or muffler (10)) and muffler (7).
6. Place the intake pipe on the exhaust manifold studs, having first replaced the gasket. The gasket should be installed with the flange facing down. Tighten the nuts, but do not tighten them all the way.
7. Insert the bolts securing the intake pipe 12 to the bracket on the gearbox. Tighten the nuts, but do not tighten them.
8. Install the rings and hang the muffler on them (7).
9. Hang the muffler (3) in place on the rings (1) and (4).
10. Attach the muffler (3) to the muffler (7) using clamps, replacing the sealing ring. Do not tighten the fastening completely.
11. By rocking from side to side, ensure that all elements of the exhaust system hang completely freely. Check that all elements of the system have sufficient distance to the chassis units and the body floor, so that the rings (1) and (4) are evenly loaded.
12. Tighten the nuts securing the pipe to the manifold and gearbox bracket to a torque of 30 N·m (3.0 kgf·m).
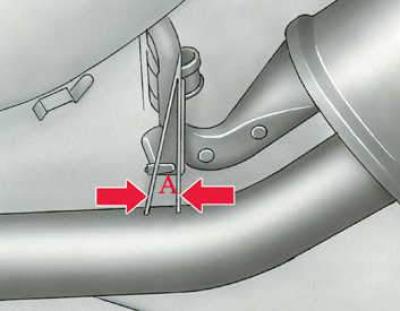
13. With force, pull the muffler (7) so that the muffler suspension ring is pulled forward of the vehicle by 7 mm (distance A).
14. Tighten all threaded connections to a torque of 25 Nm (2.5 kgf·m).
[The article was copied from the website «Audimanual.ru»]