
Table of contents: Replacing the front oil seal ↓ Removal and installation the front… ↓ Replacing the rear oil seal and its… ↓
1 The crankshaft seal parts are shown in the illustration.
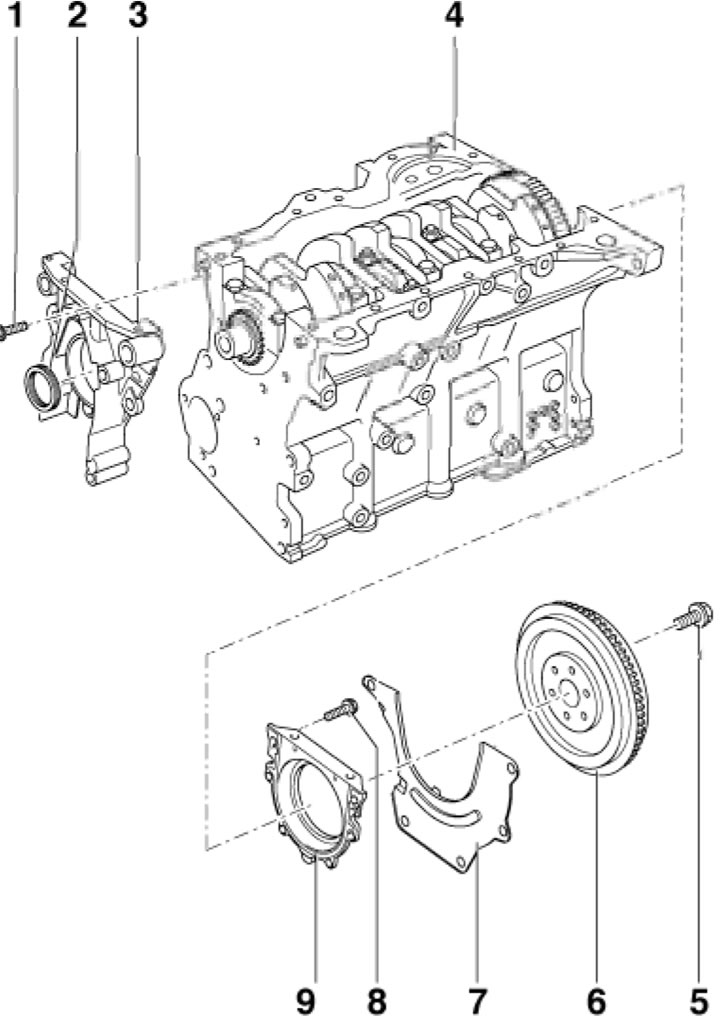
11.1 Crankshaft seal parts 1. Holder mounting bolts 3, 15 Nm; 2. Front oil seal; 3. Front oil seal holder (oil pump sprocket cover); 4. Cylinder block; 5. Flywheel mounting bolts; 6. Flywheel; 7. Intermediate shield; 8. Holder mounting bolts 9, 15 Nm; 9. Rear oil seal holder with oil seal
Replacing the front oil seal
2. Set the radiator frame to the service position (see Section 6) and remove the alternator belt (see Section 8).
3. Remove the timing belt (see Section 10).
4. Fix the crankshaft gear using support No.3415, unscrew its mounting bolt and remove the gear (see illustration).
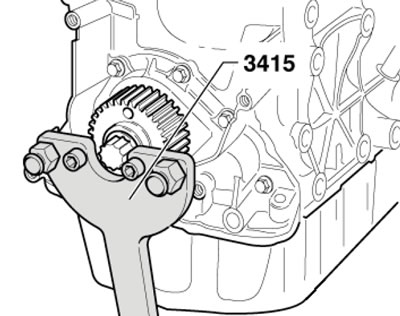
11.4. Keeping the gear from turning
5. Screw the gear mounting bolt back into the crankshaft by hand. Unscrew the inner part of puller #3203 by 9 turns (approximately 20 mm) from the outer part and secure with a knurled screw. Lubricate the threaded head of the puller with engine oil, install and, pressing hard, screw it as deep as possible into the seal (see illustration). Loosen the knurled bolt and rotate the inside of the puller against the crankshaft until the seal is pulled out. Clamp the puller in a vice at the flat spots and remove the seal from it with pliers.
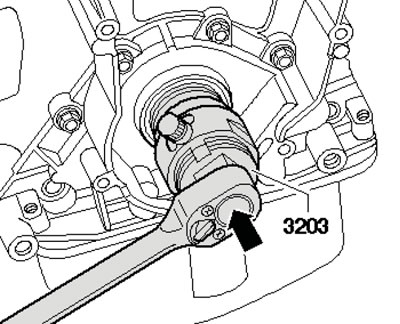
11.5. Removing the oil seal
6. Clean the working and sealing surface. Remove any remaining oil from the crankshaft connecting rod journal with a clean rag, and fit guide bush No. T10053/1 onto the journal (see illustration) and slide the oil seal through the guide sleeve onto the crankshaft journal.
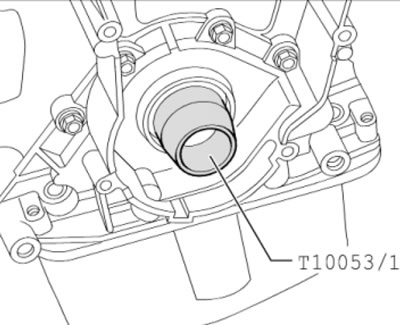
11.6. Mounting sleeve
7. Press the oil seal flush with the central bolt of the gear wheel and the bushing from the mounting device No. T10053 (see illustration).
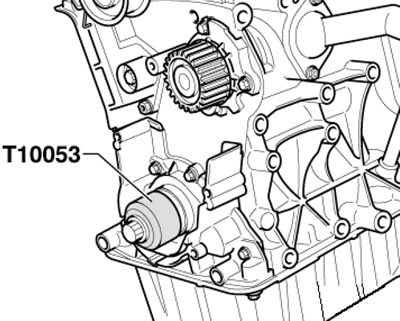
11.7. Installing the seal
8. Fit the toothed wheel and hold it from turning with support No.3415 (see illustration 11.4), tighten the new mounting bolt.
Note: There must be no oil on the mating surfaces between the gear and the crankshaft; the bolt should also be screwed in without additional lubrication.
9. Further installation is carried out in the reverse order of dismantling the components.
Removal and installation the front oil seal holder
10. Set the radiator frame to the service position (see Section 6) and remove the top engine cover (see illustration 5.21).
11. Remove the alternator belt (see Section 8), unscrew the bolt (18 in illustration 7.1) and remove the intermediate roller (17).
12. Remove the timing belt (see Section 10) and the crankshaft gear (see paragraph 4).
13. Remove the bolts (1-10 in the illustration) and remove the front oil seal holder. Press the oil seal out of the removed holder. Seal the torn off part of the engine crankcase with a rag.
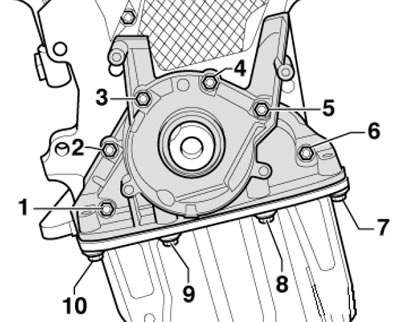
11.13. Front oil seal housing fastening bolts
14. Carefully remove any remaining sealant from the cylinder block, oil pan and seal cover. Clean the seating surfaces from oil and grease.
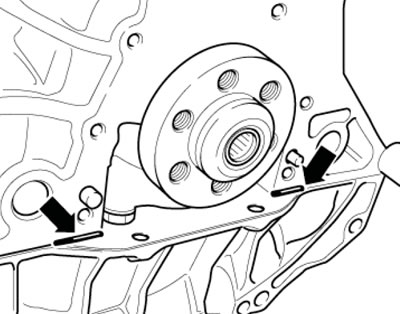
15. Apply a 2 mm bead of sealant to the joints of the cylinder block and oil pan (see illustration).
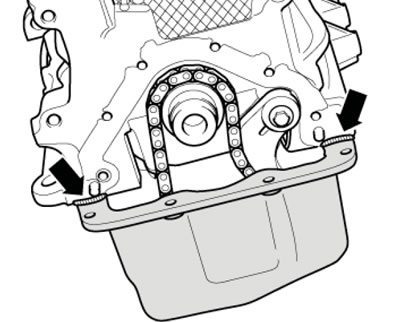
11.15. Places of sealant application (between the cylinder block and the oil pan)
16. Apply a 2-3 mm diameter bead of sealant to the clean front seal retainer seating surface as shown in the accompanying illustration. Additionally, apply an even layer of sealant to the entire area of the lower seal retainer mating surface.
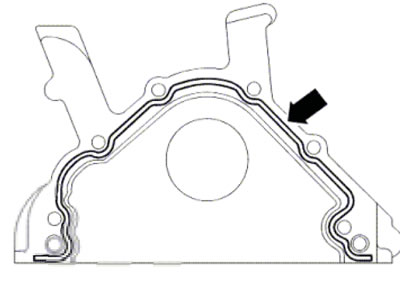
11.16. Applying sealant to the front oil seal holder
Note: The seal holder must be installed within 5 minutes after applying the sealant.
17. Carefully slide the oil seal holder onto the cylinder block and tighten the bolts (1-10 in illustration 11.13) its fasteners, install a new seal, gear wheel and other parts (see subsection above).
Replacing the rear oil seal and its holder
Note: The rear oil seal can only be replaced as a complete assembly with the holder.
18. Remove the manual transmission (see Chapter 6) or CVT/AT (see Chapter 7).
19. Remove the flywheel (see Section 12).
20. Remove the intermediate shield from the sealing flange and mounting bushings (see illustration).
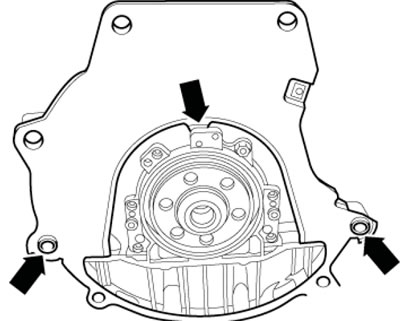
11.20. Intermediate shield
21. Remove the bolts (1-8 in the illustration) and remove the rear oil seal holder.
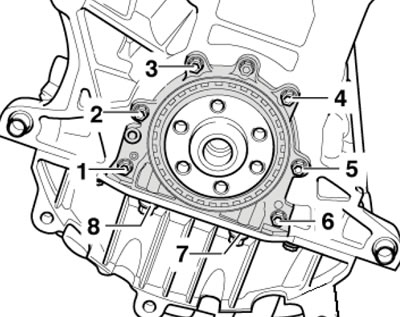
11.21. Rear oil seal holder mounting bolts
22. Carefully remove any remaining sealant from the cylinder block and oil pan. Clean the mounting surfaces from oil and grease.
23. Apply a 2 mm bead of sealant to the mating surfaces between the cylinder block and the oil pan (see illustration). Apply an even coat of sealant to the entire area of the lower seal retainer mating surface.
11.23. Places of application of sealant (between the cylinder block and the oil pan
Note: The seal holder must be installed within 5 minutes after applying the sealant.
24. Attach the holder (2 in the illustration) rear oil seal together with the guide sleeve (1) inserted into the holder onto the crankshaft. Then carefully slide the oil seal holder onto the cylinder block pins.
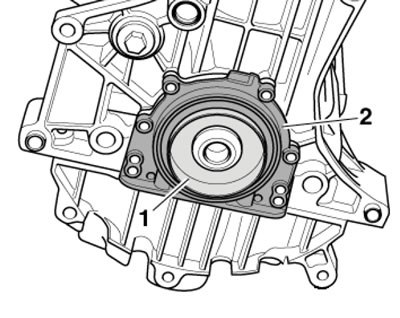
11.24. Installing the rear oil seal with holder
25. Tighten the bolts (1-8 in illustration 11.21) rear oil seal holder fastenings.
26. Hang the intermediate shield on the seal holder and place it on the mounting bushings.
27. Install the flywheel and transmission.
Text provided by the online resource AUDIMANUAL