
2. Drain the coolant from the cooling system (see Chapter 3).
3. Set the radiator frame to the service position (see Section 6) and remove the alternator drive belt (see Section 7).
4. Remove the bolts (1 in illustration 7.1) and remove the alternator belt tensioner.
5. Remove the upper coolant pipe (see Chapter 3).
6. Remove the generator (see Chapter 5).
7. Turn out the front (see illustration 5.27a) and rear (see illustration 5.27b) power steering pump mounting bolts. Remove the power steering pump and place it on the side member without disconnecting the power steering fluid lines.
8. Remove the intake manifold (see Chapter 4).
9. Remove the lower coolant pipe and thermostat housing (see Chapter 3).
10. Perform the actions described in paragraphs 47-49 Section 5.
11. Remove the bolts (1-6 in the illustration) accessory bracket mounts and remove it.
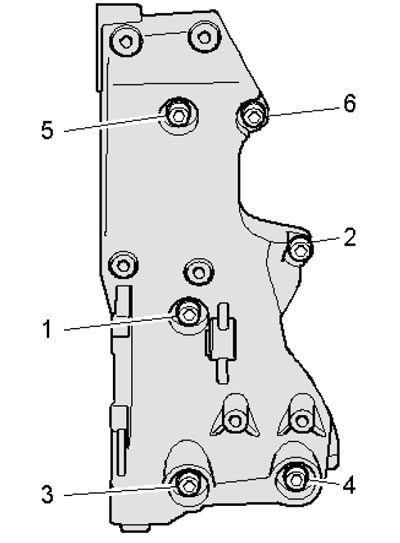
9.11. Auxiliary unit bracket mounting bolts
12. Installation is carried out in the reverse order of dismantling the components. Please note the following information.
13. After removal, the threaded holes in the cylinder block must be cleaned of any remaining thread varnish. Otherwise, when screwing in new bolts, there may be a risk of jamming and, as a consequence, thread stripping during the next unscrewing. A tap can be used for cleaning.
14. Apply thread varnish to the threads of the bracket mounting bolts and tighten them in the sequence (1-6 in illustration 9.11) with a force of 40 Nm.
15. Tighten the intake manifold bracket to the auxiliary unit bracket with a torque of 23 Nm; tightening forces for other fasteners are indicated in the captions illustrations 7.1.
16. After installation, fill with coolant.