
Table of contents: Removal ↓ Installation ↓
Removal
Remove the door trim.
Disconnect the electrical connectors in the door.
Disconnect the central door locking system hose from the actuator.
Disconnect the rod from the inside door opening handle.
Disconnect the electrical connector from the window regulator.
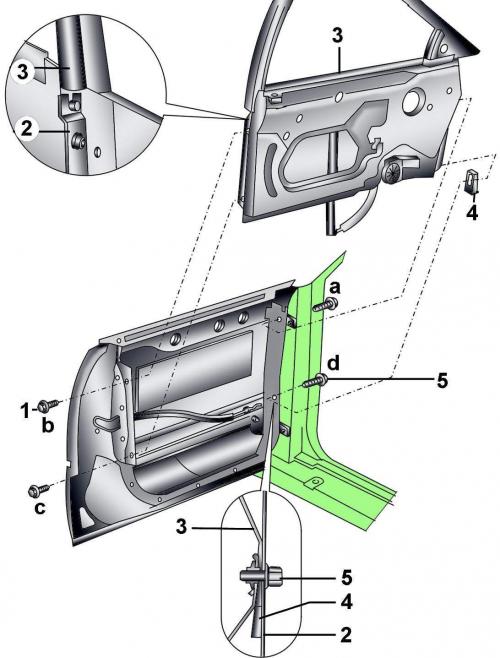
Fig. 16–24. Front door and bracket: 1 – bolt, 30 Nm; 2 – door; 3 – door bracket; 4 – adjusting wedge; 5 – bolt, 30 Nm; a, b, c, d — bolt tightening sequence
Unscrew bolts 1 and 5 (see Fig. 16–24) and remove the bracket from the door.

Fig. 16–22. Location and fastening of interior side impact protection elements: 1 – bolt; 2 – cap; 3 – rod; 4 – base; 5 – elastic cord; 6 – corrugated cover
If necessary, remove cap 2 (Fig. 16–22) and unscrew bolts 1 securing rod 3 of the side impact protection. Rod 3 and base 4 of the side impact protection are glued together and must not separate.
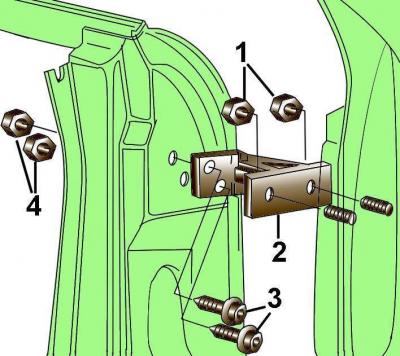
Fig. 16–23. Fastening elements of the upper hinge of the front door: 1 – nuts, 30 N·m;
2 – door hinge; 3 – bolts, 30 Nm; 4 – nuts
Remove the door with two people. While one person supports the door, the other unscrews the nuts securing the door hinges to the front pillar of the car and removes the door (Fig. 16-23 and 16-25).
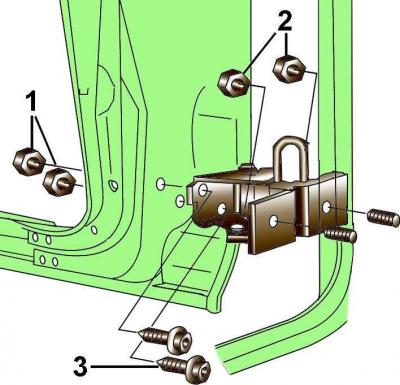
Fig. 16–25. Fastening elements of the lower hinge of the front door (arrows indicate the places where the hinge should be lubricated): 1 – nuts; 2 – nuts, 30 Nm; 3 – bolts, 30 Nm
Installation
Installation is carried out in the reverse order of removal, taking into account the following.
Install the door.
Install the bracket into the door and secure it with bolts 1 and 5 (see Fig. 16–24) located diagonally.
Install adjusting wedges 4 between door 2 and bracket 3 and screw in longer bracket mounting bolts 1 and 5. The adjusting wedge is used to adjust the position of the door relative to the rack.
Tighten the lug nuts in sequence a, b, c, d.
(The original article is posted on the resource: «AUDIMANUAL.RU»)