
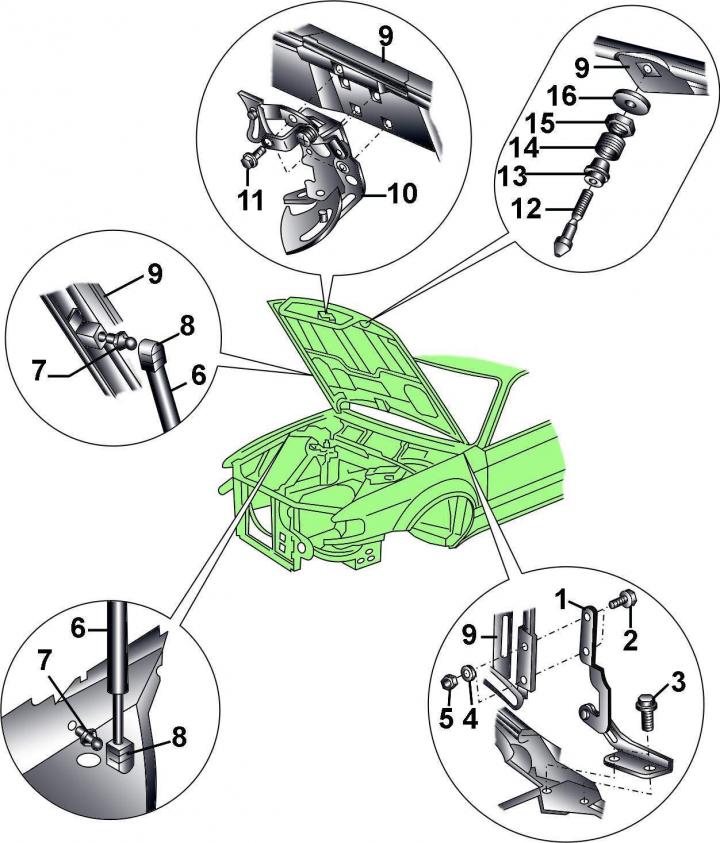
Pic. 16–9. Bonnet fasteners: 1 - hood hinge; 2 - bolt; 3 - bolt, 21 Nm; 4 - washer; 5 - nut, 21 Nm; 6 - gas-filled rack; 7 - pin with a spherical head, 10 Nm; 8 - retainer; 9 - hood; 10 - limiter; 11 - bolt, 8 Nm; 12 - lock pin; 13 - guide sleeve; 14 - spring; 15 - nut, 10 Nm; 16 - washer
Elements of fastening of a cowl are shown on fig. 16–9.
Withdrawal
Open the hood and place a clean rag under the corners to protect the vehicle's paintwork when the hood is removed.
Disconnect the hose from washer nozzle and electrical connectors. Tie a thin, long cord to the hose and electrical connector. Pull the electrical wiring and hose out of the hood, untie the cord from them, leave it in the hood. In the future, the cord will be required to install the electrical wiring and hose in the hood.
Using a marker, mark the position of the hinges on the hood.
Have an assistant support the hood in the open position and, using a screwdriver blade, disconnect the gas-filled strut from the hood. If it is necessary to remove the gas-filled hood strut from the vehicle, remove the lower part of the support in the same way.
If a new pneumatic support is to be installed, the gas must be removed from the old support for disposal. To do this, fix the supports in a vice for the area X, shown in fig. 16–10. To avoid an accident, be sure to clamp the support at the indicated area. At a distance equal to 1/3 of the length, cut the body of the pneumatic support. Use goggles to protect your eyes when sawing
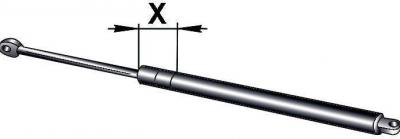
Pic. 16–10. Support section X, for which it is necessary to clamp the support in a vice: X = 50 mm
Remove the bolts securing the left and right hinges of the hood and, being careful, remove the hood.
Check the condition of the hood hinges for play and wear, replace them if necessary.
Installation
With two assistants, install the hood and screw in the hood hinge bolts by hand. Align the hood hinges according to the previously made marks and tighten the hood mounting bolts.
Fasten the gas-filled struts to the hood by pressing the stop with force until it is fixed on the spherical hinge of the hood.
Tie the electrical connector and washer hose to the cord and pull them into the hood. Put the hose on washer nozzle windshield.
Hood adjustment
Close the hood and adjust the height of its rear part relative to adjacent body elements. Height adjustable by elongated holes for mounting bolts 2 (see fig. 16–9) hinges to the hood. To adjust, loosen the bolts, change the relative position of the hood hinge to the hood, and tighten the bolts.
Close the hood and check its position relative to adjacent surfaces. With the hood closed, the gap around its perimeter should be the same on all sides and be 3.5 mm. To adjust, loosen the bolts 3 fastening the hood hinges to the body and, moving the hood, adjust its position. After adjustment, tighten the hood hinge bolts.
To adjust the front part of the hood in height, loosen the nut 15 (see fig. 16–9). fastening pin 12 of the lock and rotate from the corresponding side of the lock pin, then tighten the nut.
In case of unreliable locking of the hood with a lock, loosen the nut 15 fastening the pin 12 of the lock and, moving the lock pin due to the enlarged hole in the hood, achieve its alignment with the hood lock socket. Tighten the nut securing the hood lock pin.
Visitor comments