
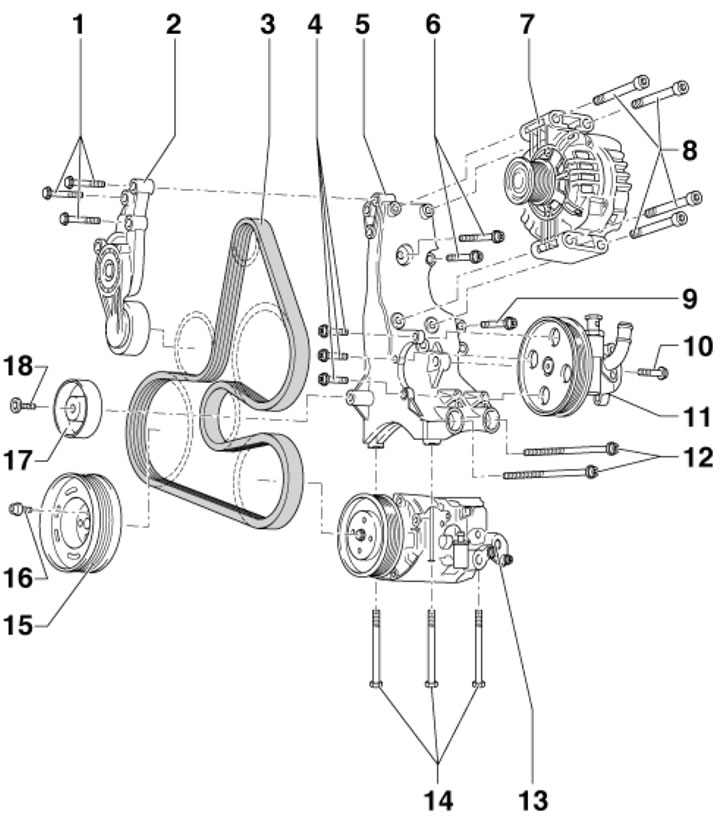
7.1 Alternator belt installation details. 1. Tensioner mounting bolts 2, 25 Nm; 2. Belt tensioner 3; 3. Generator drive belt; 4. Holder mounting bolts 5, 25 Nm; 5. Auxiliary unit holder; 6. Holder mounting bolts 5, 40 Nm; 7. Generator; 8. Generator mounting bolts, 20 Nm; 9. Holder mounting bolt 5, 40 Nm; 10. Rear power steering pump mounting bolt, 20 Nm; 11. Power steering pump; 12. Holder mounting bolts 5, 40 Nm; 13. Air conditioning compressor; 14. Compressor mounting bolts 13, 25 Nm; 15. Crankshaft pulley; 16. Pulley mounting flange bolts 15, 10 Nm, then tighten to an angle of 90°; 17. Intermediate roller; 18. Special roller mounting bolt 17, 25 Nm
2. If there is a casing (1 in illustration 5.11) on the right side of the engine compartment, remove this cover.
3. Disconnect the EVAP valve solenoid connector (1 in illustration 5.12) and remove the electromagnetic valve. Unscrew the screws (arrows) and remove the air duct (2).
4. Mark the alternator belt with chalk or a felt-tip pen to indicate the direction of rotation so that you can install the belt in the same way. Loosen the belt tension by turning the tensioner in the direction of the arrow (see illustration 5.26), and remove the belt from the alternator pulley. Unload the tension roller and remove the drive belt completely.
Note: If the belt cannot be removed from the pulley, loosen the tensioner mounting bolts a few turns.
5. Installation is carried out in the reverse order of dismantling the components. Before installing the belt, make sure that all units (generator, compressor, power steering pump) are mounted securely. Install the used belt so that it runs in the same direction as before. Pay attention to the correct seating of the belt on the pulleys and its running.
(The original publication in its entirety is posted on the website: AudiManual.ru)