
Repair Chevrolet Repair Toyota Repair Honda Repair AvtoVAZ Repair Mercedes-Benz Repair BMW Repair Opel
Home  |  Contacts  |  Sitemap  |    
English Русский
Български
Беларускі
Український
Српски
Hrvatski
Română
Polski
Slovenský
Magyar
AudiManual.ru


  • AUDI 80
  • AUDI 100
  • AUDI A3
  • AUDI A4
  • AUDI A6
  • AUDI A8
  • AUDI Q
  • OTHER
  • ARTICLES
B8 (2007-2015) B7 (2004-2008) B6 (2000-2006) B6 (2000-2006, petrol) B5 (1994-2001) B5 (1994-2001, petrol)

Checking engine oil pressure and engine oil pressure indicator D/V (Audi A4 B7)

  • Home
  • Audi A4
  • B7 (2004-2008)
  • Power unit
  • Petrol engines 2.0 (ALT)
  • Checking engine oil pressure and engine oil pressure indicator D/V
            0
Note: Before checking, correct the engine oil level if necessary (see Chapter 1). To check the oil pressure in the engine, it is necessary to remove the D/V oil pressure indicator, then install in its place an adapter for connecting a pressure gauge or diagnostic stand. You should have a rag on hand to collect the leaked oil, and do not allow oil to get on the drive belts.


1. Make sure the engine oil temperature is at least 80°C (the cooling system fan should operate at least once).

2. Disconnect the engine oil pressure indicator connector and remove the engine oil pressure indicator.

3. Install a pressure gauge with a control lamp instead of the D/V oil pressure indicator (see illustration). If the light comes on, replace the oil pressure sensor (at 1.4 bar).
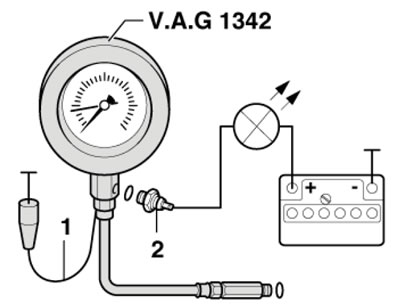
4.3. Connection diagram of the pressure gauge with a control lamp

4.3. Connection diagram of the pressure gauge with a control lamp


4. Start the engine and increase the speed. At a pressure of 1.2÷1.6 bar (for petrol engines), 0.55÷0.85 bar (for diesel engines 1.9 and 2.0 l) or 0.7÷1.1 bar (for diesel engines 2.7 and 3.0 l) the indicator lamp should light, otherwise the oil pressure sensor should be replaced. Read the pressure gauge readings and compare them with the Specifications.


5. Compare the obtained data with the requirements Specificationsif the specified values are not achieved, check the engine (for example, the crankshaft main bearings may be damaged), or replace the pressure relief valve or oil pump.

6. Installation is carried out in the reverse order. Use a new O-ring D/B of the oil pressure indicator. After installation, check and, if necessary, adjust the engine oil level.

Information obtained from this resource: audimanual.ru
The article was checked by auto expert Timur Bazhenov
This article is available at russian, bulgarian, belarusian, ukrainian, serbian, croatian, romanian, polish, slovak, hungarian

Share information:
Previous articles
Audi A4 B7: Petrol engines 2.0 (ALT)
Next articles

Checking the engine with a vacuum gauge
Checking the compression pressure
General information and preparatory operations
Engine — Specifications
Removal and installation the engine
Bringing the radiator frame into service position
Removal and installation the alternator drive belt
Removal and installation the crankshaft pulley


Similar articles on other Audi car models:
Engine oil — pressure Audi 80 B4 (1991-1996)
Oil pressure warning light and buzzer (DR engine)... Audi 100 C3 (1982-1990, petrol)
Checking the condition of the tires and their pressure Audi A3 Type 8L (1996-2003)
Checking the crankcase pressure on a 2.5-I-TDI engine Audi A6 C5 (1997-2004)
Starting the engine Audi A8 D2 (1994-2002)
Checking engine compression pressure Audi Q7 Typ 4L (2005-2015, diesel)
Pressure reducing valve of the engine crankcase ventilation… Audi A2 (1999-2005)
Link to this page in different formats


Visitor comments

No comments yet


How much will 36 + 20 =


A4(B8, 2007-2015) 
  • General information
  • Operating instructions
  • Power unit
  • Petrol engines 1.8 l
  • Petrol engines 1.8/2.0 l
  • Petrol engines 3.0 l
  • Petrol engines 3.2 l
  • Fuel system (petrol)
  • Diesel engines 2.0 l (CA*)
  • Diesel engines 2.0 l (CJCB)
  • Diesel engines 2.7/3.0 l
  • Diesel engines 3.0 l
  • Fuel system (diesel)
  • Transmission
  • Manual gearbox 0B1
  • Manual gearbox 0B2
  • Manual gearbox 0B3
  • Manual gearbox 0B4
  • Automatic transmission 0B5
  • Automatic transmission 0B6
  • Automatic transmission 0AW
  • All-wheel drive system
  • Chassis
  • Front suspension
  • Rear suspension
  • Brake system
  • Steering system
  • Body
  • Exterior
  • Interior
  • Seats
  • Doors, locks and windows
  • Security system
  • Heating and air conditioning
  • Electrical equipment
  • Audio system
  • Power devices
  • Equipment and devices
  • Lighting and lamps
  • Electrical circuits
 
A4(B7, 2004-2008) 
  • General information
  • Introduction to manual
  • Troubleshooting
  • Operating instructions
  • Maintenance
  • Power unit
  • Petrol engines 2.0 (ALT)
  • Petrol engines 2.0 (TFSI)
  • Petrol engines 1.8 (MPI)
  • Diesel engines
  • Cooling system
  • Air conditioner
  • Fuel and exhaust system
  • Ignition system
  • Starting and charging
  • Transmission
  • Clutch
  • Manual gearbox
  • Automatic gearbox
  • Drive shafts
  • Chassis
  • Brake system
  • Front suspension
  • Rear suspension
  • Steering
  • Body
  • Exterior
  • Interior
  • Electrical equipment
  • Equipment and devices
  • Lighting and signaling
  • Windscreen wipers and washers
  • Electrical diagrams
  • Electrical diagrams (since 2007)
 
A4(B6, 2000-2006) 
  • General information
  • Vehicle Description
  • User manual
  • Maintenance
  • Power unit
  • Gasoline engine
  • Diesel engine
  • Lubrication system
  • Cooling system
  • Supply system
  • Injection system
  • Exhaust system
  • Ignition and control
  • Transmission
  • Gear box
  • Clutch and drive shafts
  • Chassis
  • Brake system
  • Car suspension
  • Steering
  • Body
  • Heating and ventilation
  • Exterior (external elements)
  • Interior (internal elements)
  • Electrical equipment
  • Power devices
  • Lighting and appliances
  • Electrical circuits
 
A4(B6, 2000-2006, petrol) 
  • General information
  • Introduction to the guide
  • Car care
  • Power unit
  • Engine repair
  • Lubrication system
  • Cooling system
  • Injection and control system
  • Ignition system
  • Power and exhaust system
  • Transmission
  • Clutch and drive shafts
  • Car gearbox
  • Chassis
  • Suspension and wheels
  • Steering
  • Brake system
  • Body
  • Interior
  • Exterior
  • Electrical equipment
  • Equipment and devices
  • Lighting and signaling
  • Power devices
  • Electrical circuits
 
A4(B5, 1994-2001) 
  • General information
  • Introduction to the guide
  • Car care
  • Maintenance (gasoline)
  • Maintenance (diesel)
  • Power unit
  • Gasoline engines
  • Diesel engines
  • Engine overhaul
  • Cooling system
  • Fuel injection (gasoline)
  • Fuel system (diesel)
  • Exhaust system
  • Ignition system
  • Transmission
  • Clutch
  • Mechanical gearbox
  • Automatic gearbox
  • Drive shafts
  • Chassis
  • Brake system
  • Car suspension
  • Steering
  • Body
  • Exterior
  • Interior
  • Doors, locks and windows
  • Heating and ventilation
  • Electrical equipment
  • Power devices
  • Equipment and devices
  • Electrical circuits
 
A4(B5, 1994-2001, petrol) 
  • General information
  • Vehicle description
  • Maintenance
  • Power unit
  • Engine repair
  • Turbocharging
  • Exhaust system
  • Cooling system
  • Ignition system
  • Fuel system
  • Motronic injection system
  • MPI and MPFI injection system
  • Transmission
  • Clutch
  • Gearbox and shafts
  • Chassis
  • Steering
  • Car suspension
  • Brake system
  • Wheels and tires
  • Body
  • Heating and ventilation
  • Body parts
  • Electrical equipment
  • Fuses and relays
  • Power devices
  • Lighting and lamps
  • Tools and devices
  • Electrical circuits
 
AudiManual.ru © 2017-2026 · Mobile version · Feedback · Sitemap: EN BG BY UA RS HR RO PL SK HU · Site search · News and articles
80 B2 · 80 B3 petrol · 80 B3 · 80 B4 · 100 C3 diesel · 100 C3 petrol · 100 C3 · 100 C4 petrol · 100 C4 · A3 Type 8L · A4 B5 petrol · A4 B5 · A4 B6 petrol · A4 B6 · A4 B7 · A4 B8 · A6 C4 · A6 C5 · A6 C5 Allroad · A8 D2 · Q5 Type 8R · Q7 Typ 4L · Audi A2 ·
This site uses cookies 🍪. Click the button to accept this fact.