
Table of contents: Glow Plugs - Checking ↓ Glow Plug Relay - Check ↓ Coolant Temperature Sensor - Check ↓ Instrument cluster warm-up indicator… ↓
Glow Plugs - Checking
The fact that one of the glow plugs is faulty is usually noticeable when starting a cold engine. All cylinders with working glow plugs ignite the mixture immediately, but the cylinder with the faulty plug seems to lag and is knocked out of the working rhythm. The exhaust gases are dark blue. It may also happen that in the warm season the defect of a plug or several plugs does not manifest itself in any way, but when the cold engine is first started it will become obvious.
1. Check the 80A fuse.
2. Open the fuse box cover (see illustration).
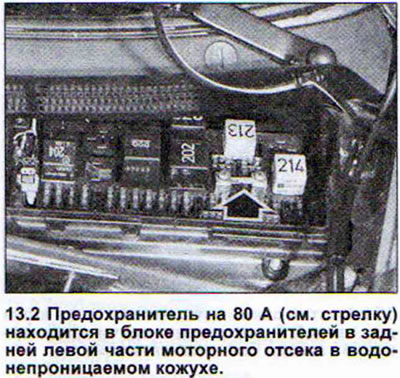
3. Make sure that the fuse link is not oxidized or burnt out. Replace the defective link.
4. Check the voltage supply to the spark plugs if the fuse is normal.
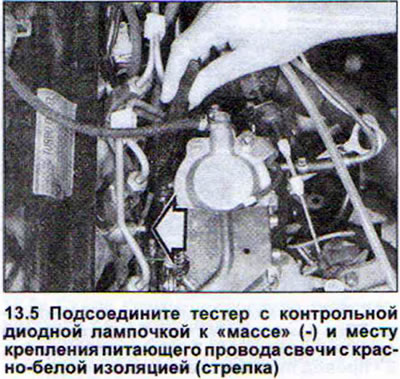
5. Connect the tester with the control diode lamp to the "ground" (-) and the place where the spark plug supply wire with red and white insulation is attached (see illustration).
6. Disconnect the coolant temperature sensor plug.
7. Turn the ignition key to the "Warm Up" position. The LED should light up, confirming that power is supplied. If the LED does not light up, the fuse or power supply wire is faulty.
8. Check the spark plugs themselves to see if the voltage supply is normal.
9. Remove the injectors together with the fuel lines.
10. Remove the injector heat shields. When installing, do not forget to replace the old heat shields with new ones. Do not disconnect the spark plug power wire.
11. Turn the ignition key to the "Warm-up" position. If the engine is warm, disconnect the coolant temperature sensor plug.
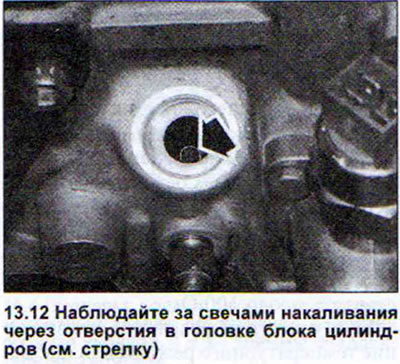
12. Observe the glow plugs through the holes in the cylinder head. This way you can determine which of the plugs is faulty or install a plug with a weak glow (see illustration).
13. Replace the defective glow plug. It is recommended to replace all the plugs at once. A 12 mm spanner is required to unscrew and install the plugs. The tightening torque of the plugs is 30 Nm.
Glow plugs are designed for 15,000 engine starts. Experience shows that the spark plug pins burn out before this period. As a rule, glow plug pin burnout is the result of a defect in the fuel injectors. In this case, the injectors must be checked and replaced if necessary. An unregulated injection start of the high-pressure fuel pump also affects the "lifespan" of the glow plugs.
The following glow plugs are installed on AUDI 80 vehicles with TD engines:
- Beru 857 MJ;
- Bosch, article no. 0250 201 031;
- Audi, article no. 102 13002.
Glow Plug Relay - Check
14. Disconnect the power wire with red and white insulation from the glow plug.
15. Connect a tester with a test light to this wire. Be careful not to short circuit.
16. Connect the second tester lead to ground.
17. Disconnect the coolant temperature sensor plug.
18. Turn the ignition key to the "Warm-up" position and watch the tester indicator light. It should remain lit until the warm-up indicator light on the instrument panel goes out. The warm-up period lasts approximately 8 seconds. Then the tester indicator light should light up again for approximately 10 seconds.
19. Turn the ignition key to the "Off" position, then back to the "Warm-up" position. As soon as the control lamp on the instrument panel goes out, start the engine and let it idle. After starting the engine, the tester control lamp should light for 180 seconds.
20. Perform a final check. Turn the ignition key to the "Off" position and then back to the "Warm" position.
21. Connect an extension cable to the wire with brown-gray insulation on the terminal of the disconnected coolant temperature sensor plug and connect it to the "ground" (-), for example, to the engine. The tester indicator lamp should go out immediately.
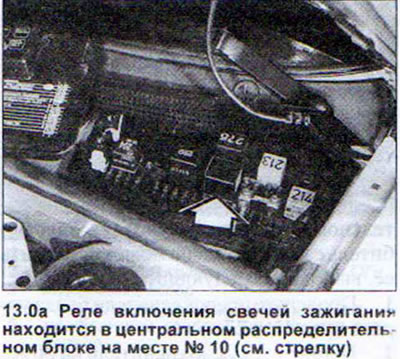
If the test light comes on as indicated above, then the glow plug relay is normal. Possible failures in the relay may be caused by a malfunction of the coolant temperature sensor. If the tester's test light does not work as indicated above, then check the power wires using the circuit diagram. If they are normal, then the glow plug relay should be replaced (see illustration 13.0a).
Coolant Temperature Sensor - Check
The coolant temperature sensor can be checked with an ohmmeter when removed.
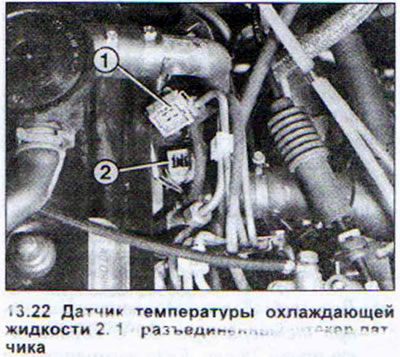
22. Disconnect the temperature sensor plug (see illustration).
23. Connect an ohmmeter to the sensor. Connect one wire of the ohmmeter to the contact with the wire with brown-gray insulation, and the second to the contact with the wire with brown insulation.
24. Read the ohmmeter readings by checking the sensor resistance in two temperature modes. At a temperature of approximately 20°C (room temperature) the ohmmeter should show about 1000 ohms, and at a temperature of about 120°C the ohmmeter reading should be about 100 ohms.
If the ohmmeter does not respond to changes in temperature or the ohmmeter readings differ significantly from those indicated, the sensor should be replaced.
Instrument cluster warm-up indicator light - check
If the engine is warm enough, it will start without preheating and the control lamp on the instrument panel will not light up in such cases. When starting a cold engine, it should light up as soon as the key in the ignition switch is turned to the appropriate position. The control lamp can be checked without dismantling.
25. Disconnect the glow plug relay.
26. Connect relay terminal 49/L with an auxiliary wire to ground (-).
27. Turn the ignition key to the "Warm-up" position. The indicator light should light. Otherwise, either it is burnt out or its power supply wire is broken. If the indicator light lights up, and this did not happen before the test, then the glow plug relay may be faulty. Check the relay. If the instrument cluster indicator light lights up for too long or, conversely, for too short a time, then the coolant temperature sensor may be defective.