
Repair Chevrolet Repair Toyota Repair Honda Repair AvtoVAZ Repair Mercedes-Benz Repair BMW Repair Opel
Home  |  Contacts  |  Sitemap  |    
English Русский
Български
Беларускі
Український
Српски
Hrvatski
Română
Polski
Slovenský
Magyar
AudiManual.ru


  • AUDI 80
  • AUDI 100
  • AUDI A3
  • AUDI A4
  • AUDI A6
  • AUDI A8
  • AUDI Q
  • OTHER
  • ARTICLES
B4 (1991-1996) B3 (1986-1991) B3 (1986-1991, petrol) B2 (1979-1986)

Brake drum — removal, inspection and installation (Audi 80 B4)

  • Home
  • Audi 80
  • B4 (1991-1996)
  • Chassis
  • Brake system
  • Brake drum — removal, inspection and installation
            0
Table of contents: Checking the condition of the brake… ↓ Wheel cylinder - removal ↓
The rear wheel brakes of the front-wheel drive AUDI 80 models with a 66 kW engine (without ABS) produced before 10/92 were equipped with brake drums.

In these brakes, both brake shoes are pressed against the brake drum under pressure from the pistons of the wheel cylinder, which is located between the upper parts of both brake shoes. The arrangement of the brake shoes in the AUDI 80 brake drum is such that one of the brake shoes has a self-amplifying braking effect, and the wheel cylinder used in this type of brake is double. The self-amplifying braking effect is that one of the brake shoes, when the wheel reaches a certain number of revolutions, begins to independently attract to the brake drum, facilitating the braking process. This shoe is the front shoe, if you look in the direction of travel.

The brake drum mechanism is self-adjusting. This effect is achieved by means of an adjusting device for automatic adjustment of the gap between the brake shoes. As the brake shoes wear, the spring of the expansion bar between both brake shoes is forced to lengthen so that the shoes fit the brake drum during braking. This lengthening of the expansion bar is provided by a wedge with a return spring, the tension of which increases with the wear of the brake linings and it moves the wedge, allowing the expansion bar spring to lengthen.

When determining the residual thickness of the brake pads, only the thickness of the front pad is measured, because it wears out to a greater extent.


1. Place the rear of the vehicle on jack stands.

2. Remove the plastic cap from the corresponding rear wheel (see illustration).
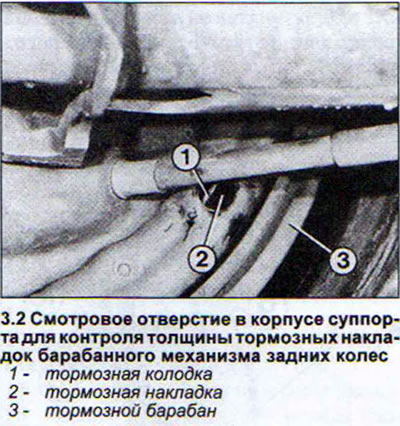
2. Remove the plastic cap from the corresponding rear wheel (see illustration).


3. Shine a flashlight into the inspection hole in the caliper housing. The remaining thickness of the brake pads without the backing plate should be at least 2.5 mm.

The brake drum can be removed without removing the wheel.

4. Unscrew one of the wheel mounting bolts.

5. Place the rear of the vehicle on jack stands.

6. Rotate the wheel disc or brake drum until the hole of the removed wheel bolt is at the top.

7. Insert a screwdriver into the bolt hole and push the adjusting wedge upwards. This will cause the brake shoes to move away from the brake drum.

8. Remove the protective cap from the wheel hub nut.

9. Bend back the ends of the split pin on the nut and remove it.

10. Remove the slotted lock washer and unscrew the hub hex nut.

11. Remove the thrust washer and outer bearing

12. Remove the brake drum (see illustration).
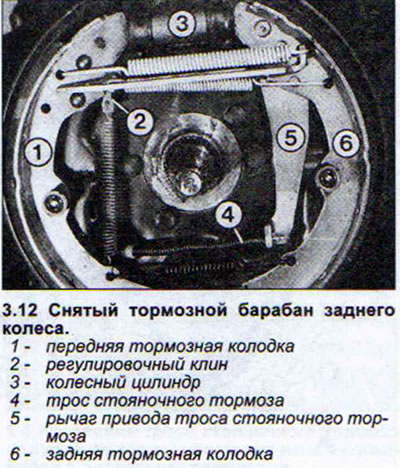
12. Remove the brake drum (see illustration).


13. Adjust the bearing clearance after installing the brake drum in place.


14. Depress the brake pedal to allow the brake shoes to seat themselves in the brake drum.

Attention! If the brake adjusting wedge cannot be pressed upwards because it is rusted, ask an assistant to press the brake pedal. This will cause the wedge to move upwards. Now the assistant should release the pedal. In this position of the pedal, you can remove the screwdriver from the hole for the wheel mounting bolt. If you remove the screwdriver earlier, the wedge will return to its original position.


Caution! The brake pedal can only be pressed when the brake drums are not removed.


Checking the condition of the brake drum


The surface of the brake drum, to which the brake shoes are attached, should be as smooth as possible. If there are grooves or ribs on it, formed as a result of friction of rivets of worn brake linings, then the brake drum can be turned down. A new brake drum has an internal diameter of 230 mm. After finishing, the internal diameter of the brake drum should not exceed 231 mv 3 otherwise both brake drums are subject to replacement.

If the drum has been modified, the brake shoes should be fitted with thicker linings.

Wheel cylinder - removal


15. Remove the brake drum.

16. Remove the brake pads.

17. Unscrew the bleed nipple.

18. Disconnect the brake hose. If the new wheel cylinder is not installed immediately, press the brake pedal and hold it in this position to avoid leakage and loss of brake fluid.

19. Unscrew the two bolts securing the wheel cylinder to the caliper and remove the cylinder.

(The original publication in its entirety is posted on the website Audimanual.ru)
The article was checked by auto expert Timur Bazhenov
This article is available at russian, bulgarian, belarusian, ukrainian, serbian, croatian, romanian, polish, slovak, hungarian

Share information:
Previous articles
Audi 80 B4: Brake system
Next articles

Brake discs and pads — checking condition and replacement
Disc brakes
General description
Brake system specifications
Brake pads — removal and installation
Rear disc brakes
Parking brake
Master Brake Cylinder — Removal and Installation


Similar articles on other Audi car models:
Brake drum — inspection and replacement Audi 100 C3 (1982-1990, diesel)
Checking the brake system Audi A3 Type 8L (1996-2003)
Do-it-yourself work on the brake system Audi A4 B5 (1994-2001, petrol)
Rear brake drum Audi A6 C4 (1994-1997)
Parking brake Audi A8 D2 (1994-2002)
Electromechanical parking brake Audi Q5 Type 8R (2008-2017)
Rear drum brake mechanism Audi A2 (1999-2005)
Link to this page in different formats


Visitor comments

No comments yet


How much will 20 + 49 =


80(B4, 1991-1996) 
  • General information
  • User manual
  • Maintenance
  • Troubleshooting
  • Power unit
  • Engine
  • Cooling system
  • Heating and ventilation
  • Petrol injection
  • Diesel fuel system
  • Fuel system
  • Exhaust systems
  • Ignition system
  • Transmission
  • Clutch
  • Car gearbox
  • Chassis
  • Brake system
  • Suspension and steering wheel
  • Body
  • Body and trim
  • Electrical equipment
  • Electrical system
  • Electrical circuits
 
80(B3, 1986-1991) 
  • General information
  • Repair characteristics
  • Maintenance
  • Power unit
  • Gasoline engine
  • Diesel engine
  • Engine lubrication system
  • Fuel system (gasoline)
  • Injection system (gasoline)
  • Fuel system (diesel)
  • Ignition system
  • Cooling system
  • Heater
  • Exhaust system
  • Transmission
  • Clutch and gearbox
  • Chassis
  • Steering
  • Brake system
  • Car suspension
  • Body
  • Body elements
  • Electrical equipment
  • Power devices
  • Lighting and appliances
  • Electrical circuits
 
80(B3, 1986-1991, petrol) 
  • General information
  • User manual
  • Maintenance
  • Power unit
  • Engine 4-cylinder
  • Engine 5-cylinder
  • Cooling system
  • Fuel and exhaust systems
  • Ignition system
  • Transmission
  • Clutch
  • Mechanical transmission
  • Automatic transmission
  • Drive shafts
  • Chassis
  • Brake system
  • Suspension
  • Steering
  • Body
  • Exterior
  • Interior
  • Electrical equipment
  • Equipment and devices
  • Electrical circuits
 
80(B2, 1979-1986) 
  • General information
  • User manual
  • Power unit
  • Engine FZ
  • Engine EP, YP, YZ, DT, DS, DZ
  • Transmission
  • Clutch
  • 4 speed gearbox
  • 5 speed gearbox
  • Front wheel drive
  • Chassis
  • Front suspension
  • Rear suspension
  • Steering
  • Brake system
  • Electrical equipment
  • Equipment and devices
  • Electrical circuits
 
AudiManual.ru © 2017-2026 · Mobile version · Feedback · Sitemap: EN BG BY UA RS HR RO PL SK HU · Site search · News and articles
80 B2 · 80 B3 petrol · 80 B3 · 80 B4 · 100 C3 diesel · 100 C3 petrol · 100 C3 · 100 C4 petrol · 100 C4 · A3 Type 8L · A4 B5 petrol · A4 B5 · A4 B6 petrol · A4 B6 · A4 B7 · A4 B8 · A6 C4 · A6 C5 · A6 C5 Allroad · A8 D2 · Q5 Type 8R · Q7 Typ 4L · Audi A2 ·
This site uses cookies 🍪. Click the button to accept this fact.