
The surface of the brake discs should not have grooves formed as a result of friction from dirt. These grooves lead to premature wear of new brake pads and reduce braking efficiency. Grooved brake discs can be finished by grinding if they are not worn out and their thickness allows this. Blue discoloration of the metal of the brake disc can be ignored.
2. Replace the brake discs on both wheels at the same time. Replacing the brake disc on only one wheel may result in uneven braking of the wheels.
3. Place the front of the vehicle on jack stands.
4. Remove the wheel.
5. Unscrew the caliper mounting bolts and remove the caliper. Do not disconnect the brake hose from the caliper.
6. Remove the Phillips head screw, if present.
7. Remove the brake disc from the hub. If it does not budge, knock it off with a hammer, provided that this disc will not be installed again.
8. Before installing a new brake disc, clean the surface of the hub where the disc contacts.
When replacing the brake pads, it is necessary to change the brake pads of both wheel brake mechanisms. When replacing the brake pads of the Girling brake mechanism, two new self-locking caliper mounting bolts are needed. They are included in the brake lining kit. When replacing the brake pads of the ATE brake mechanism, the old bolts do not need to be replaced with new ones.
As the brake pads wear out, the pistons of the wheel cylinders move forward more and more. Therefore, before installing new brake pads, they must be pressed back. This squeezes the brake fluid back into the expansion tank. If brake fluid was added to the tank before, it is possible that the amount of fluid in the tank will be excessive. In this case, remove the excess fluid in the tank so that it does not spill out and damage adjacent parts.
9. Place the front of the vehicle on jack stands.
10. Remove the wheel.
11. Turn the steering wheel fully to provide access to the brake pads.
12. ATE brake mechanism. Remove the protective cover on the inside of the brake mechanism.
13. Insert a socket wrench into the hole in the head of the lower brake caliper mounting bolt and remove the bolt (see illustration). Do not unscrew the upper bracket mounting bolt.

14. Lift the caliper (bracket) up. If both mounting bolts are unscrewed, the bracket can be removed and secured to the body.
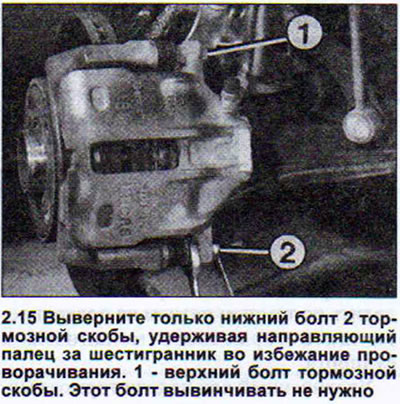
15. Girling brake mechanism. Remove only the lower brake caliper bolt. Hold the guide pin by the hexagon to prevent it from turning (see illustration).
16. Fold the caliper up (see illustration).
17. Both types of brake mechanisms. Remove the brake pads from the guides (see illustration).
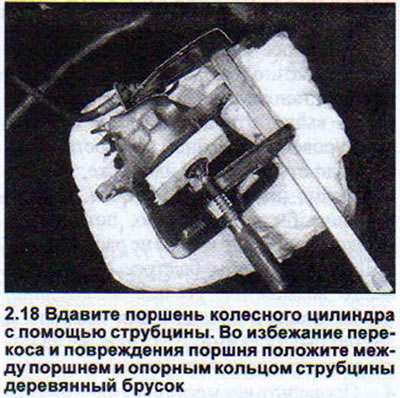
18. Press the wheel cylinder piston in with a clamp. To avoid damaging the piston, place a wooden block between the piston and the clamp support ring (see illustration).
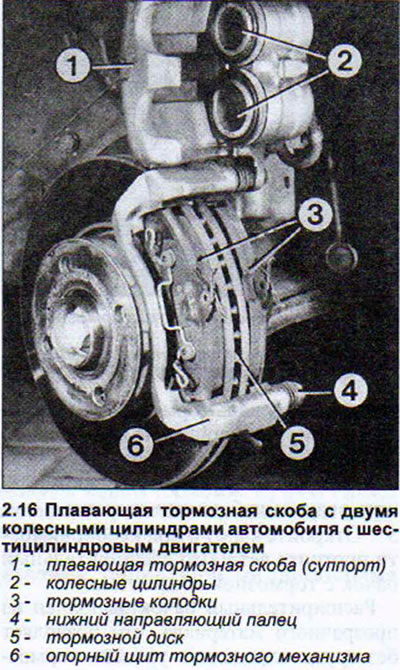
The pistons of a floating brake caliper with two wheel cylinders are pressed in the same way, either together or one at a time.
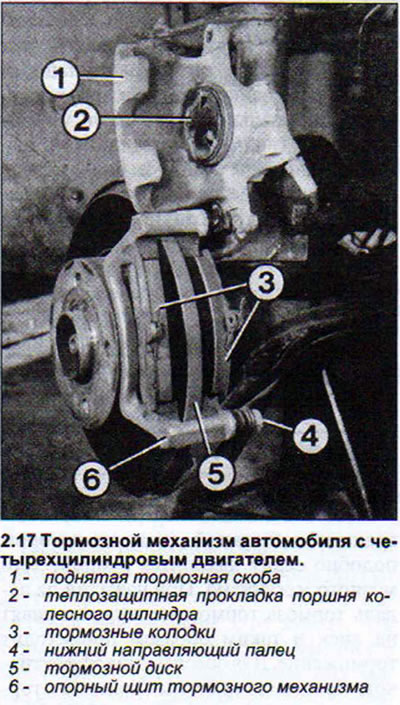
19. Make sure that the wheel cylinder piston heat shield is installed correctly (see illustration 2.17).
20. Install new brake pads.
21. Install the caliper (bracket) in place and secure it with bolts. Tighten the ATE brake caliper mounting bolt to 25 Nm and put on the protective cap.
22. Replace the lower Girling caliper mounting bolt with a new one and tighten it to 35 Nm. Do not tighten the upper mounting bolt. This bolt is also self-locking and additional tightening will ruin this effect. When tightening the lower bolt, hold the guide pin with a thin spanner to prevent it from turning. If you use a spanner that is thick enough to hold the guide pin from turning, the spanner will jam when tightening and the tightening torque will be set incorrectly.
23. Press the brake pedal several times to allow the brake pads to self-install.
Attention! After installing new brake pads, avoid sudden braking until the first 500 km.
The front brake calipers are secured to the shock absorber strut with two rip-bolts. These bolts must never be replaced with regular ones. The tightening torque of the rip-bolts is 125 Nm.
If the wheel cylinder seal in the caliper is damaged, it must be replaced immediately. Otherwise, dirt that gets into the cylinder will jam its piston. The seal is sold complete with a piston sealing ring. In order to install these parts, the piston must be pressed out of the cylinder. We recommend that you entrust this work to a workshop, removing the caliper yourself and delivering it to the workshop.
Caution! The brake system must be bled if it was necessary to disconnect a brake hose or line to perform repair work.
(The original source of the article can be found on the website «AUDIMANUAL»)