
Electric window lift parts
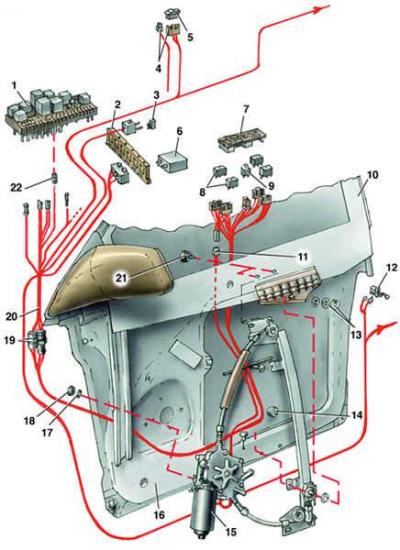
- 1 - relay and fuse box;
- 2 - additional block;
- 3 - thermal fuse (20 A);
- 4 - connector;
- 5 - switch on the passenger side door;
- 6 - window lift control device;
- 7 - bracket;
- 8 - switch on the driver's side door;
- 9 - switch that locks the rear doors;
- 10 - driver's side door glass;
- 11 - Driver's side window lift motor connector;
- 12 - door switch;
- 13 - glass fastening elements;
- 14 - screw;
- 15 - window lifter motor;
- 16 - inner door panel;
- 17 - washer;
- 18 - nut;
- 19 - detachable connection on the left under the instrument panel;
- 20 - wiring harness;
- 21 - screw;
- 22 - wire connected to ground (contact "A")
Execution order
1. Remove the door trim.
2. Lower the glass so that you can access the glass frame fastening to the slider. Fix the glass in this position with a wooden wedge.
3. Disconnect the window regulator slider from the glass frame.
4. Loosen the window lift mechanism mounting nuts and window lift guide mounting screws.
5. Disconnect the window regulator wiring harness from the wiring harness by sliding it back.
6. Remove the window regulator through the lower mounting hole in the door panel.
7. Install the window regulator in reverse order.
8. A special key is required to adjust the upper limiter, so it is recommended to carry out the adjustment at a service station.
Content source: the specified website AUDIMANUAL