
Table of contents: Replacing the oil filter ↓ Filling engine oil ↓ Checking the engine and engine… ↓
2.5-I-TDI Engine Remove the upper engine cover (see fig. 2.82). Using a SW 32 wrench, unscrew cover 1 (Fig. 1.4) of the oil filter housing. Oil from the filter housing flows into the oil pan.

Place the vehicle over an inspection pit or lift it on a lift.
Remove the lower engine compartment splash guard (see fig. 2.4-2.6).
Place a container under the engine to collect the engine oil.
Loosen the oil drain plug about half a turn. Place a container to catch the oil under the plug and unscrew the plug completely. If necessary, apply pressure to the plug while unscrewing to prevent premature oil leakage (see fig. 1.2).

If there are metal filings or shavings in the drained engine oil, this indicates severe wear of the main or connecting rod bearings.
In order for the engine lubrication system to function properly, it is necessary to thoroughly clean the oil channels and pipelines during subsequent repairs. If present, it is also necessary to replace the oil heat exchanger.
After the oil has drained, wipe everything around the oil drain hole with a rag and screw the oil drain plug back into place with a new sealing ring.
Oil drain plug tightening torques:
- 4-cylinder engine with stamped steel oil pan - 30 Nm
- 4-cylinder engine with aluminum oil pan with fins - 50 Nm
- 6-cylinder engine - 40 Nm
- 8-cylinder engine - 50 Nm
Lower the car.
Replacing the oil filter
Changing the oil filter is necessary when changing the engine oil.
In a disassemblable oil filter, only the filter element needs to be replaced.
Petrol engines and 1.9-I-TDI 110 hp engine.
Using the special tool HAZET 2171-1, loosen the oil filter, then unscrew it by hand (see fig. 1.3). Collect any leaking oil with a rag.

Clean the oil filter flange in the engine block. Make sure that there is no oil filter gasket left on the engine block.
Lubricate the rubber seal of the new oil filter with clean engine oil and screw the oil filter in by hand until the rubber gasket touches the engine, then screw the filter in by hand ½ turn.
Engines 1.9-I-TDI 115/130 hp and 2.5-I-TDI
Using a SW 32 wrench, unscrew cover 1 (Fig. 1.5) of the oil filter housing. Remove filter element 3 of the oil filter and sealing ring 2 (Fig. 1.5) from the housing.
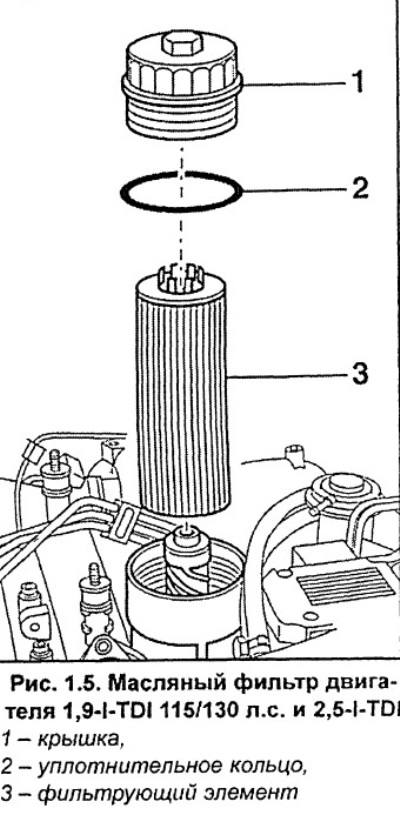
Install the new filter element and sealing ring into the oil filter housing.
Screw on the cap and tighten it to 25 Nm.
Install the upper engine cover.
Filling engine oil
Caution. On TDI engines, when first started after changing the engine oil, the engine must run at idle speed until the oil pressure warning light goes out. Only after the oil pressure has returned to normal can the engine speed be increased. This is necessary to ensure lubrication of the rotating parts of the turbocharger, since otherwise it may fail due to insufficient lubrication.
Remove the cap from the oil filler neck (see fig. 1.6).

Fill the engine with engine oil using the appropriate grade of oil. It is recommended to immediately fill the oil with j less than required. Warm up the engine at idle speed and, after a few minutes, check the oil level with a dipstick and top up if necessary. If the oil level is above the mark a (more than normal) pump it out, otherwise the crankshaft sealing rings and catalytic converter will be damaged.
The oil level is normal if it is in zone b (Fig. 1.7). If the oil level is in zone c (Fig. 1.7), adding about another liter will raise the oil level to the maximum on the dipstick.

After the test drive, check the engine for oil leaks around the filter and the drain plug on the pan. Tighten them if necessary.
Turn off the engine and wait three minutes for the oil to drain into the pan. Check the oil level and top up if necessary.
Install the lower engine compartment splash shield.
Checking the engine and engine compartment for fluid leaks
Remove the upper engine cover. Remove the lower engine compartment splash guard.
Check the pipes and hoses and their connections:
- fuel system;
- engine cooling and car interior heating systems:
- brake system;
- power steering. Visually identify any leaks, porosity, breaks, or cracks and repair them if necessary.