
Table of contents: 4-cylinder engine with air… ↓ Engine 1.8-I (125/150 hp) ↓ Engine 1.9-I-TDI ↓ 6-cylinder petrol engine ↓ 6-cylinder TDI engine ↓ Cars with air conditioning ↓
The poly V-belt is wider than a regular V-belt and has several longitudinal grooves. The poly V-belt drives such units as the generator, power steering pump, radiator fan, and, depending on the engine model, the air conditioning compressor and water pump.
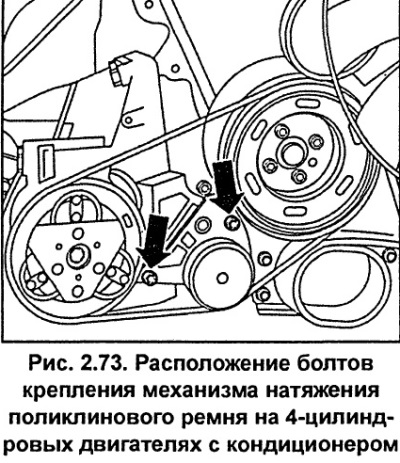
4-cylinder engine with air conditioning
The air conditioner is driven by a separate belt.
Remove the lower engine compartment splash shield.
When reinstalling the belt, use a marker or paint to mark the direction of rotation with an arrow.
Loosen the screws securing the poly V-belt tensioner mechanism, and after the poly V-belt tension has been released, remove it from the pulleys (see fig. 2.73).
Installation
Install the poly V-belt onto the pulleys. When reinstalling the poly V-belt, install it in accordance with the arrow previously applied.
Check that the poly V-belt is positioned correctly on the pulleys.
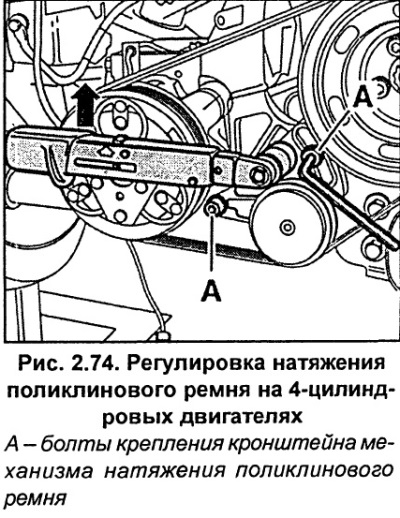
Install a torque wrench on the bracket of the poly V-belt tension roller and turn it to a torque of 25 Nm and in this position tighten the bolts A (Fig. 2.74) securing the tensioning mechanism.
Install the lower engine compartment splash shield.
Engine 1.8-I (125/150 hp)
Power steering pump, alternator and radiator fan drive belt
Remove the lower engine compartment splash shield.
When reinstalling the belt, use a marker or paint to mark the direction of rotation with an arrow.
If present, remove the air conditioner drive belt.
Place the engine compartment front panel in the service position.
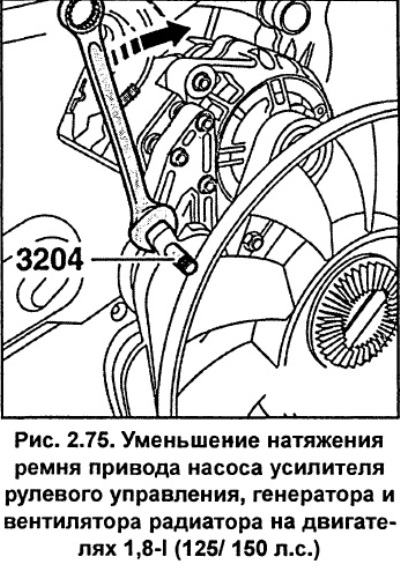
Use a wrench to loosen the belt tension by turning the tensioner clockwise and securing it with a 5 mm diameter steel rod AUDI-3204 (see fig. 2.75).
Remove the belt from the pulleys.
Installation
The water pump is driven either by a toothed belt or an additional, thin V-belt.
Install the poly V-belt on the engine pulleys. When reinstalling the belt, install it in accordance with the previously applied arrow.
Using a wrench, press the belt tensioner mechanism clockwise and remove the steel rod AUDI-3204 that secures the tensioner mechanism (see fig. 2.75). Slowly release the belt tensioner mechanism, this will automatically tighten the belt.
Install the front panel of the engine compartment to its normal position.
Install the lower engine compartment splash shield.
Start the engine and check the operation of the belts.
Engine 1.9-I-TDI
Poly V-belt for power steering pump, alternator, water pump and radiator fan
All operations and instructions for removing and installing the poly V-belt are similar to the operations for removing and installing the poly V-belt of 1.8-I engines (125/150 hp). This section describes operations that are specific to the 4-cylinder TDI engine only
If present, remove the air conditioner drive belt.
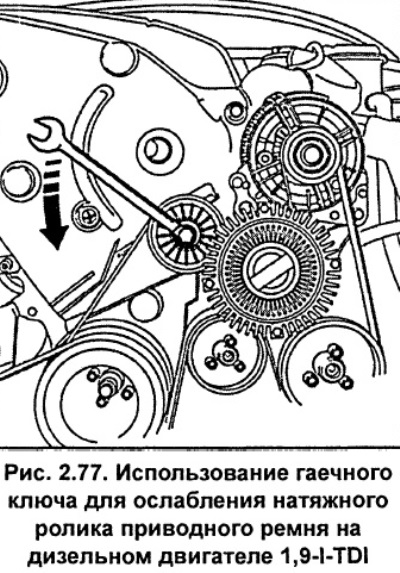
Using a wrench, turn the tension roller counterclockwise on the bolt head and remove the belt (see fig. 2.77). The bolt has a left-hand thread, so turning it counterclockwise will not loosen it.
Using a wrench, turn the belt tension roller clockwise by the bolt head and install the belt on the pulleys. Slowly release the tension roller, and the belt tension will be adjusted automatically.
6-cylinder petrol engine
Removal
All operations and instructions for removing and installing the poly V-belt are similar to the operations for removing and installing the poly V-belt of 1.8-I engines (125/150 hp). This section describes operations that are specific to the 6-cylinder petrol engine.
Remove the upper engine cover.
Place the engine compartment front panel in the service position.
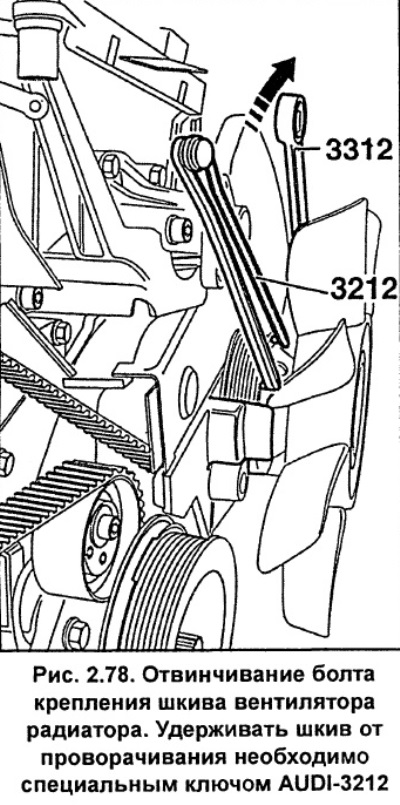
Using a special AUDI-3212 key, hold the radiator fan pulley from turning, and use an AUDI-3312 open-end wrench to unscrew the pulley mounting bolt. Keep in mind that the bolt has a left-hand thread, so to unscrew it, you need to turn it clockwise (see fig. 2.78).
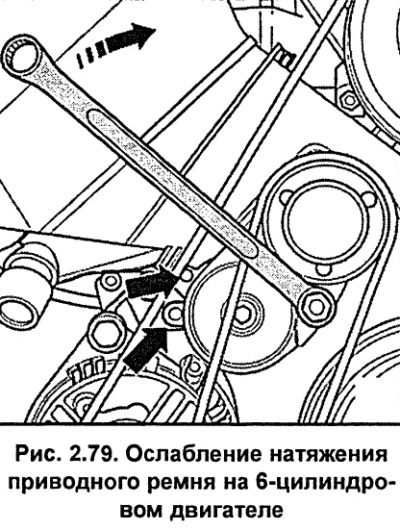
Using a wrench, turn the belt tensioner clockwise until the holes align. Lock the tensioner in this position by inserting a 5 mm diameter steel rod into the hole (see fig. 2.79).
Installation
Place the poly V-belt in a counterclockwise direction first on the crankshaft pulley and last on the tension roller.
Use a spanner to turn the belt tensioner counterclockwise and remove the steel rod that secures the tensioner. Slowly release the spanner, and the belt will automatically tighten.
Install the radiator fan pulley and secure it with the bolt, tightening it to 70 Nm. When using the AUDI-3312 key, tighten the bolt to 40 Nm.
Note: The radiator fan pulley mounting bolt has a left-hand thread, so tighten the bolt by turning it counterclockwise.
Note: On vehicles without air conditioning, the auxiliary drive belt is installed from pulley 6 to pulley 4.
Install the front panel of the engine compartment to its normal position.
Install the upper engine cover.
6-cylinder TDI engine
Removal
All operations and instructions for removing and installing the poly V-belt are similar to the operations for removing and installing the poly V-belt of 1.8-I engines (125/150 hp). This section describes operations that are specific to the 6-cylinder TDI engine only.
Remove the front bumper.
Cars with air conditioning. After removing the front bumper, unscrew the bolt securing the air conditioning system pipe (see fig. 2.63). Do not disconnect the air conditioning system pipes.
Place the engine compartment front panel in the service position.
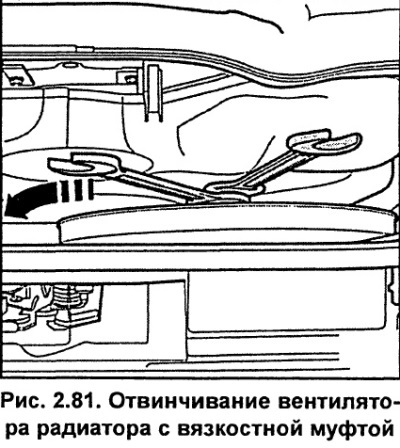
Unscrew the radiator fan mounting bolt with a viscous coupling, while holding the fan shaft from turning with an additional wrench (see fig. 2.81).
Unscrew the screws and remove the engine cover (see fig. 2.82).

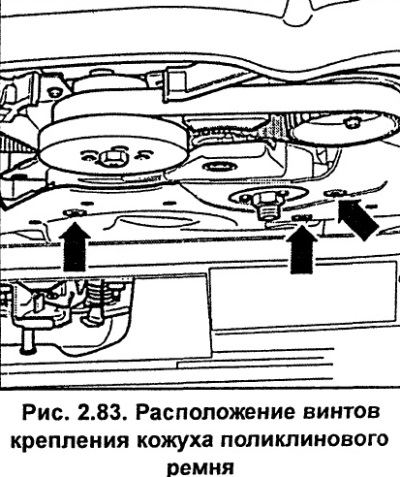
Unscrew the screws and remove the poly V-belt cover (see fig. 2.83).
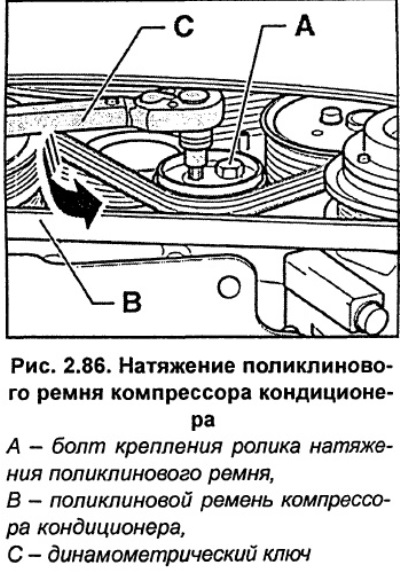
Cars with air conditioning. Unscrew bolt A (Fig. 2.86) securing the tensioning mechanism, loosen the tension and remove the air conditioning drive belt.
Using a socket wrench, turn the tensioning mechanism of the main poly V-belt counterclockwise, which will loosen the belt tension, fix the tensioning mechanism in this position with pin 1 (Fig. 2.84) and remove the belt.

Installation
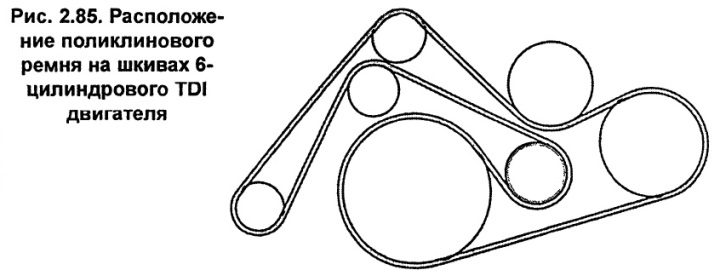
Place the poly V-belt in a counterclockwise direction first on the crankshaft pulley and last on the tension roller (see fig. 2.85).
Cars with air conditioning. Using a torque wrench with an 8 mm hex head C (Fig. 2.86), turn the tension roller of the poly V-belt of the air conditioning compressor counterclockwise to a torque of 7 Nm, and, holding the torque wrench in this position, tighten bolt A of the poly V-belt tension roller with a second wrench to a torque of 25 Nm.
Install the poly V-belt cover (see fig. 2.83).
Install the engine cover (see fig. 2.82).
Install the radiator fan pulley and secure it with the bolt, using the second wrench to hold the bushing from turning.
Install the front panel of the engine compartment to its normal position.
Cars with air conditioning
Before installing the front bumper, tighten the air conditioning system pipe mounting bolt (see fig. 2.63).
Install the front bumper.
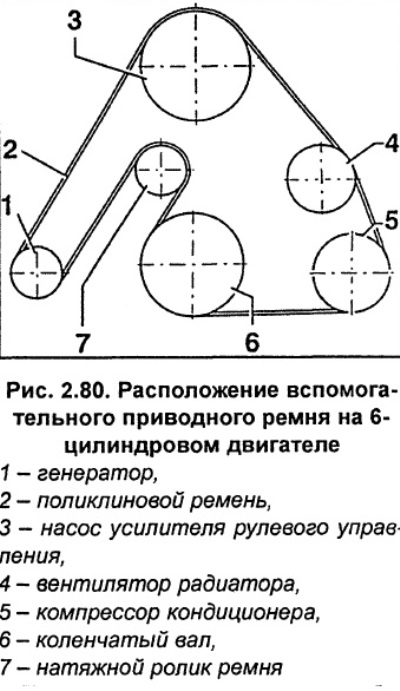
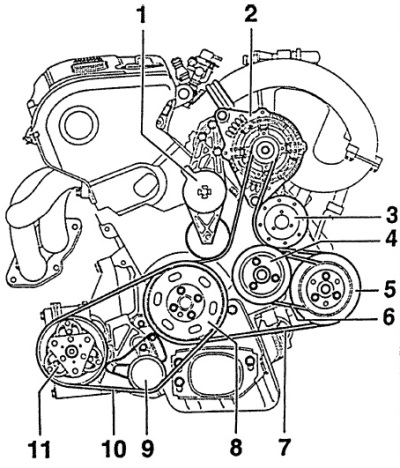
Fig. 2.76. Location of belts on gasoline engines 1.84 (1251150 hp)
1 - belt tensioning mechanism,
2 - generator,
3 - fan,
4 - water pump,
5 - power steering pump,
6 - water pump belt,
7 - belt of power steering fan and generator,
8 - vibration damper,
9 - air conditioning compressor belt tensioning mechanism,
10 - air conditioning compressor belt,
11 - air conditioning compressor