
Table of contents: Engine 1.9-I-TDI/110 hp. ↓ Engine 1.9-I-TDI-115/130 hp. ↓ Engine 2.5-I-TDI ↓ Replacing the fuel filter ↓
Engine 1.9-I-TDI/110 hp.
Removal water from the fuel filter
The fuel filter is located on the left side of the cylinder block behind the generator.
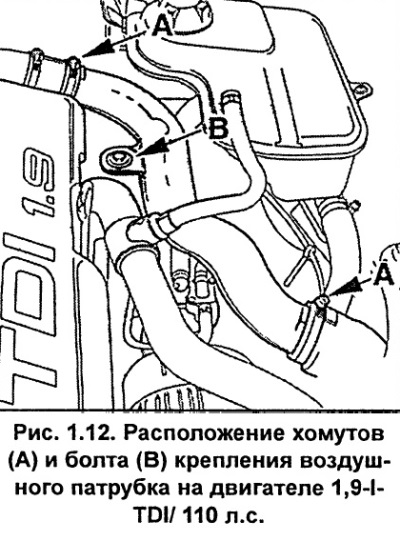
Remove the air duct by loosening clamps A (Fig. 1.12) and unscrewing bolt B.
Unscrew the air bleed screw 3 (Fig. 1.13).
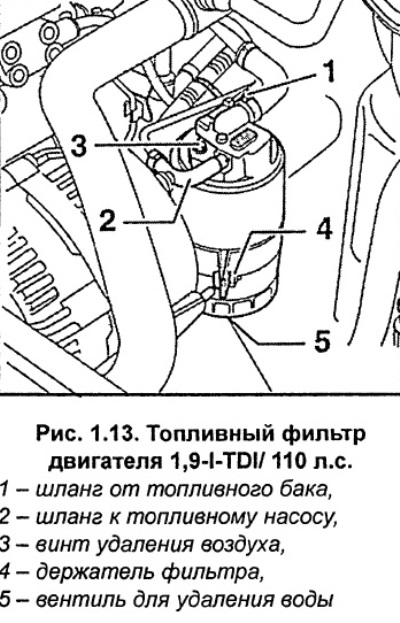
Unscrew valve 5 (Fig. 1.13) from the bottom of the fuel filter to remove water and drain about 100 cm³ of liquid into a container. A hose can be placed on the valve to drain the liquid specifically.
Hand tighten the valve to remove water.
Tighten the air bleed screw 3 (Fig. 1.13).
Install and secure the air duct with clamps A (Fig. 1.12) and bolt B.
Air removal from the fuel occurs automatically when the engine is started. After repeated increases in engine speed, the fuel should flow through the transparent hose without air bubbles.
Check for fuel leaks, especially where the hoses connect to the fuel filter.
Replacing the fuel filter
Remove the air duct by loosening clamps A (Fig. 1.12) and unscrewing bolt B.
At the bottom of the fuel filter, unscrew valve 5 (Fig. 1.13) to remove water and drain all liquid into a container.
Unscrew the nut that clamps the holder 3 (Fig. 1.13) and remove the fuel filter with the fuel hoses connected to it from the holder.
Unscrew the fuel filter from the top of the filter. To do this, the filter can be held with a 17 mm wrench installed at the base of the air bleed screw.
Moisten the new O-ring and rubber gasket with a small amount of diesel fuel.
Fill the new filter with clean diesel fuel. This is necessary for faster engine starting.
Screw the fuel filter securely into the top of the filter.
Place the filter in the holder and tighten the nut that secures the filter holder clamps.
Install and secure the air duct with clamps A (Fig. 1.12) and bolt B.
Start the engine and visually check for fuel leaks.
Engine 1.9-I-TDI-115/130 hp.
Replacing the fuel filter
Remove the engine oil dipstick.
Remove the upper engine casing. To do this, remove the three plugs from the casing and unscrew the three nuts located under the plugs.
Remove the lower engine compartment splash shield.
Unscrew the bolt and set aside the top of the filter along with the fuel hoses connected to it (see fig. 1.14).
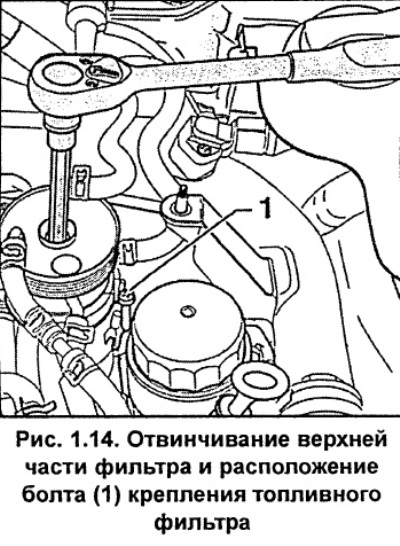
Unscrew screw 1 (Fig. 1.14) securing the filter and remove it.
Fill the new filter with clean diesel fuel. This is necessary for faster engine starting.
Place the filter in the holder, lower it down and secure with screw 1 (Fig. 1.14).
Place the top part of the filter on the filter and secure it with the bolt.
Install the lower engine compartment splash shield, upper engine cover and engine oil dipstick.
Start the engine. Air is removed from the fuel automatically when the engine is started.
Visually check for fuel leaks.
Engine 2.5-I-TDI
Removal water from the fuel filter
Remove the cover from the right side of the engine compartment.
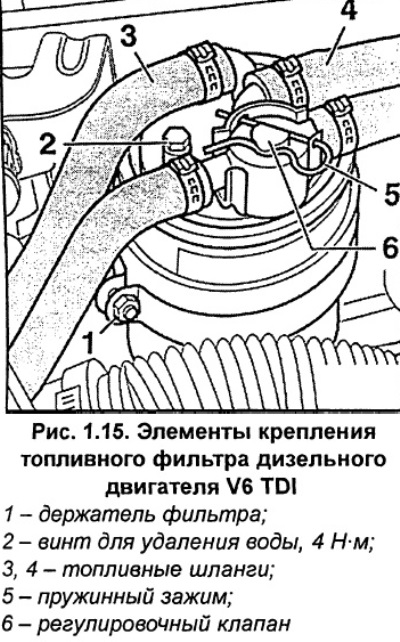
Unscrew screw 2 to remove water from the fuel filter (see fig. 1.15).
Do not allow diesel fuel to come into contact with the cooling system hoses. Hoses that have been exposed to diesel fuel for a long time must be replaced.
Connect the hose of the VAG 1390 hand vacuum pump with a container equipped with a VAG 1390/1 water drain tap to the hole for the water drain screw on the fuel filter (Fig. 1.16).
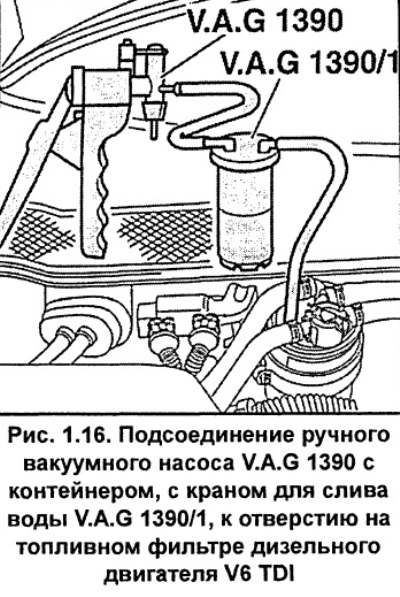
Using a vacuum pump, suck out about 100 cm³ of fluid from the fuel filter.
Disconnect the hand vacuum pump hose from the water drain hole on the fuel filter.
Screw screw 2 (Fig. 1.15) into the fuel filter and tighten it to a torque of 4 Nm.
Start the engine. Air is removed from the fuel automatically when the engine is started.
Visually check for fuel leaks, especially where the hoses connect to the fuel filter.
Replacing the fuel filter
Loosen the clamps and remove fuel hoses 2 and 3 from the fuel filter fittings.
Pull and remove spring clip 5 (Fig. 1.15) securing the control valve.
Remove the control valve 6 (Fig. 1.15) together with the connected pipelines.
Loosen the bracket mounting nut and remove the fuel filter valve.
Fill the new fuel filter with clean diesel fuel to ensure quick engine starting.
Install the fuel filter into the bracket and secure the bracket clamp with the nut.
Lubricate the new sealing ring with a thin layer of fuel, install it and the regulating valve 6 (Fig. 1.15) in place and secure them with the spring clamp 5.
Install fuel hoses 2 and 3 (Fig. 1.15) on the fuel filter and secure them with clamps. Do not mix up the fuel hoses. The arrows on the fuel filter indicate the direction of fuel flow.
Start the engine. Air is removed from the fuel automatically when the engine is started.
Visually check for fuel leaks, especially where the hoses connect to the fuel filter.