
Checking the level
The brake fluid reservoir is located in the engine compartment. The threaded cap of the reservoir has a ventilation hole that should not be clogged.
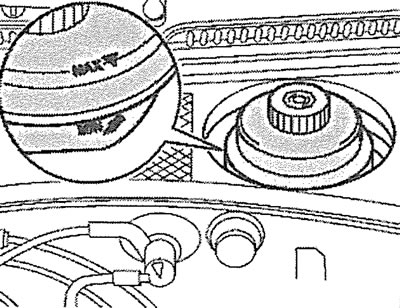
14.0. The brake fluid level should be between the maximum and minimum marks
The tank is transparent, so the fluid level can be checked visually at any time. In addition, too low a level of brake fluid is signaled by a light on the instrument panel. However, it is still recommended to regularly check the fluid level in the tank visually, each time you check the engine oil level.
The brake fluid level should be between the maximum and minimum marks (see illustration 14.0).
Fill only with fresh brake fluid meeting FMVSS 116 DOT 4 specification.
Attention! Due to wear of the brake pads of disc brakes, a slight decrease in the brake fluid level occurs. This is normal and replenishment of the fluid in the reservoir is not required.
If the brake fluid level in the reservoir drops over a short period of time or the level drops below the MIN mark, this indicates a loss of fluid. In this case, it is necessary to immediately find the leak. For safety reasons, it is better to have the brake system checked in a specialized workshop.
Replacement
Attention! Refilling with used brake fluid is not permitted.
Caution! Observe safety precautions when working with brake fluid.
Attention! Do not pour out or dispose of used brake fluid with household waste. Brake fluid must be taken to recycling points.
Brake fluid absorbs moisture from the air through the pores in the brake hoses. Over time, this leads to a decrease in the boiling point of the brake fluid. In such cases, when the brakes are heavily loaded, vapor locks may form in the pipes, which significantly impairs the functioning of the brake system.
Brake fluid should be replaced every 2 years, preferably in the spring. If you drive frequently in mountainous terrain, the brake fluid should be replaced at shorter intervals.
In a workshop or service station, bleeding the brake system is usually done with a special device that pours new fluid into the expansion tank under pressure and simultaneously bleeds the brake system. It is possible to remove air without using a device, but in this case, an assistant is needed who will press the brake pedal (pump).
Precautions when bleeding the brake system with ABS
Caution! Do not allow the expansion tank to empty when bleeding the brake system, because this will allow air to enter the brake system and the ABS hydraulic pump. If air enters the ABS pump when bleeding the brake system, the air must be removed in a workshop using an appropriate device. When installing a new brake hose, subsequent bleeding of the system must also be performed in a workshop. The vehicle cannot be operated without bleeding the brake system.
Sequence of bleeding the brake system:
- 1 - front left wheel brake mechanism;
- 2 - front right wheel brake mechanism;
- 3 - rear left wheel brake mechanism;
- 4 - brake mechanism of the rear right wheel.
1. Mark the brake fluid level on the expansion tank with a felt-tip pen or marker. When replacing the fluid, pour the fluid into the tank up to this mark. This will prevent the fluid from spilling over the edge of the expansion tank when replacing the brake pads.
2. Remove the cap from the expansion tank.
Attention! It is impossible to take brake fluid from the expansion tank because there is a non-removable sieve in the filler neck.
3. Carefully unscrew the bleed nipple so as not to strip its thread. It is recommended to apply a rust converter to the nipple two hours before this. If the nipples cannot be unscrewed, contact a workshop.
4. Attach a clean transparent hose to the nipple of the front left wheel brake cylinder and lower the free end of the hose into a container. To access the bleeding nipple, remove the corresponding wheel or place the car on an inspection pit.
5. Put the transmission in neutral, apply the parking brake, start the engine and let it idle.
6. Ask an assistant to press the brake pedal several times until resistance is felt. Keeping the brake pedal pressed, unscrew the brake bleeder nipple of the front left wheel with an overhead wrench.
7. Tighten the nipple when the brake pedal reaches the forward extreme position and rests on the floor, and release the pedal.
8. Cars with manual transmission. Bleed the front left brake mechanism until the brake fluid level in the expansion tank drops to the level of the clutch hydraulic drive pipe.
Attention! When removing air, constantly monitor the amount of fluid in the expansion tank and refill it. Do not allow the bottom of the tank to become exposed, otherwise air will enter the brake system again. Pour only fresh brake fluid into the tank!
9. Tighten the bleed screw.
10. Vehicles with manual transmission. Remove air from the clutch hydraulic system.
Caution! At least 100 cm³ (0.1 liter) of brake fluid is removed from the clutch hydraulic cylinder during bleeding.
11. Fill the expansion tank with fresh brake fluid up to the MAX mark on the tank.
In a similar manner, remove the old brake fluid from the remaining calipers, strictly following the specified order for bleeding the hydraulic drive.
Caution! The brake fluid that comes out must be clear and free of air bubbles. Approximately 250 cm³ (1/4 liter) of brake fluid should come out of each caliper/wheel cylinder.
12. Check the free travel of the brake pedal. It should not be more than 1/3 of the total pedal travel.
13. Add brake fluid to the expansion tank up to the mark made before replacing the fluid and bleeding the system.
14. Screw on the expansion tank cap.
Caution: Perform a proper inspection of the brake system and ensure that:
- a) the brake hoses are securely connected;
- b) the brake hoses are secured with clamps;
- c) the bleed nipples of the brake system hydraulic drive are screwed in;
- d) there is a sufficient amount of brake fluid in the expansion tank.
15. Start the engine and check the brake system for leaks. To do this, press the brake pedal with a force of 200-300 N (20-30 kg) and hold it in this position for about 10 seconds. The brake pedal resistance should not decrease. Check all joints for leaks.
16. Perform a test drive. While driving, brake several times. At least once brake until the car comes to a complete stop, which will activate the ABS. Perform this braking, for example, on an unpaved road. When ABS is activated, you will feel a pulsation in the brake pedal.