
For better control over the condition and operation of the engine, it is recommended to fill in the engine oil of one type and one brand. It is recommended to install a plate indicating the brand and viscosity of the filled oil after each oil change.
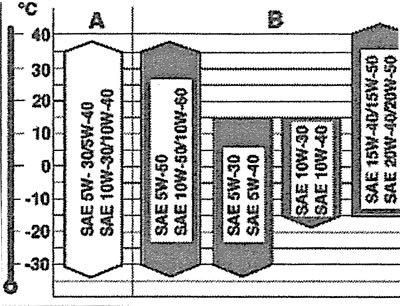
6.0. Viscosity classes of motor oils: A - light all-season motor oils; B - all-season motor oils
The indiscriminate use of oils of different types has an adverse effect on the condition of the engine. If possible, do not mix motor oils of the same type, but different brands. If necessary, you can safely mix oil of the same brand and the same type, but different viscosity (see illustrations 6.0 and 6.0a).
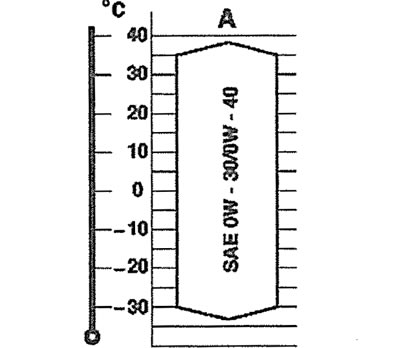
6.0a. Viscosity of motor oil. Cars with extended service intervals
Checking the engine oil level
Attention! The permitted oil consumption per 1,000 km of run is no more than 1 l. Exceeding this volume indicates wear of the oil-deflecting caps and/or piston rings.
1. Warm up the engine and place the car on a horizontal surface.
2. Turn off the engine and wait approximately 3 minutes to allow the oil to drain into the oil pan.
3. Remove the oil level indicator (dipstick) and wipe it dry with a clean rag.
4. Insert the dipstick all the way into place, then pull it out again and check the oil level.
The engine oil level is normal if it is within the "b" mark on the dipstick. If the oil level is near the "c" mark, then oil needs to be added (see illustration).
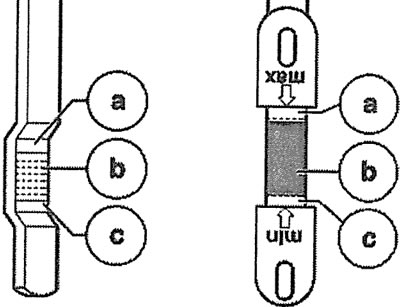
6.4 The engine oil level is normal if it is within the "b" mark on the dipstick. If the oil level is near the "c" mark, then oil needs to be added. The illustration shows both versions of the dipstick used on Audi vehicles
Attention! If the oil level is above the "a" mark (see illustration 6.4), then excess oil should be removed, because it can lead to damage to the sealing gaskets or the catalytic converter.
Under significant engine loads, such as long trips on the highway in summer, with a trailer or in mountainous terrain, the oil level should be at the top of the dipstick.
5. Fill the oil through the oil filler neck in the cylinder head cover. Use only the types and brands of oil recommended by the manufacturer, do not use any additives.
6. Replace the dipstick and screw the filler cap onto the filler neck.
Draining engine oil
7. Diesel vehicles: Unscrew the oil filter cap with a socket wrench or 32 mm socket head (see arrow in illustration). Before doing this, remove the upper protective cover of the engine. After unscrewing the cover, the oil will flow out of the filter.
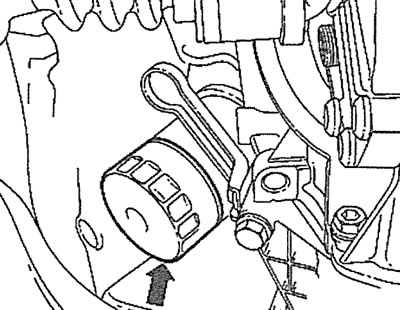
6.7. Unscrew the oil filter cover with a socket wrench or 32 mm socket head (see arrow). Diesel Engine Cars
8. Remove the oil using a siphon through the guide tube of the oil level indicator rod (dipstick). If there is no siphon for removing the oil, drain the oil by placing the car horizontally on trestles.
9. Remove the engine splash guard.
10. Place a container under the drain hole of the pan to collect the used oil.
11. Unscrew the drain plug from the oil pan and allow the oil to drain.
Caution! If large amounts of metal shavings and metal abrasion products are found in the engine oil, this indicates the presence of scoring, for example, in the crankshaft bearings or connecting rod bearings. To avoid further damage, after repairing the engine, it is necessary to thoroughly clean the oil channels and oil circulation hoses.
As an additional measure, if installed, the oil cooler must be replaced.
12. After draining the oil, screw the plug into the drain hole, replacing its old sealing ring with a new one. Do not exceed the tightening torque of the threaded drain hole plug. Otherwise, oil may leak or the thread may be damaged.
Tightening torques for the drain plug thread:
- cars with 6-cylinder engine - 40 Nm;
- cars with 8-cylinder engine - 50 Nm.
13. Lower the car onto its wheels.
Refilling engine oil
Caution! When starting the diesel engine for the first time after changing the oil, please note that the engine will run at idle speed until the engine oil pressure indicator light goes out. Only after reaching the nominal oil pressure in the system can you press the accelerator pedal. If you press the accelerator pedal and thereby increase the load on the engine when the engine oil pressure indicator light is on, the turbocharger may be damaged due to insufficient lubrication.
14. Unscrew the oil filler cap and fill with oil.
Attention! When adding engine oil, it is recommended to fill it with about 1/2 liter less than the filling volume. After that, start the engine and warm it up. Then turn off the engine and after a few minutes check the oil level and add oil if necessary. Excess oil must be removed because it can cause damage to the engine and catalytic converter seals.
The oil level is normal if it is within the limits indicated by the letter "a" on the dipstick. If the level reaches the "c" mark, then oil should be added so that its level is near the "a" mark (see illustration 6.4).
15. Perform a test drive and after its completion check the tightness of the drain plug and oil filter. If necessary, tighten them, being careful.
16. Check the oil level approximately three minutes after stopping the engine and top up the level to normal if necessary.
17. Reinstall the engine splash guard.
Read the original source on the website: AUDIMANUAL.ru