
Table of contents: Seat belts - visual inspection ↓ Dust filter - replacement ↓
In accordance with the maintenance plan, the following work must be performed:
- Check the condition of the seat belts.
- Conduct a visual inspection of the body, anti-corrosion protection of the underbody and body cavities and eliminate damage.
- Lubricate the door opening limiters and lock switches.
- Sunroof. Clean the guides and lubricate them.
- Lubricate the tailgate hinges
- Replace the dust filter element.
Seat belts - visual inspection
Warning! The noises that occur when the seat belts are retracted are caused by the automatic belt retractor mechanism. Never lubricate the mechanism to eliminate these noises. As a last resort, replace the seat belt with another one. Do not disassemble the automatic seat belt retractor mechanism, as this may cause the tensioned spring to jump out. Risk of accident!
1. Pull the seat belt webbing completely out of the retractor. Check the belt webbing for torn fibres. Damage may be caused, for example, by the belt being pinched or by a burning cigarette. In this case, replace the belt.
If areas with abrasions are found, but the fibers are intact, then the belt does not need to be replaced.
If the belt is difficult to move, make sure that the tape is not twisted. If necessary, remove the B-pillar trim.
If the automatic retractor does not work, replace the belt (the work is done in the workshop).
Clean the belt tape only with water and soap, never use solvents or chemical cleaning agents.
Dust filter - replacement
2. Open the hood. The cabin filter is located on the air intake pipe under the fairing on the right side.
3. Remove the rubber seal from the fairing fold, and then the fairing grille.
4. Remove holder 2 and take out cabin filter 1 (see arrows in the illustration).
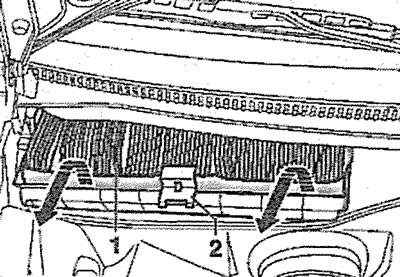
18.4. Remove holder 2 and take out cabin filter 1 (ohm arrows)
5. Insert the new filter into frame B so that the arrows A are facing down (see illustration).
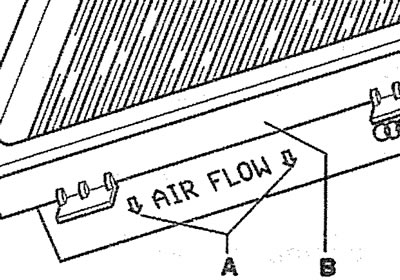
18.5. Insert the new filter into frame B so that the arrows A are facing down
6. Secure the filter with holder 2 (see illustration 18.4).
7. Replace the fairing grille and place the rubber seal on the fold.
Attention! If the fairing grille is installed incorrectly, water will flow into the heater and the passenger compartment.
The full version is posted on the resource AUDIMANUAL.ru