
Examination
1. When repairing, it is always recommended to replace old liners with new ones, but do not rush to throw away old liners - they can tell a lot about the condition of the engine being repaired (Fig. 11.1).
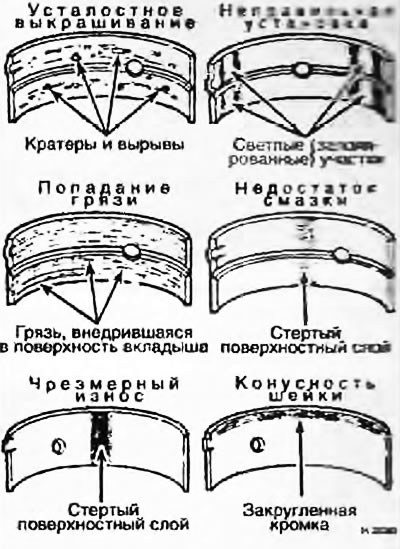
Fig. 11.1 Typical damage to bearings
2. Bearing failure occurs due to lack of lubrication, excess dirt and foreign inclusions in the oil, engine overload or corrosion. Regardless of the cause of bearing failure, it must be eliminated before engine assembly to prevent it from happening again.
3. To inspect the bearings, remove them from the engine by removing the main and connecting rod bearing caps. Lay the bearings out on a clean horizontal surface in the order they are placed on the engine. This will allow you to match the bearing problems with the corresponding cylinders. Do not touch the inner surface of the bearings to avoid damaging the delicate surface.
4. Dirt and other foreign particles enter the engine in a variety of ways. They may remain in the engine after assembly, or enter through filters or crankcase ventilation. They may enter the oil and with it the bearings. Metal particles are often present in the oil, which are products of normal wear or mechanical processing of parts. Abrasives often remain in the engine after rebuilding, especially if the engine is not washed well after processing. Regardless of the source, these foreign particles often end up embedded in the soft metal of the bearings, where they are easy to recognize. Large particles will leave scratches in both the journal and the bearing. The best remedy for these diseases is cleanliness - wash all engine components thoroughly and keep everything spotlessly clean during the assembly process. Frequent and regular oil and filter changes are also recommended.
5. Lack of lubrication (or stop-lubrication) has many interrelated causes. High temperature (the oil becomes unacceptably thin), overload (squeezes grease out of plain bearings). increased bearing clearances. worn oil pump, high engine speeds cause lubrication to stop. Clogged lubrication channels, often as a result of misaligned oil passage holes in the liners, cause oil starvation of the bearings and premature failure. If insufficient lubrication is the cause of the failure of the liner, the soft material of the plain bearing will rub off the metal substrate until it is completely removed. Increased friction temperature will paint the liner substrate in tempered colors.
6. The lifespan of the bearings is greatly affected by the driving style. Full throttle ("pedal to the floor", "full hole"), driving "under tension" create high loads on the crankshaft bearings, squeezing the oil film out of their gaps. This weakens the bearings, leaving fatigue microcracks in their working surfaces. The cracked material peels off from the substrate in pieces.
7. Short trips lead to bearing corrosion, because condensate and corrosive gases are not removed from the unheated engine oil and form acid and sludge in it. All this is supplied together with the oil to the plain bearings.
8. Incorrect installation of bearings naturally leads to their wear. Overtightened bearings have insufficient clearances, insufficient clearances have insufficient lubrication. Dirt and foreign inclusions clog insufficient clearances, leaving bearings without lubrication.
9. Do not touch the inner surface of the earbuds with your fingers during assembly to avoid scratching their delicate surface and leaving accidental dirt.
10. As noted at the beginning of this paragraph, the liners are subject to replacement during any disassembly of the crankshaft bearings. Do not skimp on replacing the liners.
[The original article is posted on the resource AUDIMANUAL.ru]