



Note: If the valve timing is not adjusted, the valve drive and crank mechanism do not work in sync. An incorrectly adjusted valve timing mechanism causes a drop in the effective engine power, and in extreme cases can lead to engine failure as a result of the piston hitting the valve that has not had time to close. Adjustment of the valve timing mechanism is performed differently for each type of engine.
Replacing the timing belt on five- and six-cylinder engines is only possible with special tools.
In order to remove the toothed belt on a five-cylinder engine, it is necessary to remove and then reinstall the vibration damper on the crankshaft. This operation is performed using a special extension 2079 for a torque wrench and a counter support 2084. These devices are not required when replacing only the cylinder head. 11When replacing the head, the toothed belt in its lower part remains on the crankshaft gear.
As for the six-cylinder engine, to adjust the valve timing mechanism after replacing the timing belt and dismantling the cylinder head, it is necessary to precisely set the camshaft and crankshaft to the TDC position using special instruments.
These difficulties are not typical for a four-cylinder engine. No special tools are needed when working with a toothed belt.
Four-cylinder engine
1. Set the piston of cylinder No.1 to the TDC position.
2. Remove the V-belt or ribbed belt.
3. Remove the belt pulley from the crankshaft by unscrewing the Allen bolts (not the central mounting bolt).
4. Remove the timing belt protective cover.
5. Loosen the timing belt tension and remove it.
6. Install a new timing belt. If there is no displacement of the crankshaft and camshaft, then we can assume that the valve drive setting is not knocked down. We recommend playing it safe and checking it again.
7. Rotate the timing belt gear on the camshaft until the mark under the arrow on gear 1 aligns with the mark on the rear timing belt cover 2 (see illustration).
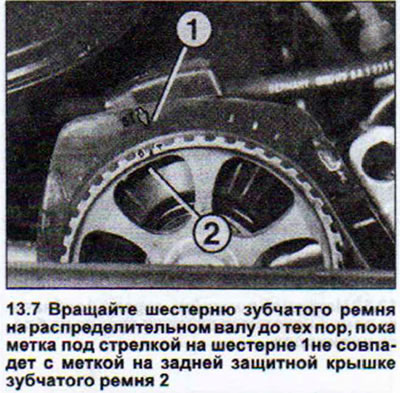
If it is necessary to turn the camshaft, this can be done provided that none of the pistons are at TDC. Otherwise, damage to the valves or pistons will occur.
8. Place the toothed belt on the crankshaft and intermediate shaft gears.
9. Secure the V-belt pulley to the crankshaft by screwing in one bolt. When doing this, observe the correct installation of the pulley, which depends on the engine version. In some cases, the belt pulley should be fixed on the stop pin. In other versions, the holes for the pulley mounting bolts are located asymmetrically, and therefore the pulley will be installed correctly if all the holes on the pulley match the holes on the crankshaft.
10. Rotate the crankshaft until the notch on the V-belt pulley faces upward.
11. Align the notch on the intermediate shaft gear with the notch on the V-belt pulley (see arrows in the illustration).
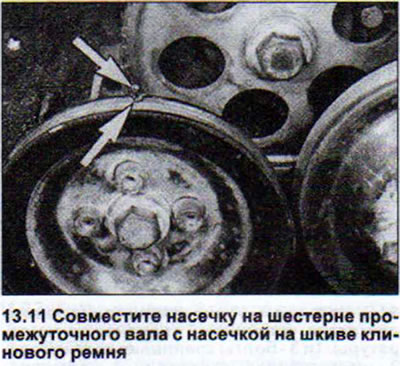
12. Apply the toothed belt. Do not allow the gears and pulleys to shift in position.
13. Tighten the timing belt.
14. Remove the distributor cap and make sure that the distributor rotor faces the notch on the distributor body. If this is not the case, then unscrew the distributor mounting bolt.
15. Rotate the distributor until the runner is opposite the notch. If necessary, remove the runner and install it again opposite the notch.
16. Install the ignition distributor in place and secure with the bolt.
17. Crank the engine twice and check the adjustment.
Before installing the lower part of the timing belt guard, remove the V-belt pulley from the crankshaft again.
18. Install the belt pulley in place and ensure it is seated correctly.
19. Tighten the belt pulley mounting bolts to 20 Nm.
20. Adjust the ignition timing.
Five-cylinder engine
If the timing belt is only removed from the camshaft gear to replace the cylinder head, no special tool is needed.
21. Set the piston of cylinder No.1 to the TDC position.
22. Remove the V-belt.
23. Remove the timing belt protective cover.
24. Loosen the timing belt tension and remove it.
25. Install counter support 2084 on the crankshaft belt pulley (with vibration damper) and unscrew the central bolt using extension 2079.
26. Remove the pulley, gear and toothed belt.
27. Mark the direction of rotation of the timing belt to install it correctly. Always install the old timing belt observing its direction of rotation.
28. Place the toothed belt on the removed crankshaft gear.
29. Install the timing belt sprocket together with the belt onto the crankshaft. Make sure that the timing belt is not pinched anywhere.
30. Install counter support 2084 on the crankshaft belt pulley (with vibration damper) and tighten the central bolt using extension 2079 to 350 Nm.
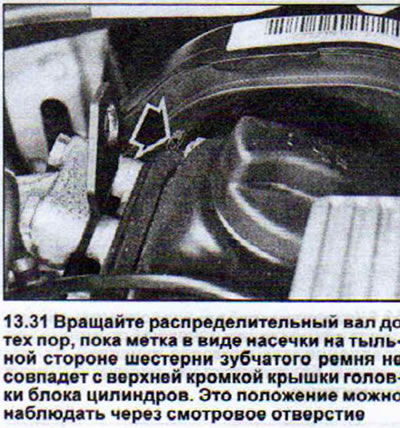
31. Make sure that the camshaft and crankshaft are at TDC. If they are not, rotate the camshaft until the notch mark on the back of the timing belt sprocket aligns with the top edge of the cylinder head cover. This position can be observed through the inspection hole (see arrow in illustration).
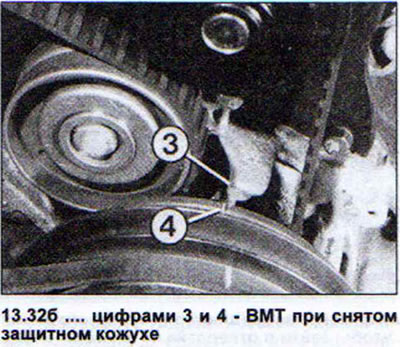
32. Set the TDC crankshaft position mark located on the flywheel opposite the mark in the inspection window on the crankcase. You can also use the TDC reference marks on the V-belt pulley on the crankshaft. Numbers 1 and 2 mark the reference marks with the toothed belt protective cover installed, numbers 3 and 4 mark the TDC with the protective cover removed (see illustrations).
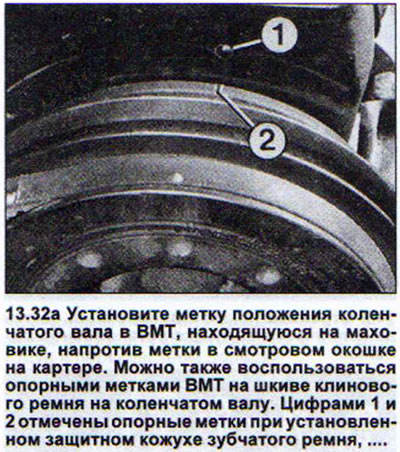
33. Place the toothed belt on the camshaft and water pump gears, as well as on the tension roller. Do not change the position of the camshaft and crankshaft.
34. Tighten the timing belt.
35. Perform two full engine revolutions and check the adjustment.
36. Check the position of the ignition distributor by performing all the steps specified for a four-cylinder engine.
37. Adjust the ignition timing.
Six-cylinder engine
To replace the timing belt, special tools are required.
38. Remove the V-belt together with the tensioner mechanism.
39. Remove the timing belt guards on both sides.
40. Set the piston of cylinder No.1 to the TDC position. The reference marks on the belt pulley and the protective cover of the toothed belt should coincide, and the larger diameter holes in the locking plates of the gears of both camshafts will not be facing the center of the engine.
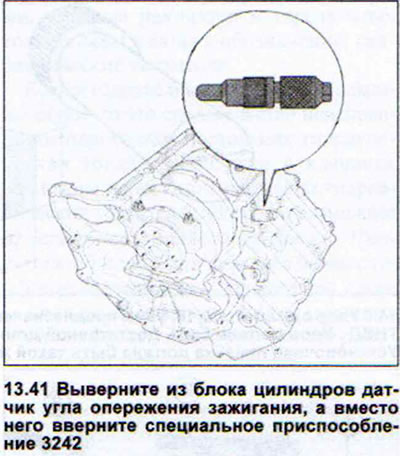
41. Unscrew the ignition timing sensor from the cylinder block and screw in special tool 3242, called the crankshaft stop, instead. This tool should fit into the corresponding hole on the crankshaft when screwed in. Tighten the tool without applying significant force (see illustration).
42. Remove the V-belt pulley and the lower part of the toothed belt protective cover from the crankshaft.
43. Mark the direction of rotation of the toothed belt for subsequent installation. Do not change the direction of rotation of the toothed belt during subsequent installation.
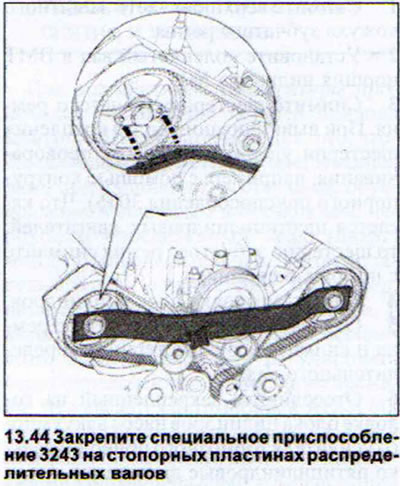
44. Attach special tool 3243 to the camshaft locking plates. This tool is called a camshaft stop when setting it to TDC (see illustration).
45. Loosen the timing belt sprocket mounting bolts on the camshafts by turning them out approximately three turns.
46. Remove camshaft stop 3243.
47. Remove the timing belt sprockets from the cone of both camshafts. Use a cam puller for this.
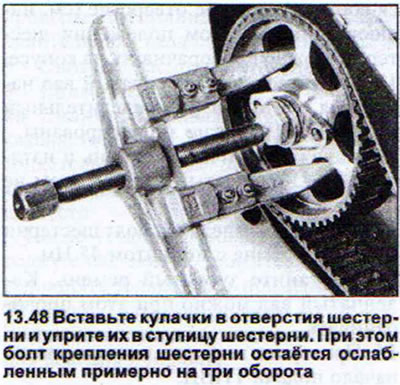
48. Insert the cams into the pinion holes and press them against the pinion hub. The pinion mounting bolt remains loosened by approximately three turns (see illustration).
From this point on, adjustment work is carried out. If the toothed belt is to be replaced, this should be done now.
49. Apply the timing belt.
50. Fit special tool 3243 to the camshaft locking plates and ensure that the tool is correctly installed. The toothed belt gears on the cones of both camshafts must be seated so that they can be turned, but the gears must not be allowed to swing from side to side. The mounting bolt must be finger tight.
51. Tighten the timing belt.
52. Tighten the timing belt sprocket mounting bolts on the camshafts to a torque of 70 Nm.
53. Remove the special tools.
54. Reinstall all previously removed parts.
[The original article is available on the website AudiManual.ru]