Table of contents: Examination ↓ Installation ↓
Most work on the cylinder head requires a torque wrench, a long T55 socket wrench, and a special tool for removing the timing belt. The consumables required for installing the cylinder head include a new gasket of the appropriate thickness and a set of new mounting bolts.
1. Disconnect the negative (-) battery terminal.
2. Drain the coolant into a suitable container.
3. Disconnect the air intake hose from the air filter.
4. Remove the cylinder head cover.
5. Disconnect the fuel supply lines from the injectors and place them on a clean rag.
6. Seal the holes to the injectors and fuel injection pump with suitable plugs (you can use a rag or even paper handkerchiefs).
7. Disconnect the return fuel line from the injectors to the high-pressure fuel pump.
8. Disconnect the glow plug power wire.
9. Disconnect the power supply plug to the temperature sensors.
10. Remove the bolts securing the exhaust pipe from the turbocharger.
11. Disconnect the feed and return oil lines from the turbocharger and plug the holes with clean plugs. If necessary, remove the turbocharger.
12. Remove the toothed belt. Disconnect the coolant circulation hoses from the cylinder head.
14. TD Engine Disconnect the cold start accelerator cable.
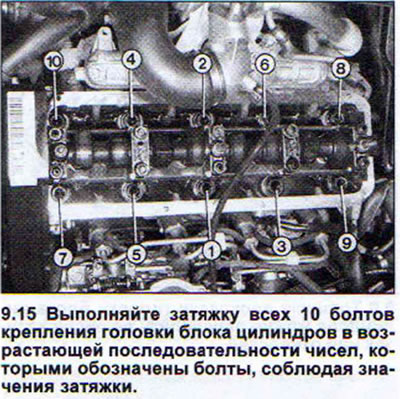
15. Unscrew the cylinder head mounting bolts in the reverse order of their screwing in (see illustration).
Attention! To avoid subsequent distortion of the cylinder head, it should only be removed from a cooled engine.
16. Remove the cylinder head. If the head does not come off due to a tight fit, tap it with a plastic hammer.
Examination
17. Remove the old sealing gasket. The sealing surfaces of the head and cylinder block must be absolutely clean, without any sealing compound residue.
Caution! Do not clean the sealing surfaces of the cylinder head with sharp tools. The resulting burrs or scratches may cause subsequent damage to the head.
18. Make sure there are no cracks on the valve seats. Small cracks of no more than 0.5 mm are acceptable. In such cases, the cylinder head can be reinstalled for further operation.
19. Check the cylinder head for warpage. This is especially important if the gasket has burned out.
20. Place a long metal ruler or square along the cleaned sealing surface of the head and use the template to ensure that there are no distortions greater than 0.1 mm.
AUDI does not recommend reworking (grinding) the cylinder head. Therefore, if the curvature exceeds 0.1 mm, the cylinder head should be replaced with a new one.
Installation
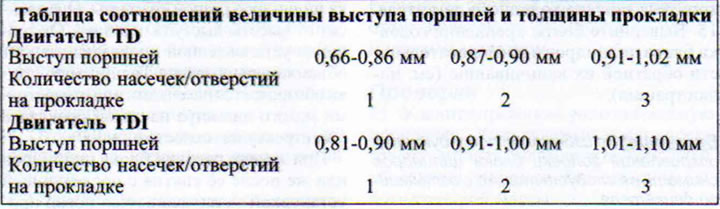
Before installing the cylinder head, it is necessary to specify the thickness of the new gasket. Diesel engines are equipped with cylinder head gaskets of different thicknesses. It depends on the height of the piston protrusion. The volume of the combustion chamber depends on the thickness of the installed gasket. The thickness of the gasket is indicated by notches or small-diameter holes on the gasket itself (see arrow in illustration 9.0).

When replacing the cylinder head or after its removal with subsequent installation, a new gasket is installed that is absolutely identical to the previous one. This means that a gasket with the same number of notches or holes must be purchased and installed to replace the previous gasket.
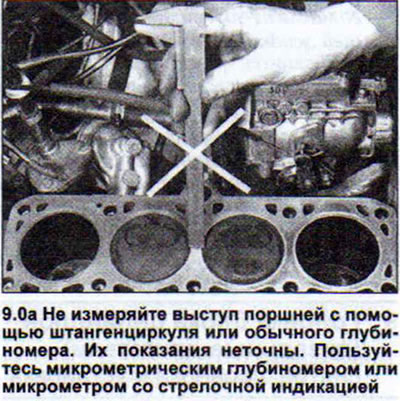
If the crankshaft parts were replaced (the crankshaft itself, connecting rods, pistons) or if the old cylinder head is installed on a new cylinder block, then it is necessary to first measure the piston protrusion (see illustration 9.0a). Piston protrusion is the distance that the pistons protrude above the cylinder block surface. Based on the size of this protrusion, you should purchase and install the appropriate gasket.
Caution! The threads of the cylinder head mounting bolts and the threads of the mounting bolt holes in the cylinder block must be clean and undamaged. Otherwise, the tightening torque of the bolts will not correspond to the nominal one. There must be no oil or liquid in the bolt holes. Failure to do so may result in the metal of the cylinder block being torn.
21. Turn the crankshaft so that none of the pistons are at TDC. Otherwise, when installing the cylinder head, the open valve may hit the piston.
22. Place the cylinder head gasket on the cylinder block so that its marking or the inscription "OBEN" (top) faces the cylinder head.
23. Install the cylinder head. If there are no centering pins on the cylinder block, then in workshops two guide pins are screwed into the holes for bolts 8 and 10, which prevent the head itself and the gasket from shifting during installation. Instead of guide pins, you can insert two pins of the appropriate diameter.
24. Install all cylinder head mounting bolts and tighten them first on a cold engine in several stages and in the sequence as shown in Illustration 9.15 with the following tightening torques.
step 1: Tighten the bolts with a torque wrench to 40 Nm.
step 2: Tighten the bolts with a torque wrench to 60 Nm.
step 3. Tighten the bolts with a wrench by half a turn (180°), without interrupting the forward movement of the wrench.
step 4: Warm up the engine (the coolant temperature should be approximately 80°C) and tighten the bolts with a wrench by ¼ turn (90°), without interrupting the forward movement of the wrench.
Caution! If the cylinder head was removed due to a damaged head gasket, the coolant must be completely drained and replaced with new coolant. The same applies to replacing the cylinder head.
A faulty cylinder head gasket can be identified by one or more of the following signs:
a) loss of coolant,
b) clouds of white gases from the exhaust pipe,
c) when the engine is running, air bubbles come out of the expansion tank with coolant, and when the tank cap is opened, active leakage of coolant occurs in the form of foam,
d) grey or brown emulsion on the dipstick due to coolant getting into the engine oil.
Warning! Coolant in the engine lubrication system may cause bearing failure. Replace the cylinder head gasket immediately. Do not start the engine! Deliver the car to the workshop by loading it onto a platform.