
Repair Chevrolet Repair Toyota Repair Honda Repair AvtoVAZ Repair Mercedes-Benz Repair BMW Repair Opel
Home  |  Contacts  |  Sitemap  |    
English Русский
Български
Беларускі
Український
Српски
Hrvatski
Română
Polski
Slovenský
Magyar
AudiManual.ru


  • AUDI 80
  • AUDI 100
  • AUDI A3
  • AUDI A4
  • AUDI A6
  • AUDI A8
  • AUDI Q
  • OTHER
  • ARTICLES
B4 (1991-1996) B3 (1986-1991) B3 (1986-1991, petrol) B2 (1979-1986)

Setting the piston to the top dead center position of cylinder No. 1 (Audi 80 B4)

  • Home
  • Audi 80
  • B4 (1991-1996)
  • Power unit
  • Engine
  • Setting the piston to the top dead center position of cylinder No. 1
            0
Table of contents: Four-cylinder petrol engine ↓ Five-cylinder petrol engine ↓ Six-cylinder petrol engine ↓ Diesel engines ↓ Four and five-cylinder petrol engines ↓ Six-cylinder petrol engine ↓
When performing certain work on the engine, as well as to set the piston to TDC of cylinder No.1, the engine crankshaft must be set to the appropriate position or completely turned. The crankshaft can be turned in several ways.

method 1

Place the car with a manual transmission on a level surface and engage 5th gear. Push the car forward or backward.

2nd method

Four-cylinder petrol engine


1. Install a 22 mm socket wrench on the nut of the central bolt securing the alternator belt pulley and turn the engine with a V-belt.
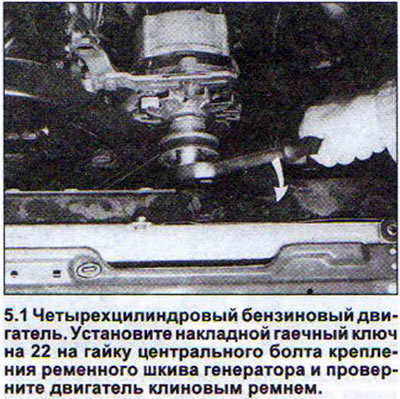
1. Install a 22 mm socket wrench on the nut of the central bolt securing the alternator belt pulley…


If the V-belt slips, apply pressure to the V-belt with one hand on the section between its two pulleys to ensure better tension (see illustration).

Five-cylinder petrol engine


2. Place a 24 mm wrench on the nut of the central bolt of the generator belt pulley and turn the engine in the same way as a four-cylinder engine (see illustration).
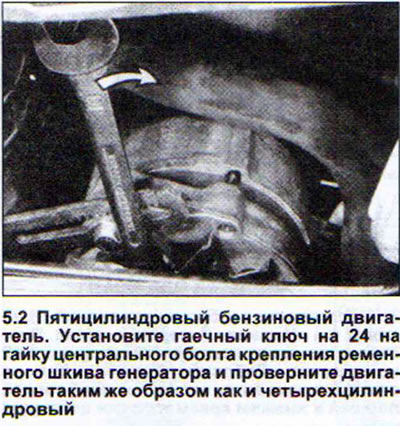
2. Place a 24 mm wrench on the nut of the central bolt of the generator belt pulley and turn the…


Six-cylinder petrol engine


3. Insert a 12-point 24 mm socket wrench into the head of the center bolt securing the belt pulley to the crankshaft and turn the crankshaft using a ratchet or pry bar (see illustration).
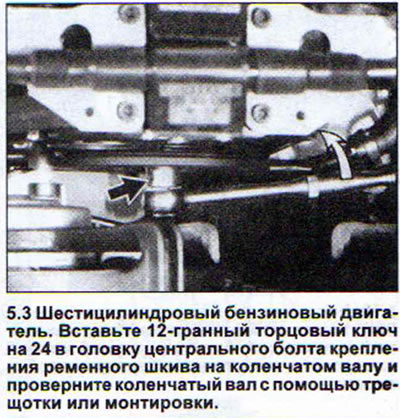
3. Insert a 12-point 24 mm socket wrench into the head of the center bolt securing the belt pulley…


Diesel engines


4. Place a 24 mm socket wrench with a ratchet on the nut of the central bolt securing the alternator belt pulley and turn the engine with a V-belt.

Caution: Do not attempt to turn the engine with the timing belt guard removed by the timing belt pinion mounting bolt. This may cause the timing belt to jump and cause engine damage.


In four-stroke engines, the piston reaches TDC twice during the four working strokes. This happens once when the fuel-air mixture is ignited, and the second time when the exhaust gases are released with the simultaneous intake of the fuel-air mixture. Usually, when performing adjustment work, TDC of the piston of cylinder No.1 is used.

Four and five-cylinder petrol engines


5. Remove the cover separating the breaker from the distributor, as well as the distributor rotor and protective cover.

6. Install the distributor rotor in place and turn the crankshaft until the rotor contact is positioned over the small notch on the distributor edge. This will be the TDC of the piston of cylinder No.1.


7. Make sure the piston is at TDC. If so, the "O" mark on the flywheel should extend halfway out from under the edge of the inspection hole on the gearbox housing. If necessary, move the crankshaft slightly forward or backward (see arrow in illustration).
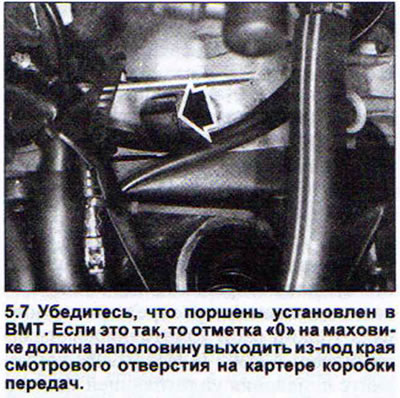
7. Make sure the piston is at TDC. If so, the «O» mark on the flywheel should extend halfway out…


Six-cylinder petrol engine


8. Remove the left and right parts of the timing belt guard, see the relevant chapter.

9. Turn the crankshaft until the larger diameter holes on the locking plates of both camshaft gears are facing the center of the engine (see arrow in illustration).
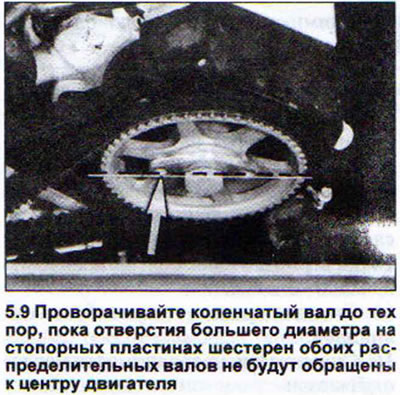
9. Turn the crankshaft until the larger diameter holes on the locking plates of both camshaft gears…


10. Make sure the piston is at TDC. If so, the "0" mark on the flywheel should extend halfway out from under the edge of the inspection hole on the gearbox housing. If necessary, move the crankshaft slightly forward or backward (see arrow in illustration 5.7). Another mark for the installation of the piston of cylinder No.1 of a six-cylinder gasoline engine is located on the V-belt pulley or on the lower protective cover of the toothed belt (see arrows in illustration 5.10).
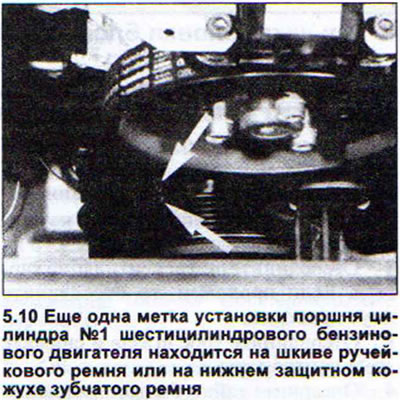


10. Make sure the piston is at TDC. If so, the «0» mark on the flywheel should extend halfway out…


11. Remove the cylinder head cover.

12. Turn the engine by hand until both front camshaft lobes point upward.

13. Make sure that the piston is set to TDC. If so, the "0" mark on the flywheel 1 should come out from under the reference mark 2 of the inspection hole on the gearbox housing (see illustrations).
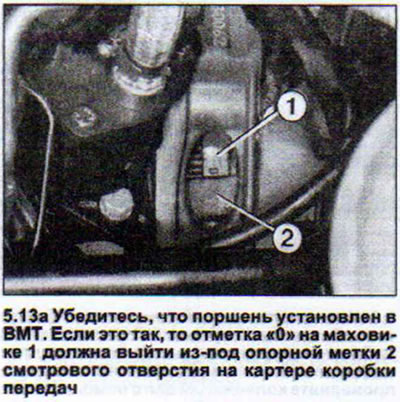
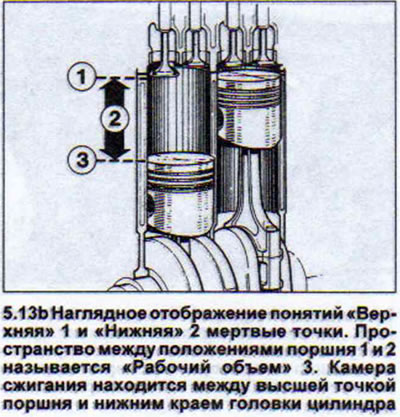
13. Make sure that the piston is set to TDC. If so, the «0» mark on the flywheel 1 should come out…


13. Make sure that the piston is set to TDC. If so, the «0» mark on the flywheel 1 should come out…
The article was checked by auto expert Timur Bazhenov
This article is available at russian, bulgarian, belarusian, ukrainian, serbian, croatian, romanian, polish, slovak, hungarian

Share information:
Previous articles
Audi 80 B4: Engine
Next articles

Engine — removal and installation
Diesel engines
Petrol engines
General description
Cylinder Head Cover — Removal and Installation
Cylinder head
Cylinder head (petrol engines) — removal, inspection and…
Cylinder head (diesel engines) — removal, inspection and…


Similar articles on other Audi car models:
Engine compartment and underbody of 5-cylinder diesel model 2.5L… Audi 100 C3 (1982-1990, diesel)
Setting the piston of the first cylinder to TDC (petrol) Audi A3 Type 8L (1996-2003)
Setting the engine to the TDC position of the first cylinder Audi A4 B6 (2000-2006, petrol)
Seat position memory device Audi A6 C5 (1997-2004)
Left cylinder head cover Audi A8 D2 (1994-2002)
Belt pulley cylinder block Audi Q5 Type 8R (2008-2017)
Setting the clock Audi A2 (1999-2005)
Link to this page in different formats


Visitor comments

No comments yet


How much will 19 + 37 =


80(B4, 1991-1996) 
  • General information
  • User manual
  • Maintenance
  • Troubleshooting
  • Power unit
  • Engine
  • Cooling system
  • Heating and ventilation
  • Petrol injection
  • Diesel fuel system
  • Fuel system
  • Exhaust systems
  • Ignition system
  • Transmission
  • Clutch
  • Car gearbox
  • Chassis
  • Brake system
  • Suspension and steering wheel
  • Body
  • Body and trim
  • Electrical equipment
  • Electrical system
  • Electrical circuits
 
80(B3, 1986-1991) 
  • General information
  • Repair characteristics
  • Maintenance
  • Power unit
  • Gasoline engine
  • Diesel engine
  • Engine lubrication system
  • Fuel system (gasoline)
  • Injection system (gasoline)
  • Fuel system (diesel)
  • Ignition system
  • Cooling system
  • Heater
  • Exhaust system
  • Transmission
  • Clutch and gearbox
  • Chassis
  • Steering
  • Brake system
  • Car suspension
  • Body
  • Body elements
  • Electrical equipment
  • Power devices
  • Lighting and appliances
  • Electrical circuits
 
80(B3, 1986-1991, petrol) 
  • General information
  • User manual
  • Maintenance
  • Power unit
  • Engine 4-cylinder
  • Engine 5-cylinder
  • Cooling system
  • Fuel and exhaust systems
  • Ignition system
  • Transmission
  • Clutch
  • Mechanical transmission
  • Automatic transmission
  • Drive shafts
  • Chassis
  • Brake system
  • Suspension
  • Steering
  • Body
  • Exterior
  • Interior
  • Electrical equipment
  • Equipment and devices
  • Electrical circuits
 
80(B2, 1979-1986) 
  • General information
  • User manual
  • Power unit
  • Engine FZ
  • Engine EP, YP, YZ, DT, DS, DZ
  • Transmission
  • Clutch
  • 4 speed gearbox
  • 5 speed gearbox
  • Front wheel drive
  • Chassis
  • Front suspension
  • Rear suspension
  • Steering
  • Brake system
  • Electrical equipment
  • Equipment and devices
  • Electrical circuits
 
AudiManual.ru © 2017-2026 · Mobile version · Feedback · Sitemap: EN BG BY UA RS HR RO PL SK HU · Site search · News and articles
80 B2 · 80 B3 petrol · 80 B3 · 80 B4 · 100 C3 diesel · 100 C3 petrol · 100 C3 · 100 C4 petrol · 100 C4 · A3 Type 8L · A4 B5 petrol · A4 B5 · A4 B6 petrol · A4 B6 · A4 B7 · A4 B8 · A6 C4 · A6 C5 · A6 C5 Allroad · A8 D2 · Q5 Type 8R · Q7 Typ 4L · Audi A2 ·
This site uses cookies 🍪. Click the button to accept this fact.